background image

Chapter 2 Using Your Presto! PVR

7

Analog TV

4.

Click 

OK

 to close the 

Settings

 dialog box and watch some TV.

Receiving S-Video and Composite Signals

1.  Click 

 and choose 

S-Video

 or 

Composite

 from the source type.

2.  PVR will pick up video and audio signals.

These two features may not be available on all devices.
Please refer to the user guide for your device.

Receiving FM Radio

To get the latest cool and hip music and news through your computer, you
can set it up to receive FM Radio.

1.

Click 

 and choose 

FM Radio

 from the source type.

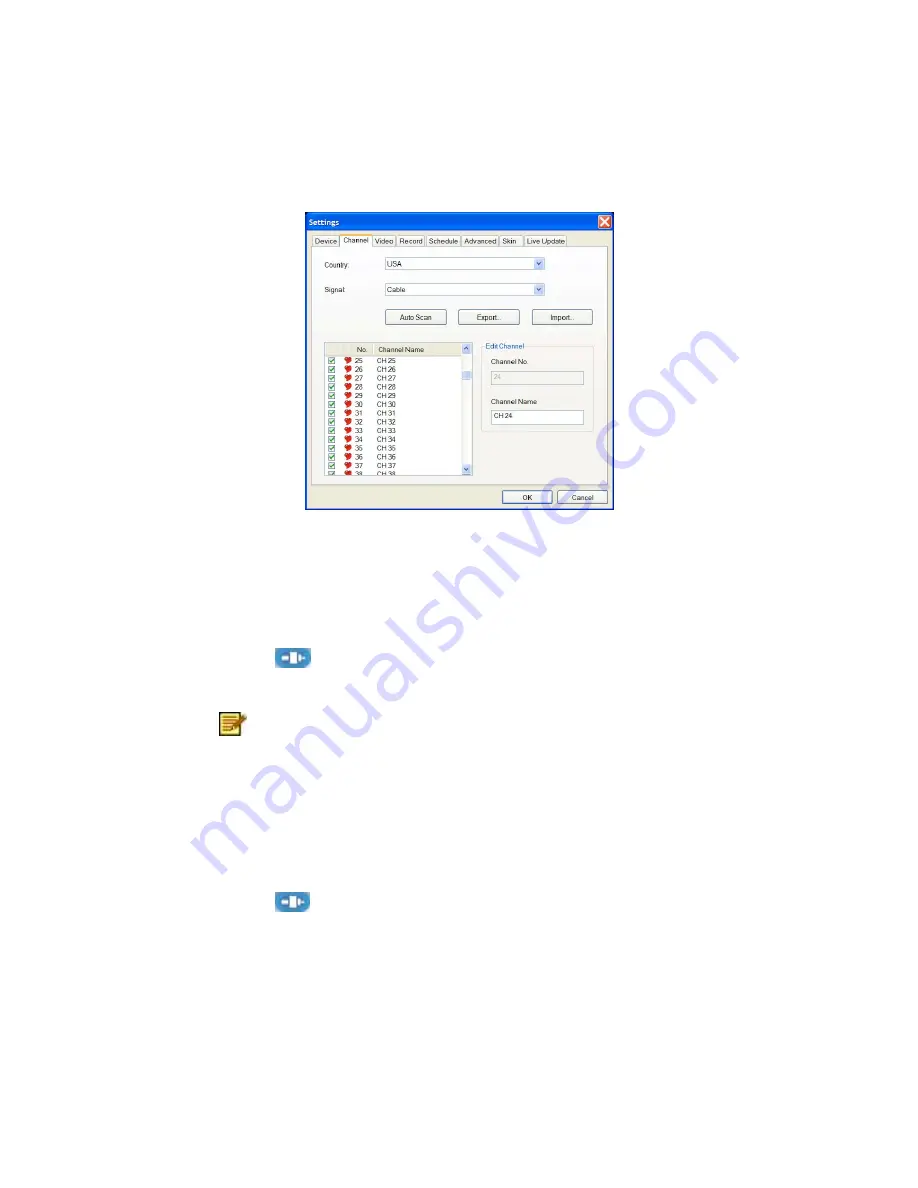
2.

Click 

Auto Scan

 to find all the available radio stations.

Содержание S810

Страница 1: ......

Страница 2: ...ii Presto PVR Analog Digital TV DVB T Digital TV ATSC User s Guide 507100 02 01 W E 052507 09 ...

Страница 3: ... purpose All information contained herein is subject to change without notice All sample images and electronic files included in the documentation and distribution materials are copyrighted by their respective photographers and are not to be copied or reproduced in any manner Trademarks Windows 2000 Windows XP and Windows Vista are registered trademarks of Microsoft Corporation Pentium is a regist...

Страница 4: ...7 Choosing a Channel to Watch 8 Channel List 9 Channel Surfing Window 10 Teletext available for DVB T or PAL Analog TV 10 Recording a Program 11 Scheduling Your Program Recording 12 Adjusting the Schedule Settings 13 Task 14 Time 14 Quality 15 Using EPG Electronic Program Guide 15 Time Shifting 16 Adjusting the Volume 17 Taking Snapshots 17 Chapter 3 Menus and Settings 19 Main Screen 19 Program Vi...

Страница 5: ...l 30 Video 33 Record 34 Recording 36 Time Shifting 37 Schedule 38 Advanced 40 Skin 41 Live Update 42 Channel Surfing 43 History 44 Taskbar Commands 45 Shortcut Keys 46 Chapter 4 Appendix 47 Frequently Asked Questions 47 Troubleshooting 48 Glossary 51 ...

Страница 6: ...s Presto PVR will run on Microsoft Windows 2000 Windows XP or Windows Vista A Pentium 4 or AMD Athlon 2 0 GHz processor is required Pentium 4 2 4 GHz is recommended At least 256 MB RAM is needed 512 MB is recommended A least 100 MB of hard disk space is required for installing the program An additional 500 MB of space will be needed working with files A True Color or HiColor display card supportin...

Страница 7: ...ws that you have recorded on the hard disk Just look in the History section Pause the program while watching to do things like answer the door or make a sandwich and then resume watching without missing any of the show Watch video in a resizable preview window Choose to freely resize or retain the original ratio Adjust the brightness and color The preview window changes while the adjustments are m...

Страница 8: ... recording time shifting settings help and a link to our website Here are explanations of how to perform the most common tasks Installing Presto PVR Receiving a Channel Receiving S Video and Composite Signals Receiving FM Radio Choosing a Channel to Watch Recording a Program Scheduling Your Program Recording Time Shifting Adjusting the Volume Taking Snapshots Installing Presto PVR ...

Страница 9: ...disc drive and follow the installation instructions After the installation the Wizard will open to let you choose what type of signal you will be using The image above is for reference only This dialog box may vary depending on the version of your Presto PVR program After selecting the signal type the Settings Wizard for the selected option will open Analog TV Digital TV ...

Страница 10: ...epending on the type of TV signal selected Analog TV Digital TV For Analog TV signals you can choose an audio device and source 3 Click the Channel tab on the Settings dialog box and then click Scan or Auto Scan to search for channels If a channel is found it will be included in the channel list When finished you can choose a channel and change its name You can also scan for changes by selecting A...

Страница 11: ...Chapter 2 Using Your Presto PVR 6 You can remove selected channels by clicking the Delete button Digital TV DVB T Digital TV ATSC ...

Страница 12: ...the source type 2 PVR will pick up video and audio signals These two features may not be available on all devices Please refer to the user guide for your device Receiving FM Radio To get the latest cool and hip music and news through your computer you can set it up to receive FM Radio 1 Click and choose FM Radio from the source type 2 Click Auto Scan to find all the available radio stations ...

Страница 13: ...ions or remove selected channels by clicking the Delete button Other options include importing and exporting lists of stations Select the red heart to identify a station as your favorite Clear it to remove the station from the favorites list Search results vary from device to device If your device doesn t support radio you won t be able to receive FM Radio Please refer to the user guide for your d...

Страница 14: ...to PVR and scanned for channels you can click and select a channel from the channel list to watch Click or to switch between channels and to go to the last channel viewed Channel List Channel Surfing Window Teletext available for DVB T or PAL Analog TV Channel List ...

Страница 15: ...e Channels Click this button to show your favorite channels Favorite channels are chosen on the Channel tab of the Settings dialog box All Channels Click this button to list all available channels Channel Surfing Window You can browse all the TV channels from the Channel Surfing window Right click the program viewer and select Channel Surfing from the screen menu Presto PVR provides different opti...

Страница 16: ...by the corresponding TV station This service varies for different areas It may not be available in all the countries Recording a Program When you find a good show click to start recording The button will change to The recorded program will be saved in the working folder You can click to pause recording If you click while you are watching recording will stop and the preview screen will return to th...

Страница 17: ...ify or delete items for recording shows in the future For this you will have to open the Settings dialog box by clicking and selecting the Schedule tab The message about encrypted programs will not appear when the input source is analog TV Click Add to schedule additional recording or click Modify to change the schedule for selected recordings ...

Страница 18: ...u want to use Silent mode while recording click When a scheduled recording starts it will be in silent mode You can choose the action to be taken when a scheduled recording is finished from the After scheduled recordings from Hibernate or Standby mode are completed box For more information see Adjusting the Schedule Settings Using EPG Electronic Program Guide Adjusting the Schedule Settings ...

Страница 19: ...s dialog box will open There are three sections to pay attention to Task Time and Quality Task Time Quality Quality is only available when selecting the analog device Task Task Name Give a name to the recording session or use the default Channel Choose from the available channels for the one you want Time ...

Страница 20: ...e selected date Duration Choose how long to record The recording will stop after the specified time period Quality Saved Type Choose what kind of recording you are scheduling Quality Choose the level of quality for the selected recording After selecting the appropriate dialog box options click OK to return to the Schedule list 1 If a scheduled task comes up when running time shifting or recording ...

Страница 21: ...se the Channel box to choose an available channel Select the program that you want to record and then click Add to Schedule The program will be added to the schedule Click Refresh to make sure that the schedule is up to date Time Shifting ...

Страница 22: ...n will freeze but the recording will continue Click to continue watching the program from the point at which it was paused Click to stop time shifting and return to the live program When paused you can change the screen size and adjust the volume but you cannot change programs take snapshots change the configuration or close the program Adjusting the Volume Use the plus and minus buttons to increa...

Страница 23: ...ng Your Presto PVR 18 Click to capture the screen at that moment The snapshots will be saved in the working folder You can change the file format to save the snapshots on the Advanced tab of the Settings dialog box ...

Страница 24: ...enus and settings that you need to worry about Here they are in their entirety Main Screen Program Viewer Screen Menu Settings Channel Surfing History Taskbar Commands Shortcut Keys Main Screen The PVR screen is very compact and useful Here is an overview of the various displays and buttons Digital TV DVB T ...

Страница 25: ...recording or time shifting 2 The signal quality will only be shown when the source is Digital TV List the time along with the channel number and name Display the currently connected adapter and how much free space is available for recording These are the buttons for controlling the program There are full screen minimize and close Click the Emtec logo to connect to our website Also available is the...

Страница 26: ...ording programs and watching the programs that have already been recorded Click to capture screen at that moment and check the programs that have already been recorded The volume controls let you turn it up and down as well as off There is also an indication of the current volume level These buttons are for choosing a channel to watch on TV Either by going up or down a channel going back to the pr...

Страница 27: ...is button sends the program viewer to the taskbar Full Screen Clicking this button maximizes the program viewer to full screen Always on Top Clicking this button keeps the program viewer on top of all other windows Screen Menu When you right click your Presto PVR screen when a video is playing you will see the following menu This will give you quick control over how you watch the program Aspect Ra...

Страница 28: ...Chapter 3 Menus and Settings 23 Aspect Ratio ATSC Size DVB T ...

Страница 29: ...Chapter 3 Menus and Settings 24 Size ATSC Sound DVB T ...

Страница 30: ... height ratio for your Presto PVR screen You can choose Original Ratio 4 3 Free Ratio or 16 9 Choosing Free Ratio will allow you to distort your TV picture by dragging the lower right corner of the screen If you have chosen Original Ratio 4 3 the ratio will not change as you resize the picture ...

Страница 31: ...most recently selected size Sound If the program has multiple sound tracks you can switch them here Analog TV offers Stereo Mono or SAP audio while Digital TV has a list of the available soundtracks AC3 AC3 audio is only available for Digital TV Access to this feature requires additional codecs Please check our website for updates in case your PVR doesn t support AC3 audio Mute Click to turn the a...

Страница 32: ...Chapter 3 Menus and Settings 27 Channel Surfing Click to browse TV channels in a tiled window Exit Click to close the program About Presto PVR Click to display the program version information Settings ...

Страница 33: ...ick to see the Settings dialog box to help you personalize you Presto PVR program Device Channel Video Record Schedule Advanced Skin Live Update Device On the Device tab you can select how you control the Presto PVR device Device Audio ...

Страница 34: ...Chapter 3 Menus and Settings 29 Analog TV Digital TV Device ...

Страница 35: ...Menus and Settings 30 Available Presto PVR devices are listed here Other settings on this tab will be disabled unless you select a device Audio For Analog TV only you can choose an audio device and source Channel ...

Страница 36: ...Chapter 3 Menus and Settings 31 On the Channel tab you can set up the scan parameters to more efficiently scan for available television channels Digital TV DVB T ...

Страница 37: ...hanged to restrict the range that Scan will use to search for available channels Signal For Analog TV only choose the source of the television signals Scan Auto Scan Click to look for all available channels and list them Export Import You can use these two functions to export or import a channel list so that you don t need to scan again when using other computers Delete For Digital TV DVB T only y...

Страница 38: ...take longer to finish the scanning process If the first scan was not satisfactory select this option and scan again Channel Information Edit Channel You can edit the name for each channel Type a name that may help you be clearer about what kind of show it is Select the red heart next to a channel to make it a favorite Clear the heart to remove it from the favorites list Favorite channels will be s...

Страница 39: ...Chapter 3 Menus and Settings 34 Record ...

Страница 40: ...tab will let you adjust your recording preferences Record to the Hard Disk You are allowed to choose Saved type and Quality only when your input source is Analog If your PVR doesn t support DDR the Destination option will not be available ...

Страница 41: ...ing is available only when the input source is analog TV It is not available for DVB T or ATSC Record to DVD RW The Quality option is available when your PVR supports DDR and your input source type is Analog For more information see Recording Time Shifting Recording ...

Страница 42: ...nto the hard disk even if you have selected the DVD burner as the output device Before you click the Record button Presto PVR will check whether the disc contains data and is appendable If the DVD is not appendable you will be prompted to erase any existing data Saved type Select the kind of recording you want to save You can choose DVD or VCD with hard disk set as the output destination You are n...

Страница 43: ... shifting live TV programs to avoid CPU overload Please note that while the Quality option is available when the input source is analog TV It is not available when the source is digital TV The estimated recording time will be displayed at the bottom of this dialog box as Maximum recording time Schedule ...

Страница 44: ...Chapter 3 Menus and Settings 39 The schedule will display the programs that have been selected for recording at a later date For more information see Scheduling Your Program Recording Digital TV DVB T ...

Страница 45: ... an encrypted program it will not be recorded will appear at the bottom This message won t appear when the input source is analog TV Advanced Under Snapshot select a file format for saving the images In the Channel Surfing section you can select the display mode for channel surfing ...

Страница 46: ...fting if there is already a scheduled setting the scheduled recording will take priority When this option is selected scheduled recording is given the highest priority which means the system will begin scheduled recording regardless of whether other recording or time shifting is in process Skin ...

Страница 47: ...rom the Select list and see how it looks in the Preview window Click OK to accept Live Update In this tab you can check for product updates and news under Live Update If your Presto PVR doesn t support the AC3 audio format an update message for AC3 support will appear under the Live Update box ...

Страница 48: ...Chapter 3 Menus and Settings 43 Channel Surfing ...

Страница 49: ...Right click the program viewer and select Channel Surfing from the screen menu to tile the channels in thumbnails You can play a channel by double clicking the thumbnail To quit this function click Esc and back to live program History ...

Страница 50: ...te to erase a selected program from the hard disk Click Close to close the History dialog box Taskbar Commands After Presto PVR is installed the program icon on the system tray can be used to start and monitor Presto PVR There are three commands that you can choose from Start Presto PVR This command quickly starts Presto PVR It is unavailable if the program is running Set Schedule This command all...

Страница 51: ... tasks and removes the icon from the system tray Shortcut Keys Shortcut keys are a quick way to manipulate the program See the Readme txt file for details Click the Start button point to Programs Emtec and then Presto PVR Locate the folder that contains the Readme file and open it ...

Страница 52: ...Disable Power Management in the BIOS 4 Close unnecessary programs and do not run other programs while recording 5 Use the defragment tool to optimize the hard disk 6 Make sure your system meets the PVR minimum requirements a Use a USB 2 0 port since some TV tuner devices won t work with the older USB 1 1 ports You may need to purchase a USB 2 0 PCI card or card bus If the USB port is version 1 0 o...

Страница 53: ... the DVB T ATSC PCI slot It could be that a related driver already exists on the system or it may be a hardware issue 1 Make sure the device is properly connected 2 Make sure the device driver is installed 3 If the above steps do not fix the problem try unplugging the device from the computer and uninstalling the driver Then plug the device into a different port and install the driver again 4 If y...

Страница 54: ...he installed DirectX version is older than 9 0 download and install the latest DirectX version from the Microsoft website at http www microsoft com windows directx default aspx It s free To find out which version of DirectX you are using click Run from the Windows Start menu type dxdiag and then OK The DirectX diagnostic tool will open and the version number will be listed under System Information...

Страница 55: ...am patches available Visit the manufacturer s website for latest updates for the TV tuner driver Reinstallation is a way to correct many kinds of problems We suggest that you install the built in Windows driver for USB 2 0 PCI cards If you need to contact the Emtec support center either by phone or by e mail here are the details that you should pass on a Operating system language and service pack ...

Страница 56: ... to replace the widely used NTSC system and produces wide screen 16 9 images The ATSC standards also boast theater quality audio through the AC3 format Auto Scan Automatic scanning The computer looks for television signals Buffer This is a memory space for making time shifting possible Closed Captions Closed captions are subtitles specifically provided for the hard of hearing Deinterlace This is u...

Страница 57: ...m Usually used to present the material in a different language Smart Scanning A more efficient way to scan for channels and frequencies Teletext A free program to give information about broadcasts and schedules Not available everywhere ...

Страница 58: ...is manual Emtec will not be held responsible for any accident or other loss caused by misunderstanding of this manual We shall not be held responsible either for any loss caused by using this product or for any claim by any third party 3 Emtec will be held responsible only for the inherent problem of the device itself but not for data loss modification of the device or other indirect loss resultin...

Страница 59: ...lly understand all the operation instructions and warnings of this device 2 Check if the contents in the packing comply with the packing list If not contact the dealer immediately 3 When it is left unused for a long period of time the battery must be taken out from battery chamber If battery liquid leakage is detected and the device works abnormally do not disassemble the device for cleaning which...

Страница 60: ...ference environment to prevent data from being lost 6 Do not drop the device to the ground or suffer it from fierce impact by other objects which may lead to unnecessary damage 7 The device uses a rapid internal storage for data memory Generally even when the power is suddenly turned off the data in the device will not lose However mal operation malfunction or external strong electromagnetic inter...

Отзывы: