background image


10  

RXi 

 Panel PC Quick Start Guide 

GFK-3072D 

Installation Steps 

1.


Verify that the gasket is present and properly seated in the bezel channel located on the sides of the unit. 

2.


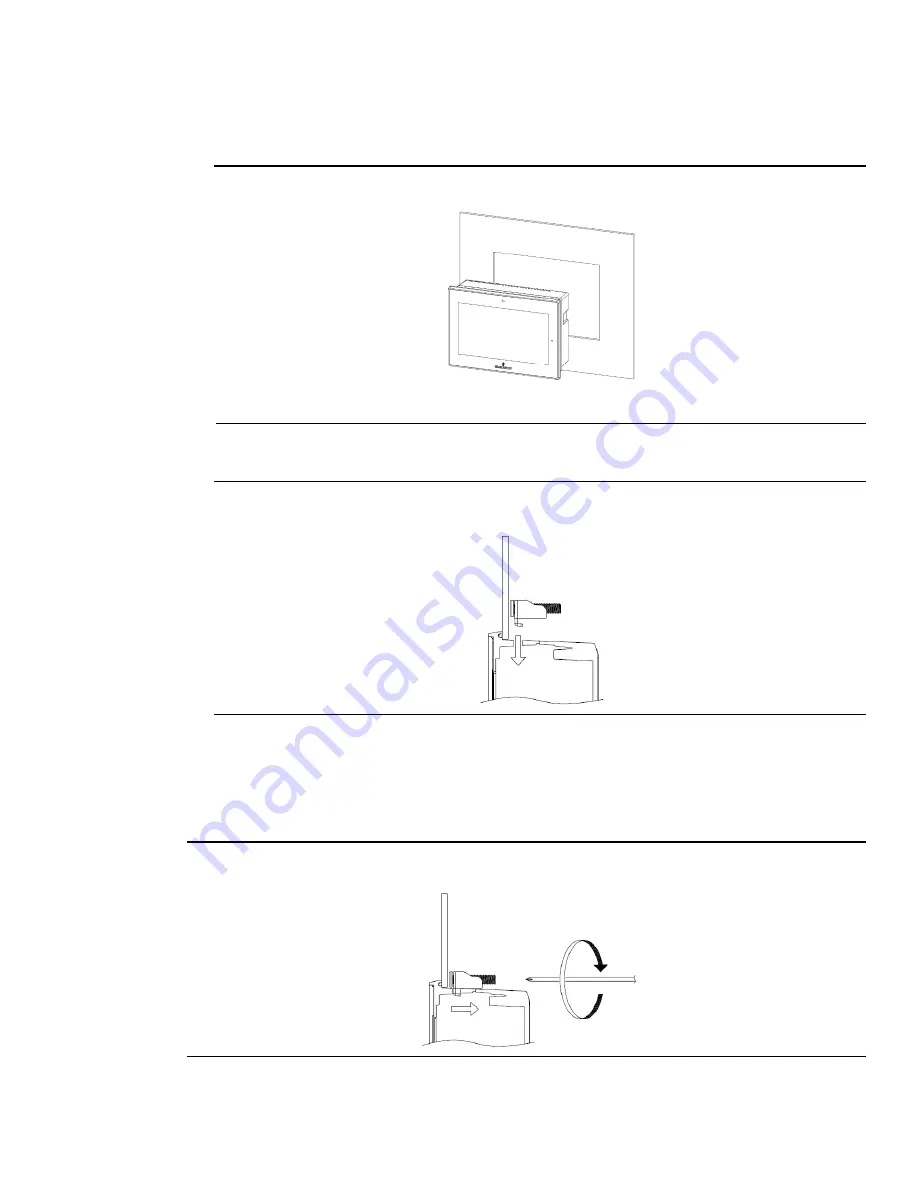
Carefully insert the Panel PC into the mounting panel cutout. 

Figure 6: Panel Install View 


3.


Insert the hook of the mounting bracket into the mounting hole as displayed in the following figure. 

Figure 7: Mounting Bracket Insertion 


4.


Tighten all mounting brackets by hand until the gasket seal contacts the mounting surface uniformly.  

5.


In a cross pattern around the monitor tighten all mounting clip screws to a torque of 13 to 13.9 in-lbs. (15 
to 16kgf-cm) making sure not to overtighten the bracket. 

Figure 8: Tighten Mounting Bracket 


Содержание GFK-3072D

Страница 1: ...Quick Start Guide GFK 3072D Dec 2020 RXi Panel PC QUICK START GUIDE ...

Страница 2: ... and maintenance The information is supplied for informational purposes only and Emerson makes no warranty as to the accuracy of the information included herein Changes modifications and or improvements to equipment and specifications are made periodically and these changes may or may not be reflected herein It is understood that Emerson may make changes modifications or improvements to the equipm...

Страница 3: ...ke On USB Keyboard Mouse 3 Serial Ports UART 4 Audio 4 Rear Audio 4 BIOS Setting 4 I O Connectors 4 Serial ATA SATA Connector 4 Features 4 BIOS Setting 4 Expansion Slots 5 Micro SD Socket 5 LVDS LCD Panel Connector 5 BIOS Setting 5 AIO DIO Connector 5 Battery Base Models 6 Battery Ryzen Models 7 LED Indicators 8 Operation Status LEDs Screen 8 Ethernet Port Operation LEDs 8 Mounting Information 9 P...

Страница 4: ...y cause undesired operation CAUTION Changes or modifications not expressly approved by the party responsible for compliance could void the user s authority to operate the equipment Industry Canada requires the following to be published CAN ICES 3 A NMB 3 A Intended Use The RXi Panel PC is intended for use in industrial environments only Adherence to supplied documentation is part of the intended u...

Страница 5: ...from the power cables 4 Secure the power cable to the mating connector noting polarity and tighten the screw clamps The torque for the attaching screws is 0 3 Nm 2 26 in lb 5 Apply dc power to the unit During normal startup and operation the LED status indicator displays as follows Solid amber while the RXi Industrial Display unit is starting up Solid green during normal operation 6 Once power is ...

Страница 6: ...area network through a network hub or router BIOS Setting Configure the onboard LAN in the Advanced menu Wakeup Configuration submenu of the BIOS Refer to chapter 3 for more information USB Ports The USB ports allow for data exchange between your computer and a wide range of simultaneously accessible external Plug and Play peripherals The RXi Panel PC is equipped with 2 onboard USB 3 0 ports USB 0...

Страница 7: ...ct an external microphone BIOS Setting Configure the onboard Audio device in the Chipset menu SB HD Azalia Configuration submenu of the BIOS I O Connectors Serial ATA SATA Connector Features 1 Serial ATA 3 0 port with data transfer rate up to 6Gb s Integrated Advanced Host Controller Interface AHCI controller The Serial ATA connector is used to connect the Serial ATA device Connect one end of the ...

Страница 8: ...ith the LVDS LCD panel connector This connector transmits video signals and power from the system board to the LCD Display Panel Refer to the right side for the pin functions of the LVDS connector BIOS Setting Configure the LCD panel in the Chipset menu DISPLAY control submenu of the BIOS Refer to Chapter 3 for more information AIO DIO Connector AIO DIO connector provides functionality to external...

Страница 9: ...ttom of the computing module when separated from the screen as shown in Figure 3 Safety Measures Danger of explosion if battery incorrectly replaced Replace only with the same or equivalent type recommended by the manufacturer Dispose of used batteries according to local ordinances Figure 3 CR2032 Battery 7 to 10 Inch 12 to 24 Inch WARNING Use of Another Battery May Present a Risk of Fire or Explo...

Страница 10: ... computing module when separated from the screen as shown in Figure 3 Safety Measures Danger of explosion if battery incorrectly replaced Replace only with the same or equivalent type recommended by the manufacturer Dispose of used batteries according to local ordinances Figure 4 CR2032 Battery for Ryzen Models WARNING Use of Another Battery May Present a Risk Of Fire or Explosion Replace Battery ...

Страница 11: ... provides visual indication of the operation status LED State System State Amber Solid Operating system starting Green Solid Normal operating state Green Blinking Backlight off Red Blinking Backlight failure Off Power not applied to the unit Ethernet Port Operation LEDs LED LED State Operating State Speed Yellow ON 10 100 1000 Link Activity Green ON Link Status ...

Страница 12: ... entitled Installation Steps Panel Thickness 161 to 7 gauge 1 6 to 5 mm Panel Thickness 1 6 to 5mm All measurements within 0 5mm Panel Cutout Dimensions Figure 5 Panel Cutout Dimensions Width Height Display Size in Width mm Height mm 7 183 5 128 5 10 255 5 174 12 317 214 5 15 398 245 5 19 482 297 24 581 360 All panel cutout measurements should be within 0 5 mm Values presented are width and height...

Страница 13: ... Install View 3 Insert the hook of the mounting bracket into the mounting hole as displayed in the following figure Figure 7 Mounting Bracket Insertion 4 Tighten all mounting brackets by hand until the gasket seal contacts the mounting surface uniformly 5 In a cross pattern around the monitor tighten all mounting clip screws to a torque of 13 to 13 9 in lbs 15 to 16kgf cm making sure not to overti...

Страница 14: ...11 RXi Panel PC Quick Start Guide GFK 3072D Mounting to Modular Display Figure 9 7 Mount Figure 10 10 mount ...

Страница 15: ...12 RXi Panel PC Quick Start Guide GFK 3072D Figure 11 12 Mount Figure 12 15 Mount ...

Страница 16: ...13 RXi Panel PC Quick Start Guide GFK 3072D Figure 13 19 24 Mount Figure 14 Panel PC with AMD Ryzen Mount ...

Страница 17: ... VESA Mount VESA Mount Dimensions The RXi Panel PC can also be VESA mounted as shown in the figures below All 7 through 24 units include VESA Mount Dimensions of 100 mm x 100 mm All units are fastened with four M4x8 screws Figure 15 7 VESA Mount ...

Страница 18: ...15 RXi Panel PC Quick Start Guide GFK 3072D Figure 16 10 VESA Mount ...

Страница 19: ...16 RXi Panel PC Quick Start Guide GFK 3072D Figure 17 12 VESA Mount ...

Страница 20: ...17 RXi Panel PC Quick Start Guide GFK 3072D Figure 18 15 VESA Mount ...

Страница 21: ...18 RXi Panel PC Quick Start Guide GFK 3072D Figure 19 19 24 VESA Mount ...

Страница 22: ...Figure 20 Panel PC with AMD Ryzen VESA Mount ...

Страница 23: ... improve the designs or specifications of the products mentioned in this manual at any time without notice Emerson does not assume responsibility for the selection use or maintenance of any product Responsibility for proper selection use and maintenance of any Emerson product remains solely with the purchaser 2020 Emerson All rights reserved Emerson Terms and Conditions of Sale are available upon ...

Отзывы: