Instruction Manual
D200149X012
3610J and 3620J Positioners
September 2017
36
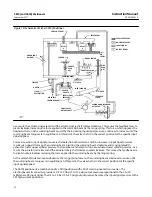
Figure 23. Schematic of Fisher 3620JP Positioner
38A6594‐A
B2149
MINOR LOOP
GAIN ADJ
ZERO ADJ
RANGE SPRING
COARSE
SPAN
ADJ
CROSS‐OVER
ADJ
RELAY BEAM
RELAY
B
RELAY
A
SUPPLY PRESSURE
NOZZLE PRESSURE
INPUT SIGNAL
OUTPUT SIGNAL
AIR
SUPPLY
FINE
SPAN
ADJ
PIVOT
B
FEEDBACK
LEVER
INPUT MODULE
PIVOT A
FLAPPER
NOZZLE
FIXED
RESTRICTION
CAVITY A
CAVITY B
POSITIONER
CAM
END VIEW OF ROTARY SHAFT
PISTON
ACTUATOR
SUMMING BEAM
COUNTER SPRING
FLAPPER
NOZZLE
FIXED
RESTRICTION
MAGNET
SUPPLY
COIL 4 TO
20 mA INPUT
OUTPUT SIGNAL
Positioner Disassembly
Removing the Positioner from the Actuator
Refer to figure 28 or 29 for key number locations, unless otherwise indicated, while removing the positioner from the
actuator.
1. Unscrew the four socket head screws (key 54), and remove the positioner from the actuator or positioner adaptor
(key 113—the positioner adaptor is used only on selected actuator types and sizes).
2. Release all pressure to the positioner. Disconnect the supply, instrument, and output tubing.
WARNING!
If using gas as the supply medium, ensure adequate ventilation and remove any ignition sources.
3. Unscrew the four captive cover screws and remove the cover (key 41).
4. For the 3611JP or 3621JP mounted on a 585 or 585R, size 100 with a 51 through 102 mm (2 through 4 inch) travel
only, disconnect the extension spring (key 185) from the feedback lever.
5. Unscrew the four socket head screws (key 54), and remove the positioner from the actuator or positioner adapter
(key 113—the positioner adapter is used only on selected actuator types and sizes).


