


Hint
Hint
• When a tape with-
out record tab is
inserted, the
DVD/VCR will start
playback automati-
cally.
• Tracking will be
automatically
adjusted upon play-
back. To adjust the
tracking manually,
press the CHAN-
NEL buttons.
– 11 –
EN
VCR Functions
Recording & OTR (One Touch Recording)
Playback
OPEN/CLOSE
STOP/EJECT
PLAY
REC /OTR
TIMER REC
F.FWD
REW
POWER
CHANNEL
V
VIDEO
AUDIO
PLAY
B
POWER
DISPLAY
VCR
DVD
PAUSE
SLOW
VCR/TV
SKIP/CH.
PLAY
STOP
REC/OTR
OPEN/CLOSE
/EJECT
SPEED
AUDIO
1
2
3
4
5
6
7
8
9
0
+10
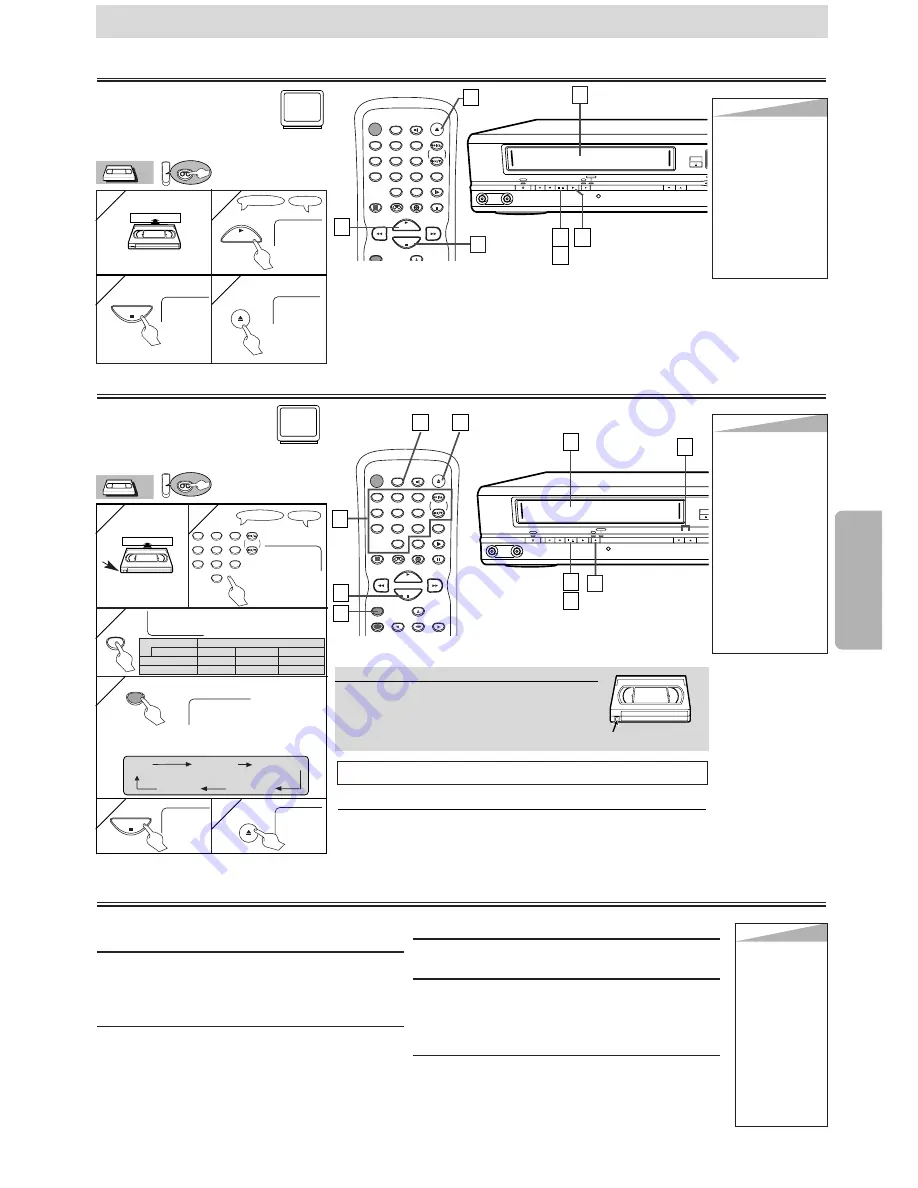
Before:
Turn on the TV and set it to
channel 3.
• If channel 3 is already occupied for broad-
casting, see “RF Output Channel” section.
1
1
2
2
3
3
4
4
1
1
2
2
STOP
EJECT
A
3
3
4
4
4
4
TV Screen
Remote Control
PLAY
STOP
OPEN/CLOSE
/EJECT
Accidental erasure prevention
To prevent accidental recording on a record-
ed cassette, remove its record tab. To record
on it later, cover the hole with cellophane
tape.
Record tab
• Select the
desired channel
1
1
2
2
with tab
SP
• Select the desired tape
speed
3
3
REC
4
4
Type of tape
T60
T120
T160
SP mode
1hour
2hours
2-2/3hours
SLP mode
3hour
6hour
8hour
Tape Speed Recording/Playback Time
CH12
TV Screen
Remote Control
1
2
3
4
5
6
7
8
9
0
SPEED
REC/OTR
REC OTR(0:30) OTR(1:00).....
(Normal recording)
OTR(8:00) OTR(7:30)
5
5
6
6
STOP
OPEN/CLOSE
/EJECT
Before:
Turn on the TV and set it to
channel 3.
• If channel 3 is already occupied for
broadcasting, see “RF Output Channel” section.
3
3
2
2
OPEN/CLO
STOP/EJECT
PLAY
REC /OTR
TIMER REC
F.FWD
REW
POWER
CHANNEL
VIDEO
AUDIO
POWER
DISPLAY
VCR
DVD
PAUSE
SLOW
VCR/TV
SKIP/CH.
PLAY
STOP
REC/OTR
MENU
SETUP
TOP MENU
ENTER
RETURN
OPEN/CLOSE
/EJECT
SPEED
AUDIO
1
2
3
4
5
6
7
8
9
0
+10
1
1
5
5
6
6
6
6
5
5
2
2
2
2
3
3
4
4
Hint
Hint
• To view one chan-
nel while recording
another
1) While you are
recording on the
DVD/VCR, press
the VCR/TV button.
2) At the cable box
or satellite box,
select the channel
you want to view.
• If you have connect-
ed the DVD/VCR to
a cable box or satel-
lite box, refer to
“Hint for Cable Box
or Satellite Box”
section on page 6.
STOP
EJECT
A
You can select a fixed recording time by press-
ing the REC/OTR button repeatedly.
To cue or review picture during playback
(Picture Search)
Press
the F.FWD or REW button
.
• Press it again and the DVD/VCR will search in
super high speed. (in the LP/SLP modes only)
To freeze the picture on TV screen during play-
back (Still mode)
Press
the PAUSE/STILL button
. Each time you
press the button, the picture will be forwarded by
one frame.
• If the picture begins to vibrate vertically during the
still mode, stabilize the picture by pressing the
CHANNEL buttons.
• If the picture is distorted or rolling vertically, adjust
the vertical hold control on your TV, if equipped.
Counter Reset
Press
the CLEAR/C.RESET button
.
To play back in slow motion
Press
the SLOW button
during playback or the still
mode.
• If the noise bars appear on the TV screen, you can
reduce it by pressing the CHANNEL buttons.
Auto Rewind
When a tape reaches its end during playback, fast-for-
ward, or recording (except timer recording and One
Touch Recording), the tape will automatically rewind
to the beginning. After rewinding finishes, the
DVD/VCR will eject the tape.
Other Operations
Hint
Hint
• Still/Slow/Pause
mode will be
automatically
cancelled after 5
minutes to pre-
vent damage to
the tape and the
video head.
• To return to
playback from
the Picture
Search/Still/
Slow mode,
press the PLAY
button.
VCR Functions
4
4
SKIP/CH.
VCR
VCR
VCR
VCR
You
CAN NOT
copy a DVD to a videotape.
To stop recording temporarily (Pause mode)
Press
the PAUSE/STILL button
.
• During the rec-pause mode, five
C
marks appear on the TV
screen. Each
C
mark represents one minute.
• Press it again to resume recording.
VCR
VCR


