background image

4

UNPACKING AND SET-UP

  •

Carefully remove the unit from the carton and remove all packing material

from the unit.

  •

Remove any labels or stickers which may be on the front or top of the set, but

do not remove any labels from the back or bottom.

  •

We suggest that you retain the original carton and packing materials in case it

ever becomes necessary to return your unit for service. This is the only sure

way to protect the unit from damage in transit.

  •

If you do dispose of the carton and packing materials, please do so properly.

Emerson cares about our environment.

AC OPERATION

1.) Unwind the AC Power Cord completely.

2.) Insert the plug into any convenient 120V 60Hz AC outlet.

POWER SOURCE

This system is designed to operate on 120V 60Hz AC house current . Connecting

this  system  to  any  other  power

supply could result in damage to the

unit which is not covered by your

warranty. You  will  note  that  this

system is equipped with a polarized

AC power plug having one blade

wider than the other. This is a safety

feature. If this plug does not fit into

your existing AC outlet, do not try to defeat this safety feature by filing the wide

blade to make it fit into your outlet.  If this plug will not fit into your outlet, you

probably have an out-dated non-polarized AC outlet. You should have your outlet

changed by a qualified licensed electrician.

PREPARATION FOR USE

AC Plug


AC Outlet

AC Outlet

FM Antenna

ES13_draft090902.p65

9/9/2002, 17:37

4

Содержание ES13

Страница 1: ...OWNER S MANUAL ES13 MICRO AUDIO SYSTEM with CD CD R RW PLAYER and DIGITAL TUNER Visit our web site at www emersonradio com ES13_draft090902 p65 9 9 2002 17 37 27 ...

Страница 2: ... of time 13 Refer all servicing to qualified service personnel Servicing is required when the apparatus has been damaged in any way such as power supply cord or plug is damaged liquid has been spilled or objects have fallen into the apparatus the apparatus has been exposed to rain or moisture does not operate normally or has been dropped 14 This appliance shall not be exposed to dripping or splash...

Страница 3: ...ing the highest quality components and standards of workmanship It was tested by Emerson inspectors and found to be in perfect working order before it left our factory However there is always the chance that some problem may occur because of rough handling during shipment to the retail store or to the final consumer If after reading this Manual you experience any problems with the operation of thi...

Страница 4: ...evice complies with Part 15 of the FCC Rules Operation is subject to the following two conditions 1 This device may not cause harmful interference and 2 This device must accept any interference received including interference that may cause undesired operation Operate controls and switches as described in the manual Before turning on the power make certain that the connecting cords and power cord ...

Страница 5: ...sert the plug into any convenient 120V 60Hz AC outlet POWER SOURCE This system is designed to operate on 120V 60Hz AC house current Connecting this system to any other power supply could result in damage to the unit which is not covered by your warranty You will note that this system is equipped with a polarized AC power plug having one blade wider than the other This is a safety feature If this p...

Страница 6: ...hted Buttons POP ROCK CLASSIC FLAT 9 CD Button 10 TUNER BAND Button 11 SKIP SEARCH TUNING SET Button 12 SKIP SEARCH TUNING SET Button 13 CD Door 14 VOLUME Button 15 VOLUME Button 16 PRESET UP RANDOM INTRO Button 17 TIME SET MEMORY Button 18 FM MODE REPEAT Button 19 CD DOOR OPEN CLOSE Button 20 Remote Control Sensor 2 1 3 6 4 7 8 9 10 11 12 13 14 15 16 17 18 19 20 5 ES13_draft090902 p65 9 9 2002 17...

Страница 7: ... MODE REPEAT Button 15 Play Pause Button 16 MEMORY Button 17 PRESET INTRO Button 18 RANDOM Button 19 TIMER OFF Button REMOTE CONTROL BATTERY INSTALLATION Insert 2 pcs AA size Alkaline batteries not included into the battery compartment of the remote controller Be sure to observe the polarity markings which are engraved inside the battery compartment then close the cover 2 1 3 4 5 6 7 9 13 15 16 17...

Страница 8: ...bient light source the performance of the infrared Remote Sensor may be degraded causing unreliable operation The maximum effective distance for remote control operation is about 15 feet BATTERY PRECAUTIONS Follow these precautions when using batteries in this device 1 Use only the size and type of batteries specified 2 Be sure to follow the correct polarity when installing the batteries as indica...

Страница 9: ...ing speaker terminals on the back panel of the main unit Make sure that the left black speaker wire is connected to the left L black speaker clip and the right red speaker wire is connected to the right red speaker clip Right Speaker Left Speaker SPEAKERS RED BLACK ES13_draft090902 p65 9 9 2002 17 37 8 ...

Страница 10: ...play to the correct minutes 5 Press the TIME SET MEMORY button once more The display will show 12 H meaning that the time will be displayed in 12 hour format 6 PM 6 00 If you prefer 24 hour format 6 PM 18 00 press either the TUNING SET or buttons on the top panel or on the remote control to switch between 12H and 24H time formats 6 Press the TIME SET MEMORY button once more The time display return...

Страница 11: ...e top panel There are no EQ controls on the remote control BASS BOOST The Bass Boost control is designed to provide additional bass response especially at lower volume levels where the bass tends to disappear Press the BASS BOOST button on the top panel to turn the Bass Boost On or Off The button lights when Bass Boost is on Note If you have the EQ set to Rock the Bass Boost On and your are listen...

Страница 12: ...isplay shows the frequency of the desired station Note Use this method to tune in weaker stations Automatic Tuning Press and hold the TUNING SET or buttons until the display begins to move then release the buttons The tuner will search up or down for the first strong station and stop on that station Repeat until the tuner stops on the desired station 4 Press the VOLUME or buttons on the top panel ...

Страница 13: ...re unit to another location MONO STEREO MODE SWITCH If you tune to an FM Stereo station the FM STEREO indicator will appear in the display However if the FM Stereo reception is unsatisfactory press the FM MODE REPEAT button on the top panel or on the remote control The MONO indicator will appear in the display and reception should improve although the sound is no longer in stereo In most cases lea...

Страница 14: ... 103 5 MHz 2 Press the MEMORY button on the remote control The Memory indicator will begin flashing in the display 3 Press either the PRESET or buttons on the remote control to select a desired memory number Example Channel Memory 7 4 Press the MEMORY button on the remote control once more to enter the station into the selected memory number 5 Repeat this procedure selecting a different preset num...

Страница 15: ... pause for a moment waiting for you to enter a second number After a few seconds it will tune to the number you entered To select presets 11 through 20 simply press the appropriate number buttons on the remote in the correct sequence CHANGING PRESET STATIONS Tune to the new station you want to memorize Press the MEMORY button then press the PRESET or buttons to select the memory number that you wa...

Страница 16: ...ove and discard the CD transit protection card 4 Place your CD on the center spindle with printed label side up Gently press down around the center hole to make sure the disc is properly seated on the spindle Close the CD door 5 The disc will begin to spin the display will show the total tracks and playing time and then playback begins on track 1 6 Adjust the VOLUME EQUALIZER and BASS BOOST contro...

Страница 17: ...sage within a track When you hear the desired passage release the buttons and normal playback will resume from that point REPEAT PLAYBACK You can repeat a single track or the entire disc automatically All Tracks Repeat Start playback and press the FM MODE REPEAT button on the top panel or on the remote control one time The Repeat indicator appears in the display The entire disc will be repeated co...

Страница 18: ...layback press the RANDOM button on the remote control or press the PRESET UP RANDOM INTRO button on the top panel until the RANDOM indicator no longer appears in the display Random Playback will also be canceled if you switch to Tuner mode open the CD door or switch the power Off INTRO SCAN PLAYBACK Intro Scan playback plays only the first 10 seconds of each track on the disc This feature is usefu...

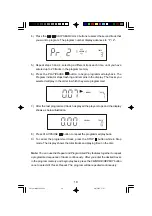
Страница 19: ... Note You cannot program the player while a disc is playing If a disc is playing press the STOP button to stop playback and then follow the steps below 1 While in Stop mode press the TIME SET MEMORY button on the top panel or the MEMORY button on the remote control The MEMORY indicator flashes and the program number Pr 1 appears in the display 2 Press the SKIPS EARCH or 9 buttons to select the fir...

Страница 20: ...ast programmed track has played the player stops and the display shows as below illustration 8 Press PLAY PAUSE button to repeat the programmed playback 9 To cancel the programmed track press the STOP button while in Stop mode The display shows the total tracks and playing time on the disc Note You can use the Repeat and Programmed Play features together to repeat a programmed sequence of tracks c...

Страница 21: ...2 Press the TUNING SET or buttons on the top panel or remote control to adjust the display to the desired wake up hour AM or PM 3 Press the TIME SET MEMORY button on the top panel or TIME SET button on remote control once more The minute digits begin to flash 4 Press the TUNING SET or buttons on the top panel or remote control to set the minutes 5 Press the TIME SET MEMORY button on the top panel ...

Страница 22: ...D Start playback and adjust the volume to the desired level to wake you up Stop playback and then switch the system back to the Standby Power Off mode At the selected wake up time the system will turn on automatically and playback will continue until the end of the disc The Timer indicator flashes in the display To shut the system Off press the STANDBY button on the front panel or on the remote co...

Страница 23: ...he system shuts off automatically To shut the system off before the Sleep Timer counts down to 00 press the STANDBY button on the front panel or on the remote control STEREO HEADPHONE JACK Connect the stereo headphones to the 3 5mm PHONES jack located at front panel for private listening When the headphones are connected the sound from the speakers will automatically cut off Before putting the hea...

Страница 24: ...reproduction quality Clean the disc periodically with a soft lint free dry cloth Never use detergents or abrasive cleaners to clean the disc If necessary use a CD cleaning kit Never write on or affix labels to the surface of compact discs CARE OF THE CABINETS If the cabinets become dusty wipe them with a soft dry dust cloth Do not use any wax or polish sprays on the cabinets If the front panel bec...

Страница 25: ...ound Function is not set to Tuner Press TUNER BAND button to select AM or FM function Volume at minimum Increase Volume Compact Disc Player CD Player will not Function is not set to CD Press CD button to select play CD function CD is not installed or Insert CD with Iabel side installed incorrectly up CD skips while playing Disc is dirty or scratched Wipe disc with cloth or use another disc FOR ADD...

Страница 26: ...e your check or money order payable to Emerson Radio Corp in the amount of 9 00 not required by California residents to cover shipping and handling costs and enclose a copy of your proof of purchase Send your unit to Emerson Radio Corp 1901 Diplomat Drive Farmers Branch TX 75234 This warranty does not cover damage from negligence misuse abuse accident failure to follow operating instructions comme...

Страница 27: ...EMERSON Part No 16 28 209 01 Printed in China EMERSON RADIO CORP ES13_draft090902 p65 9 9 2002 17 37 26 ...

Отзывы: