background image

Installation

4.3.4 

Spring-Return Actuators

The operating principle, as explained here, is applicable for actuators with assembly code 
CW (direct acting).

• 

Applying supply pressure to port A will move the pistons outwards to the "Open" 
position of the valve.

• 

Venting the supply pressure from port A will cause the springs to move the pistons 
inwards to the "Close" position of the valve.

• 

For assembly codes CC, the operating principle is reversed (reverse acting).

Figure 6 

Stroke Movements

Outward Stoke

A

A

A

A

A B

Inward Stroke

B

Installation, Operation and Maintenance Manual

DOC.IOM.EF.EN Rev. 6

September 2015

11

Section 4: Installation

Содержание EL-O-Matic F-Series

Страница 1: ...Installation Operation and Maintenance Manual DOC IOM EF EN Rev 6 September 2015 EL O Matic F Series Rack and Pinion Pneumatic Actuators EL MaticTM EL MaticTM ...

Страница 2: ......
Страница 3: ...des 7 4 2 1 Valve Rotation 7 4 2 2 Position After Failure 8 4 3 Principles of Operation 8 4 3 1 Solenoid Valve 8 4 3 2 Ingress Protection IP rating 9 4 3 3 Double Acting Actuators 10 4 3 4 Spring Return Actuators 11 4 4 Actuator Assembly Codes 12 4 5 Actuator to Valve Installation 13 4 6 Mounting of control and feedback accessories 15 4 7 Recommended Tubing Sizes 16 Section 5 Mechanical Stroke Adj...

Страница 4: ...sembly of the pistons 32 9 4 Reassembly and settings of the limit stops 34 9 5 Reassembly of the end caps 34 9 5 1 Double Acting actuators 34 9 5 2 Spring Return actuators 36 9 6 Basic function and Air Leak Test 38 Section 10 Troubleshooting 10 1 Mechanical Problems 39 10 2 Pneumatic Problems 40 10 3 Electrical Problems 41 Section 11 Parts List and Spare Parts Recommendations 11 1 Exploded View an...

Страница 5: ...sections of this manual 1 1 Installation Operation and Maintenance Reference Documents Before you start read the following documents All chapters in this manual Safety Guide Document No DOC SG EF EN NOTICE Failure to read the Safety Guide will void the warranty Not following the instructions of the Safety Guide can lead to failure of the product and harm to personnel or equipment 1 2 Warehouse Sto...

Страница 6: ...rt 1 3 On Site Storage All actuators should be stored in a clean dry warehouse free from excessive vibration and rapid temperature changes Prevent moisture or dirt from entering the actuator Plug or seal both air connection ports NOTICE Failure to follow the above guidelines Warehouse and On Site Storages will void warranty ...

Страница 7: ...nting VDI VDE3845 NAMUR The valve interface is equipped with an insert in the pinion bottom that allows both ISO5211 or DIN3337 mounting The springs in the spring return version allow a fail action in case of loss of air supply pressure Fail to Close or Fail to Open As from size FD150 double acting versions have flat end caps to reduce actuator length and internal air volume Figure 1 Identificatio...

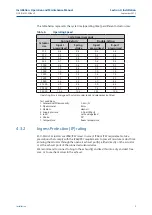
Страница 8: ... 5 to 120 psig reduced spring quantity Table 2 Operating Media Actuator Type Operating Media Double Acting and Single Acting Air dry or lubricated and inert gases Dew point at least 10K below ambient temperature For sub zero applications take appropriate measures Mentioned pressure levels are gauge pressures Gauge pressure is equal to absolute pressure minus atmospheric pressure Table 3 Temperatur...

Страница 9: ...ctuator size Maximum volume Cu in Outward Stroke Inward Stroke Central1 chamber End cap2 cham ber Displaced3 volume Double Acting and Spring Return Double Acting only 40 psig 80 psig 120 psig 40 psig 80 psig 120 psig 12 3 1 3 7 2 5 11 19 28 13 23 33 25 6 4 11 8 4 7 28 52 75 38 72 106 40 10 0 22 8 9 53 96 140 71 133 196 65 22 34 13 5 81 148 215 107 200 294 100 22 50 19 9 118 216 314 165 310 455 150...

Страница 10: ...e Square Actuator Size s 0000 No Insert NL09 ND09 9mm 0 354 0012 NL11 YD11 11mm 0 433 0025 NL14 YD14 14mm 0 551 0040 0065 NL19 YD17 17 mm 0 669 19 mm 0 748 0100 0150 NL22 YD22 22 mm 0 866 0200 NL27 YD22 22 mm 0 866 27 mm 1 063 0350 NL27 YD72 27mm 1 063 0600 See Insert Supplement for Additional Insert Options Temperature Ranges S Standard 20 C to 80 C 4 F to 176 F H High 20 C to 120 C 4 F to 248 F ...

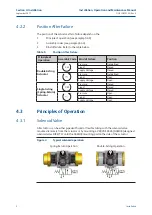
Страница 11: ...r or electrical failure it is important to know the behavior of the actuator Before mounting the actuator on a valve consult the following sections below 4 2 Actuator Rotation Direction 4 2 1 Valve Rotation For the following paragraphs we assume that valves rotate as indicated in figure 3 Figure 3 Normal valve rotation The valve is closed after a clockwise rotation The valve is open after a counte...

Страница 12: ...age Open Single Acting Spring Return Actuator Pressure Closed Signal Closed Supply Voltage Closed Pressure Open Signal Open Supply Voltage Open 4 3 Principles of Operation 4 3 1 Solenoid Valve All actuators can be either piped with solid or flexible tubing with the solenoid valve mounted remotely from the actuator or by mounting a VDI VDE 3845 NAMUR designed solenoid valve DIRECTLY onto the NAMUR ...

Страница 13: ...lenoid valve fitted Test conditions 1 Solenoid with flow capacity 0 6 m3 hr 2 Pipe diameter 6mm 3 Medium clean air 4 Supply pressure 5 5 bar 80psi 5 Load with average load 6 Stroke 90 7 Temperature Room temperature 4 3 2 Ingress Protection IP rating EL O Matic F actuators are IP66 IP67 rated In case of IP66 or IP67 requirements take precautions that comply with the IP66 IP67 requirements to preven...

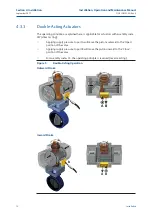
Страница 14: ...istons outward to the Open position of the valve Applying supply pressure to port B will move the pistons inward to the Close position of the valve For assembly codes CC the operating principle is reversed reverse acting Figure 5 Double Acting Operation Outward Stroke A B A Inward Stroke A B B 10 September 2015 Installation Operation and Maintenance Manual DOC IOM EF EN Rev 6 Section 4 Installatio...

Страница 15: ...ards to the Open position of the valve Venting the supply pressure from port A will cause the springs to move the pistons inwards to the Close position of the valve For assembly codes CC the operating principle is reversed reverse acting Figure 6 Stroke Movements Outward Stoke A A A A A B Inward Stroke B Installation Operation and Maintenance Manual DOC IOM EF EN Rev 6 September 2015 11 Section 4 ...

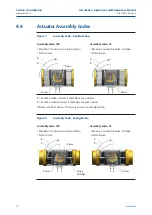
Страница 16: ...ized B Rotation when end cap air chambers are pressurized All views are from above Pistons are shown in inward position Figure 8 Assembly Code Spring Return Assembly code CW Assembly code CC Standard Clockwise to Close rotation Reverse Counterclockwise to Open Fail to Close Fail to Open A B A B A B A B Pinion Pinion Pistons Pistons Pistons Pistons Spring Cartridge 12 September 2015 Installation Op...

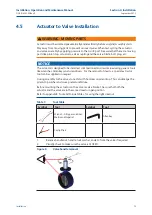
Страница 17: ...rts a special extractor tool can be supplied on request During assembly to the valve do not hit with hammer on pinion top This can damage the pinion top washer and cause premature failure Before mounting the actuator on the valve or valve bracket be sure that both the actuator and the valve are in the same closed or open position Refer to appendix B Tool and Torque tables for using the right size ...

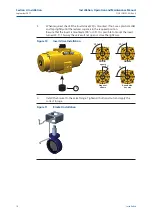
Страница 18: ... mount the insert turned 22 5 This way the valve will not open or close the right way Figure 10 Insert drive Installation 23 4 Install the bracket to the valve flange Tighten all bolts and nuts and apply the correct torque Figure 11 Bracket Installation 90 45 90 90 Parallel square Diagonal square Flat head Round with key way 14 September 2015 Installation Operation and Maintenance Manual DOC IOM E...

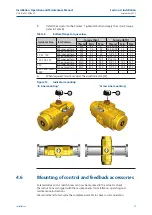
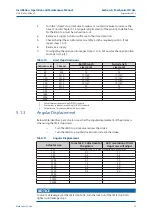
Страница 19: ... 2 F10 outer pattern M10 21 0 24 5 3 8 16 15 5 18 1 600 F10 inner pattern M10 21 0 24 5 3 8 16 15 5 18 1 F12 outer pattern M12 34 5 43 0 1 2 13 25 4 31 7 950 1600 2500 4000 6 When required mount or adjust the visual indicator 22 Figure 12 Indicator mounting In Line mounting Across Line mounting 22 22 4 6 Mounting of control and feedback accessories Solenoid valve and or switch boxes can now be mou...

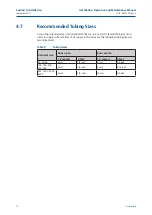
Страница 20: ...ctuator the following tubing sizes are recommended Table 9 Tubing Sizes Actuator size Runs up to Runs over to 1 2 meters 4 feet 1 2 meters 4 feet 25 40 65 6 mm 1 4 inch 6 mm 1 4 inch 100 150 200 350 600 6 mm 1 4 inch 8 mm 5 16 inch 950 1600 2500 4000 6 mm 1 4 inch 10 mm 3 8 inch 16 September 2015 Installation Operation and Maintenance Manual DOC IOM EF EN Rev 6 Section 4 Installation ...

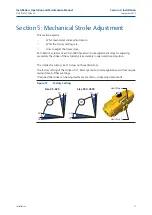
Страница 21: ...embly in open and closed position The smallest actuator size F12 does not have limit stops The factory setting of the stroke is 90 Most quarter turn valve applications will not require readjustment of these settings If required the stroke can be adjusted by means of two stroke adjustment bolts Figure 13 Factory Setting 3 10 80 93 Size 25 600 Size 950 4000 10 5 80 95 90 90 Limit Stop 2 Limit Stop 1...

Страница 22: ...se to reduce or counterclockwise to increase the travel Consult chapter 5 1 3 angular displacement of the pinion to define how far the limit stop must be turned in or out 5 Tighten the lock nut 6 Connect air and cycle the actuator to check that the position is correct If not repeat from 2 7 Remove air supply 8 For adjusting the open position repeat steps 1 to 7 but now for the open position and op...

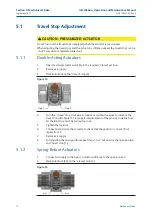
Страница 23: ...t dimension according DIN933 standard 2 Dimensions in brackets according ISO4017 standard 3 Actuator size 12 is not available with limit stops 5 1 3 Angular Displacement Below table identifies per actuator size what the angular displacement of the pinions is when using the limit stop screws Turn the limit stop clockwise reduces the stroke Turn the limit stop counterclockwise to increase the stroke...

Страница 24: ...nal installation Visually check the entire actuator as well as the control system where foreseen Ensure there are no leaks on the actuator parts under pressure Check pneumatic connections for leaks Tighten tube fittings as required Check if manual override where foreseen is regular Check if pneumatic filter cartridge where foreseen is sound and filter bowl where foreseen has been cleaned properly ...

Страница 25: ...ained through authorized Emerson Process Management Valve Automation distributors 6 2 1 Service Kits All soft seals bearings and nonreusable parts are included in the recommended service kit The service kit is identical for both the double acting and the spring return models 6 2 2 Spring Return Actuator For the spring return models we recommend a set of spare springs for each different model in ad...

Страница 26: ... system isolate the piping system on which the Actuator is installed and relieve any media pressure that may be trapped in the valve cavities before removing the actuator for maintenance A spring return actuator mounted on a valve which is stuck in mid stroke contains a high spring load which will cause a sudden rotation of the actuator versus the valve or valve bracket during disassembly This can...

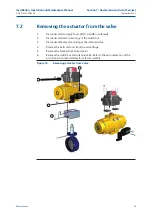
Страница 27: ...f the solenoid valve 4 Remove the bolts and nuts from the valve flange 5 Remove the bracket from the actuator 6 Remove the switch box and solenoid valve Refer to the documentation of the switch box and solenoid valve for safe disassembly Figure 16 Removing actuator from valve 1 4 3 2 Installation Operation and Maintenance Manual DOC IOM EF EN Rev 6 September 2015 23 Section 7 Decommission Out of S...

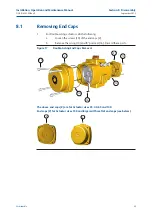
Страница 28: ...structions to release the spring force safely Normally the end caps of spring return actuators should be free of the spring load after 10 full turns crosswise relaxing of the end cap screws If there is still spring load on the end cap this might indicate a broken spring cartridge Stop this disassembly procedure immediately Continuing might cause the end cap to be shot away causing serious injury R...

Страница 29: ...nd B port seal 16 Discard these parts Figure 17 Double Acting End Caps Removal 16 2 10 14 2 10 14 The above end caps 2 are for Actuator sizes 25 40 65 and 100 End caps 2 for Actuator sizes 150 and larger will have flat end caps see below 2 2 Installation Operation and Maintenance Manual DOC IOM EF EN Rev 6 September 2015 25 Section 8 Disassembly ...

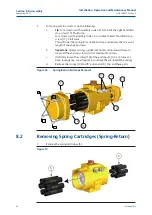
Страница 30: ...a strong sudden rotational and downward force to loosen all the end cap screws 10 for maximum 1 4 turn c Uniformly loosen the screws 10 of the end caps 2 1 4 1 2 turns at a time in sequence as per figure 18 to relieve the pre load of the springs d Remove the o rings 14 and B port seals 16 Discard these parts Figure 18 Spring Return End Caps Removal 3 1 4 2 2 14 16 17 2 10 14 8 2 Removing Spring Ca...

Страница 31: ...l 15 17 18 19 8 4 Removing Pistons 1 Use a wrench and turn the pinion counterclockwise 180 until the pistons 3 comes out of the body 2 Remove the piston bearings 7 piston rack bearing strips 6 and piston o ring seals 13 Discard these parts Figure 21 Piston Removal 6 7 3 13 6 7 13 3 Installation Operation and Maintenance Manual DOC IOM EF EN Rev 6 September 2015 27 Section 8 Disassembly ...

Страница 32: ...Recommended circlip pliers according DIN 5254 or equal for shaft circlips Actuator size Pinion top diameter Pliers according DIN 5254 12 16 mm 0 630 A1 25 100 22 mm 0 866 A2 150 350 36 mm 1 417 A3 600 55 mm 2 165 A3 8 6 Cleaning the Body In case of maintenance use a clean dry cloth and thoroughly wipe clean and remove old grease from The inside and outside of the body including thread holes and cr...

Страница 33: ...f maintenance discard all used soft parts like O ring seals guide bands and wear strips and circlip and replace them with the parts as supplied in the repair kit In case of reconfiguration replace the parts as supplied in the conversion kit see also chapter 6 Refer to the Safety Guide for Lifting Instructions NOTICE The actuator is designed to be installed commissioned and maintained using generic...

Страница 34: ...gure 23 Table 13 Grease Instructions Part Section of part Amount of grease O rings A Completely Light film Housing Parts B Piston bore Light film C Top pinion bore Light film D Bottom pinion bore Light film Piston Parts E O ring bearing groove Light film F Rack teeth Half the teeth depth full with grease G Piston bearing Light film on outside H Piston rack bearing strip Light film Piston Parts J P...

Страница 35: ...ts mating groove on the top shaft extension and with the non sharp edge 2 towards the housing and the sharp edge 1 towards the top of the shaft Figure 24 Reassemble the pinion 12 12 4 8 11 9 8 1 2 Table 14 Recommended circlip pliers according DIN 5254 or equal for shaft circlips Actuator size Pinion top diameter Pliers according DIN 5254 12 16 mm 0 630 A1 25 100 22 mm 0 866 A2 150 350 36 mm 1 417 ...

Страница 36: ... Code CW For reverse or Spring to Open Assembly Code CC 4 Slightly push the pinion inward to engage with the pinion Ensure that smooth movement and 90 degree operation can occur without moving the pistons out of the actuator body For larger pistons use a rubber mallet and slightly hitting the pistons inward to engage with the pinion 5 When the pistons are moved 90 inwards see figure 26 check that ...

Страница 37: ...to Close Reverse Spring to Open A B A B C C A Position of cam B Position of slot and in dot in pinion C Final position of pinion dot Note When the pistons are completely moved inwards the pinion top will show a 5 over travel Installation Operation and Maintenance Manual DOC IOM EF EN Rev 6 September 2015 33 Section 9 Reassembly ...

Страница 38: ... stop face 4 Move the pistons outward until the slot in the top of the pinion is in line with the centerline of the housing 5 Screw in the left hand travel stop until it comes into contact with the pinion stop face For accurate travel stop adjustment of the actuator on the valve see section 5 9 5 Reassembly of the end caps 9 5 1 Double Acting actuators 1 Grease the O ring seals 14 and B port seals...

Страница 39: ... ft Target Min Max Target Min Max 12 M4 Allen key SW 3 1 1 0 8 1 3 0 8 0 6 1 0 25 M5 SW 4 2 0 1 6 3 0 1 5 1 2 2 2 40 M5 SW 4 2 0 1 6 3 0 1 5 1 2 2 2 65 M5 SW 4 2 0 1 6 3 0 1 5 1 2 2 2 100 M5 SW 4 2 0 1 6 3 0 1 5 1 2 2 2 150 M6 SW 5 3 3 2 6 5 1 2 4 1 9 3 8 200 M6 SW 5 3 3 2 6 5 1 2 4 1 9 3 8 350 M8 SW 6 8 4 6 7 12 2 6 2 4 9 9 0 600 M10 SW 8 15 3 12 2 24 8 11 3 9 0 18 3 950 1600 2500 4000 2 Installa...

Страница 40: ...e the spring cartridges in case of spring set conversion Before assembling the spring cartridges and end caps make sure that the pistons are completely inwards Figure 29 Spring cartridge placement 1 2 3 4 5 6 A B 1 2 3 4 5 6 1 2 3 4 5 6 1 2 3 4 5 6 1 2 3 4 5 6 1 2 3 4 5 6 A Piston top view B Position of gear rack N 10 N 20 N 30 N 40 N 50 N 60 36 September 2015 Installation Operation and Maintenanc...

Страница 41: ...s per required spring set see Figure 29 4 Tighten each end cap screw in small equal turns and in the sequence as per Figure 28 Refer to Table 13 for the correct torque We recommend to use some grease on the screws for easier fastening Figure 30 Spring return end cap assembly 3 1 4 2 2 14 16 2 10 14 10 Installation Operation and Maintenance Manual DOC IOM EF EN Rev 6 September 2015 37 Section 9 Rea...

Страница 42: ... 4 2 In case of leakage around a The limit stop bolts and or the spring package bolt at spring return models Turn the lock nut of the bolts tighter until the leakage stops b The end caps Disassemble the end caps replace o rings and reassemble c The pinion top or bottom and A or B port Disassemble the complete actuator replace o rings and reassemble Figure 31 Basic function and air leak test 3 2 A ...

Страница 43: ...te insert to one cam 22 5 Section 4 5 Pressure to low Apply pressure as per sizing Sizing is wrong Check valve torque data with actuator torque data Pinion is mounted in the wrong position Re assemble actuator Section 9 Actuator rotates valve does not No coupling between actuator shaft and valve spindle Install a coupling between actuator shaft and valve spindle Section 4 5 Actuator does not rotat...

Страница 44: ... the solenoid valve Instructions shipped with the manual override Air leakage between actuator and solenoid valve Sealing between solenoid valve and actuator is not mounted air tight Reassemble solenoid valve taking care that all seals are in place Instructions shipped with the solenoid valve Double acting actuator will only move to open position Actuator has wrong solenoid valve configuration Mou...

Страница 45: ...upply voltage is not is not the same as the voltage of the applicable solenoid valve Connect the right power supply voltage Instructions of the solenoid valve There are problems with position feedback after sending the actuator to either the Open or Closed position The wiring of the feedback signals may be switched Connect the feedback wiring in the right way Instructions of the feedback device In...

Страница 46: ... 1 Thrust washer POM black UV stabilized 10 8 End cap screw Stainless Steel 11 1 Circlip Spring steel 12 2 O ring seal pinion Nitrile rubber 13 2 O ring seal piston Nitrile rubber 14 2 O ring seal end cap Nitrile rubber 15 2 O ring seal limit stop Nitrile rubber 16 2 B port seal Silicon rubber 17 2 Limit stop screw Stainless steel 18 2 Limit stop nut Stainless steel 19 2 Limit stop washer PA66 20 ...

Страница 47: ...et during this procedure Figure A 1 Spring load removal Crush Amputaion Hazard Failure to follow instructions for removal of spring loaded actuator may result in surious personal injury WARNING 1 Depressurize the actuator completely 2 Based on the actuator size choose the correct threaded rod kit from Table A 1 3 Replace one by one each end cap screw for the threaded rod kit and turn down the adju...

Страница 48: ... 5 40 M5 140 5 5 65 M5 140 5 5 100 M5 140 5 5 150 M6 145 5 7 200 M6 145 5 7 350 M8 185 7 3 600 M10 185 7 3 950 1600 2500 4000 Figure A 2 Spring load removal rod dimensions Threaded Rod Washer Adjusting nut Holding nuts Length Thread 44 September 2015 Installation Operation and Maintenance Manual DOC IOM EF EN Rev 6 Appendix ...

Страница 49: ...ue lbf ft Thread Min Max Thread Min Max 12 F04 M6 4 5 5 0 10 24UNC 3 3 3 7 25 F03 inner pattern M5 2 0 3 0 10 24UNC 1 5 2 2 F05 outer pattern M6 4 5 5 0 1 4 20 3 3 3 7 40 65 100 F05 inner pattern M6 4 5 5 0 1 4 20 3 3 3 7 F07 outer pattern M8 10 5 12 5 5 16 18 7 7 9 2 150 200 350 F07 inner pattern M8 10 5 12 5 5 16 18 7 7 9 2 F10 outer pattern M10 21 0 24 5 3 8 16 15 5 18 1 600 F10 inner pattern M...

Страница 50: ... 10 17 16 1 17 16 1 150 M 10 17 16 1 17 16 1 200 M 12 19 18 1 19 18 1 350 M 16 24 24 600 M 20 30 30 950 1600 2500 4000 Default dimension according DIN933 standard Dimensions in brackets according ISO4017 standard Actuator size 12 is not available with limit stops Table B 5 Recommended circlip pliers according DIN 5254 or equal for shaft circlips Actuator size Pinion top diameter Pliers according D...

Страница 51: ...on TX 77065 T 1 281 477 4100 F 1 281 477 2809 Av Hollingsworth 325 Iporanga Sorocaba SP 18087 105 Brazil T 55 15 3238 3788 F 55 15 3228 3300 ASIA PACIFIC No 9 Gul Road 01 02 Singapore 629361 T 65 6501 4600 F 65 6268 0028 No 1 Lai Yuan Road Wuqing Development Area Tianjin 301700 P R China T 86 22 8212 3300 F 86 22 8212 3308 MIDDLE EAST AFRICA P O Box 17033 Dubai United Arab Emirates T 971 4 811 810...

Отзывы: