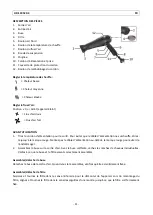
background image

- 20 - 

 
PARTS DESCRIPTION 

1.


Air outlet 

2.


Air inlet 

3.


Nozzle 

4.


Filter 

5.


Cool shot button 

6.


Heat switch 

7.


Airflow switch  

8.


Hanging loop 

9.


Handle 

10.


Power cord and plug 

11.


Cord protection cover 

12.


Cord rewinder button 

 
Heat setting:  

=

 low heat output 


= medium heat output 
 
= high heat output 


Airflow setting: 

“ 0 ”


position 

OFF


Gentle airflow 

= Strong airflow 


BEFORE USE 

1.


Pull out the power cord. To prevent the power cord from overheating, pull out until the red mark. Do not 
pull the power cord beyond the red mark to prevent damage to the power cord. 

2.


Attach the nozzle onto the air outlet. Using the hairdressing nozzle, individual sections of the hair can be 
dried by bundling the air flow. Make sure that both the nozzle and filter are correctly assembled. 


To detach/attach the nozzle 

Snap the nozzle off from the air outlet. When you place it back, make sure it is firmly connected. 

 
To detach/attach the filter 

Hold and turn the filter anti-clockwise to release it from the appliance. When assembling the filter back, align 
and turn the filter clockwise until the filter is firmly assembled. 
  

HOW TO USE THE HAIRDRYER 

1.


Make sure the airflow switch is set at the “0” position before you plug the appliance.  

2.


After connecting the power, select the desired heat and airflow to start drying or styling. Whichever the 

setting you choose, as long as you keep pressing the cool shot button, the appliance will send out cool air.  

3.


Move  the  hair  dryer  around  your  hair  and  keep  your  hair  in  a  small  distance  with  the  nozzle.  Avoid 

focusing too much heat on one area. Keep your hair away from the air inlet to prevent hair being drawn in.  

HD-119520.4                                                                                                                                                                     EN 

Содержание HD-119520.4

Страница 1: ......

Страница 2: ...1 Inhalt Teneur Obsah Content Bedienungsanleitung German 2 Mode d emploi French 8 N vod k obsluze Czech 14 Instruction manual English 18...

Страница 3: ...erungen dieser Bedienungsanleitung erfolgt verursacht wurden 1 Dieses Ger t kann von Kindern ab 8 Jahren sowie von Personen mit reduzierten physischen sensorischen oder mentalen F higkeiten oder Mange...

Страница 4: ...s kommen Es besteht Verletzungsgefahr durch Stolpern ber das Verl ngerungskabel Lassen Sie Vorsicht walten um gef hrliche Situationen zu vermeiden 8 Bevor Sie den Stecker mit der Netzsteckdose verbind...

Страница 5: ...den gewerblichen Gebrauch konzipiert 18 Verwenden Sie das Ger t nur zu seinem bestimmungsgem en Zweck 19 Wickeln Sie das Kabel nicht um das Ger t und knicken Sie es nicht 20 Halten Sie das Ger t und d...

Страница 6: ...nicht weiter als bis zur roten Markierung heraus um Besch digungen am Netzkabel zu vermeiden 2 D se auf den Luftauslass setzen Mithilfe der Stylingd se k nnen individuelle Haarstr hnen durch das B nd...

Страница 7: ...en Wenn Sie die Teile abwaschen stellen Sie sicher dass sie vor dem Befestigen komplett trocken sind Hinweis Haare oder Fussel die sich im Filter verfangen sollten regelm ig entfernt werden Wenn der F...

Страница 8: ...tsorgung zu verhindern bitte verantwortungsbewusst entsorgen um die nachhaltige Wiederverwertung von Ressourcen zu f rdern Nutzen Sie zur R ckgabe Ihres Altger ts bitte die R ckgabe und Sammelsysteme...

Страница 9: ...t tre utilis par des enfants g s de 8 ans et plus et les personnes ayant des capacit s physiques sensorielles ou mentales ou un manque d exp rience et de connaissances si elles ont t form es et encadr...

Страница 10: ...rer la fiche de l appareil dans une prise secteur v rifiez que la tension et la fr quence du secteur correspondent aux sp cifications indiqu es sur la plaque signal tique 9 D branchez la fiche lectri...

Страница 11: ...nroulez pas le cordon d alimentation autour de l appareil et ne le pliez pas 20 Veillez ce que l appareil et son cordon d alimentation ne soient pas expos s la chaleur l humidit des ar tes coupantes n...

Страница 12: ...tir Pour viter que le c ble d alimentation ne surchauffe tirez le jusqu la marque rouge Ne tirez pas le c ble d alimentation au del de la marque rouge pour viter de l endommager 2 Assemblez la buse su...

Страница 13: ...qu ils soient compl tement secs avant de les r assembler Remarque Retirez fr quemment tous les cheveux et fibres bloqu es dans le filtre Si vous ne maintenez pas le filtre propre cela peut provoquer...

Страница 14: ...s recyclez ce produit de mani re responsable afin de contribuer la r utilisation des ressources mat rielles Pour retourner votre appareil usag utilisez les syst mes de collecte et de retour ou contac...

Страница 15: ...pokud jsou dozorov ny nebo byly upozorn ny na bezpe n pou v n produktu a s t m spojen rizika 2 Tento v robek nen hra ka 3 i t n a u ivatelem prov d nou dr bu sm prov d t d ti jen pod dozorem 4 Je li p...

Страница 16: ...tahejte za kabel 13 Nedot kejte se spot ebi e pokud spadl do vody Vyt hn te z str ku z elektrick z suvky spot ebi vypn te a po lete ho na opravu do autorizovan ho z kaznick ho servisu 14 Z str ky spot...

Страница 17: ...evn n uvoln n n stavce Vyt hn te n stavec z v vodu vzduchu P i opakovan m upevn n dbejte na to aby n stavec byl pevn nasazen Upevn n uvoln n filtru Uchopte filtr a oto te proti sm ru hodinov ch ru i e...

Страница 18: ...etou z ruku na z skan spot ebi po naje dnem prodeje Z vady kter vzniknou na z klad nevhodn ho zach zen se spot ebi em a vady zp soben z sahem a opravami t et osoby nebo mont neorigin ln ch d l nejsou...

Страница 19: ...r instruction concerning use of the appliance in a safe way and understand the hazards involved 2 Children shall not play with the appliance 3 Cleaning and user maintenance shall not be made by childr...

Страница 20: ...lug socket pull the plug Do not pull the power cord 13 Do not touch the appliance if it falls into water Remove the plug from its socket turn off the appliance and send it to an authorized service cen...

Страница 21: ...filter are correctly assembled To detach attach the nozzle Snap the nozzle off from the air outlet When you place it back make sure it is firmly connected To detach attach the filter Hold and turn the...

Страница 22: ...e day of sale If you have a defective product you can directly go back to the point of purchase Defects which arise due to improper handling of the device and malfunctions due to interventions and rep...

Отзывы: