background image

- 4 - 


FN-114224                                                                                                                                                        EN 

 
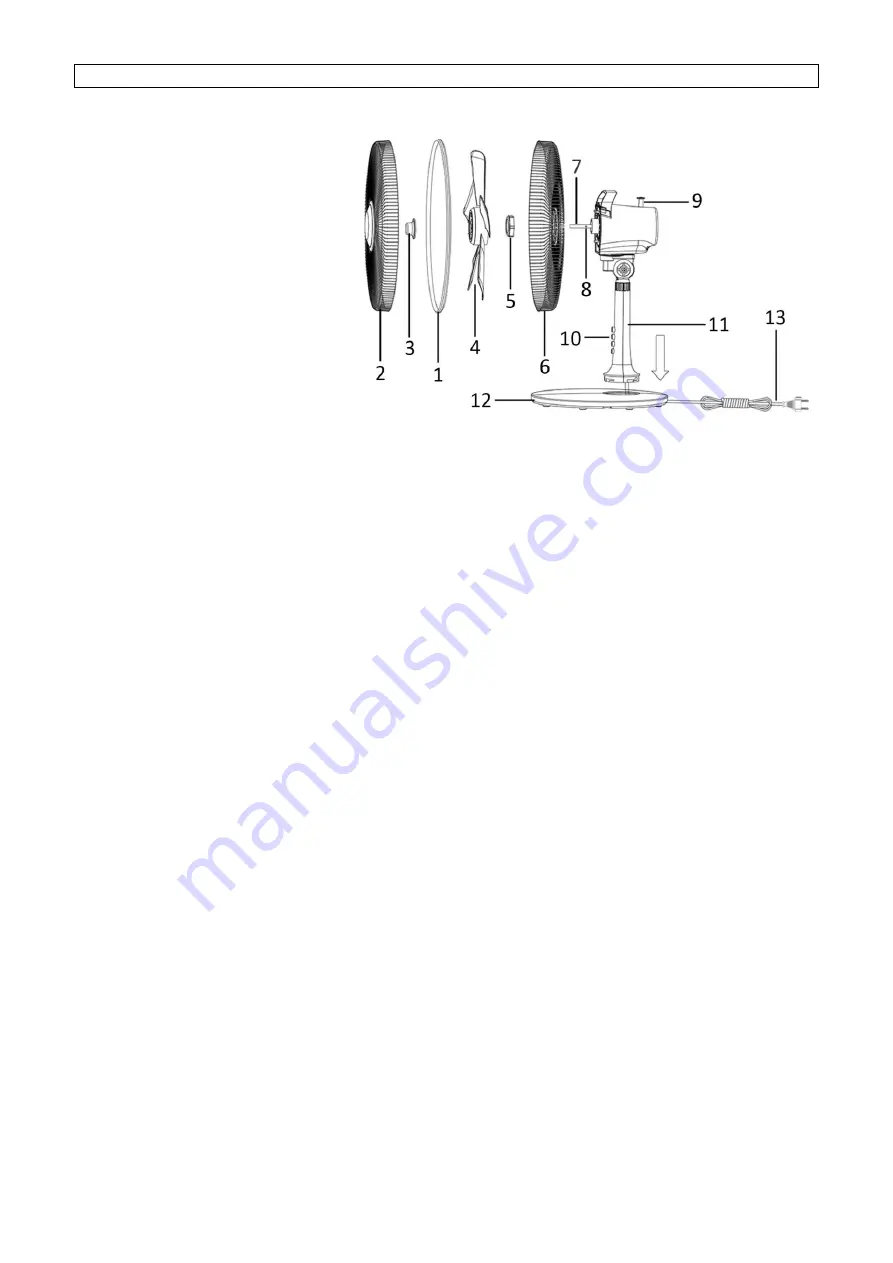
PARTS DESCRIPTION 
 
1.


Clamping ring 

2.


Front guard 

3.


Blade fastening screw 

4.


Fan blade 

5.


Guard fastening screw 

6.


Rear guard   

7.


Motor shaft   

8.


Shaft pin 

9.


Oscillation knob   

10.


Speed control buttons 

11.


Standing shaft 

12.


Standing base 

13.


Power cord 

 
ASSEMBLING INSTRUCTIONS 
1.


Base Assembly 

Put power cord (13) through the hole of standing base (12). Align the bottom of standing shaft (11) with the hole 
of standing base, turning to fix the connection. Set the power cord through the groove at the edge of standing 
base. 
 
2.


The Whole Assembly 


Remove the blade fastening screw (3) and guard fastening screw (5) from the motor shaft (7) spindle.     


Fit the rear guard (6) by positioning with the location pins. Secure the guard onto the motor body with the 
guard fastening screw (5). 


Place the fan blade (4) onto the motor shaft by matching the slot with the shaft pin (8). Fix the blade by 
tightening the blade fastening screw (3) in a counter-clockwise direction. Check that the fan blade can rotate 
freely by turning it with your hand. 


Put the front guard (2) against the rear guard (6) and fix with the clamping ring (1). Make sure the clamping 
ring is set properly at the rim of the fan guards. Tighten the screw on the clamping ring. 


OPERATING INSTRUCTIONS 
1.


Plug the power cord into a suitable socket.   

2.


Oscillation: To make the fan head oscillate, push down the oscillation knob (9). To stop the fan head from 
oscillating, pull up the oscillation knob. 

3.


The fan is switched on and off by pressing the speed control buttons, i.e. 0 = Off, 1 = Low air flow speed, 2 
= Medium air flow speed, 3 = High air flow speed. 

4.


Tilting Angles: By pushing the fan-guard, you can adjust the fan to the preferred elevation.


CAUTION: Press only one of the speed control buttons at a time. Permanent damage to the switch housing may 
result if two or more of the buttons are pressed simultaneously. 
 
CLEANING 
1.


Before servicing the fan and after each occasion of use, switch off the appliance and unplug the mains cable 
from the socket. 

2.


Never immerse the appliance in water (danger of short-circuit). To clean the appliance, only wipe it down 
with a damp cloth and dry it carefully. Always take out the mains plug first. 

Содержание FN-114224

Страница 1: ......

Страница 2: ...ntent Inhalt Teneur Innehåll Inhoud Treść Instruction manual English 2 Bedienungsanleitung German 6 Mode d emploi French 10 Bruksanvisning Swedish 14 Gebruiksaanwijzing Dutch 18 Instrukcja obsługi Polish 22 ...

Страница 3: ... lead to faults on the device and injuries to the user 6 In the event of improper use or incorrect handling no liability can be accepted for any damage that may occur 7 Do not immerse the unit or mains plug in water or other liquids There is danger to life due to electric shock However if this occurs remove the mains plug immediately and then have the unit checked by an expert before using it agai...

Страница 4: ...pliance in a dry place inaccessible to children in its packaging 18 Never put fingers or any other objects through the fan guards when the fan is running 19 Never operate the product without the fan guards in place as serious personal injury may result 20 The appliance must be assembled completely before use 21 Watch out for long hair It can be caught in the fan owing to the air turbulence 22 Do n...

Страница 5: ...ate freely by turning it with your hand Put the front guard 2 against the rear guard 6 and fix with the clamping ring 1 Make sure the clamping ring is set properly at the rim of the fan guards Tighten the screw on the clamping ring OPERATING INSTRUCTIONS 1 Plug the power cord into a suitable socket 2 Oscillation To make the fan head oscillate push down the oscillation knob 9 To stop the fan head f...

Страница 6: ...l lead to a void of warranty if this results in consequential damages then we will not be liable Neither can we hold responsible for material damage or personal injury caused by improper use if the instruction manual is not properly executed Damage to accessories does not mean free replacement of the whole appliance In such case please contact our service department Broken glass or breakage of pla...

Страница 7: ...ich qualifizierte Person ersetzt werden um Gefährdungen zu vermeiden 5 Falsche Bedienung und unsachgemäße Handhabung können zu Störungen am Gerät und zu Verletzungen des Benutzers führen 6 Es kann keine Haftung für mögliche Schäden übernommen werden die durch unsachgemäßen Gebrauch oder falsche Handhabung verursacht werden 7 Tauchen Sie das Gerät und den Netzstecker nicht in Wasser oder andere Flü...

Страница 8: ... während es sich im Betrieb befindet 16 Lagern oder verwenden Sie das Gerät nicht im Freien 17 Bewahren Sie das Gerät an einem trockenen Ort und außerhalb der Reichweite von Kindern in seiner Verpackung auf 18 Führen Sie niemals Finger oder andere Objekte durch die Schutzgitter des Ventilators während dieser sich im Betrieb befindet 19 Benutzen Sie das Gerät niemals solange die Schutzgitter des Ve...

Страница 9: ...ügelrads die Befestigungsschraube 3 gegen den Uhrzeigersinn festschrauben Das Lüfterrad mit der Hand drehen um zu kontrollieren ob es sich ungehindert dreht Den vorderen Lüfterschutz 2 auf den Lüfterschutz hinten 6 setzen und mit dem Spannring 1 fixieren Achten Sie darauf dass der Spannring korrekt auf dem Rand der Schutzabdeckungen des Ventilators sitzt Die Schraube am Spannring anziehen BEDIENUN...

Страница 10: ...ewahren ohne Quittung wird jegliche Garantie ausgeschlossen Bei Schäden durch Nichteinhalten der Bedienungsanleitung erlischt die Garantie Wir sind für daraus resultierende Folgeschäden nicht haftbar Für Materialschäden oder Verletzungen aufgrund falscher Anwendung oder Nichtbefolgen der Sicherheitshinweise sind wir nicht haftbar Schäden an den Zubehörteilen bedeutet nicht dass das gesamte Gerät k...

Страница 11: ...d accident 5 Une mauvaise utilisation et un mauvais maniement peuvent causer des dysfonctionnements de l appareil et des dommages corporels aux utilisateurs 6 En cas de mauvaise utilisation ou de manipulation inappropriée aucune garantie ne peut être assumée pour les dommages éventuels 7 N immergez pas l appareil son cordon secteur ou sa prise dans l eau ou dans tout autre liquide Il y a un risque...

Страница 12: ... ranger ou utiliser l appareil à l extérieur 17 Conserver l appareil dans un endroit sec hors de la portée des enfants dans son emballage 18 Ne jamais placer les doigts ou autres objets à travers les grilles grilles de protection lorsque le ventilateur fonctionne 19 Ne jamais utiliser le produit sans que les grilles grilles de protection ne soient en place ceci pouvant entraî ner des blessures cor...

Страница 13: ...si l hélice du ventilateur tourne librement en la faisant tourner à la main Placez la grille avant 2 contre la grille arrière 6 et fixez les avec l anneau de fixation 1 Vérifiez que l anneau de fixation est correctement positionné sur le bord des grilles Vissez la vis de l anneau de fixation CONSIGNES D UTILISATION 1 Branchez le câble d alimentation dans une prise secteur appropriée 2 Oscillation ...

Страница 14: ... de garantie Les dommages causés par le non respect des instructions de ce manuel rendront la garantie caduque Nous décline toute responsabilité en cas de dommages indirects Nous décline toute responsabilité en cas de dégâts matériels ou de dommages corporels causés par une utilisation inappropriée ou si les instructions de sécurité n ont pas été convenablement observées Si les accessoires sont en...

Страница 15: ... på apparaten och personskador 6 Tillverkaren ansvarar inte för skador som är en följd av felanvändning 7 Doppa aldrig apparaten eller elkontakten i vatten eller någon annan vätska Det är livsfarligt på grund att det kan orsaka elektrisk stöt Om detta ändå skulle hända dra genast ut stickkontakten ur vägguttaget och låt en fackman undersöka enheten innan den används igen 8 Använd inte apparaten om...

Страница 16: ...kten på en torr plats utom räckhåll för barn i sin förpackning 18 Stick aldrig in fingrar eller något annat föremål genom gallret fläktskyddet när fläkten roterar 19 Använd aldrig produkten utan gallren fläktskydden på plats eftersom det kan orsaka allvarlig personskada 20 Produkten måste monteras helt innan den får användas 21 Se upp om du har långt hår Det kan fastna i fläkten på grund av lufttu...

Страница 17: ...ra fläktbladet genom att dra åt fläktbladets fästskruv 3 i moturs riktning Kontrollera att fläktbladet kan vridas fritt genom att rotera det med handen Placera det främre skyddet 2 mot det bakre skyddet 6 och fixera med klämringen 1 Se till att klämringen är korrekt placerad vid kanten på fläktskydden Dra åt skruven på klämringen ANVÄNDNINGSINSTRUKTIONER 1 Anslut strömkabeln till ett lämpligt elut...

Страница 18: ...ljs ogiltigförklarar garantin och om detta leder till påföljande skador så kan inte vi hållas ansvariga Vi kan inte hållas ansvariga för materiella skador eller personskador som orsakas av felaktig användning eller om inte säkerhetsföreskrifterna följs Skador på tillbehören innebär inte per automatik ersättning av hela apparaten I sådana fall ska du kontakta vår kundservice Trasigt glas och trasig...

Страница 19: ... het toestel beschadigen en verwondingen toebrengen aan de gebruiker 6 Als het toestel fout bediend of ongepast behandeld wordt kan de producent niet aansprakelijk gesteld worden voor schade die zich kan voordoen 7 Dompel het toestel of de stekker niet onder in water of andere vloeistoffen Elektrische schokken zijn levensgevaarlijk Als het toestel of de stekker in water ondergedompeld is neem onmi...

Страница 20: ...lucht en gebruik het niet buitenshuis 17 Bewaar het toestel op een droge plaats ontoegankelijk voor kinderen in zijn verpakking 18 Steek uw vingers of andere voorwerpen niet door de beschermingsroosters van de ventilator als de ventilator aan het werken is 19 Gebruik het toestel nooit zonder de beschermingsroosters van de ventilator aangezien dit ernstige persoonlijke verwondingen kan veroorzaken ...

Страница 21: ...t ventilatorblad door de vastzetschroef van het ventilatorblad 3 tegen de klok in vast te draaien Controleer of het ventilatorblad ongehinderd kan ronddraaien met behulp van uw hand Plaats het voorrooster 2 tegen het achterrooster 6 en maak vast met de klemring 1 Zorg dat de klemring juist over de rand van de roosters is aangebracht Draai de schroef op de klemring vast GEBRUIKSWIJZE 1 Steek de ste...

Страница 22: ...n van de gebruiksaanwijzing vervalt het recht op garantie Voor vervolgschade die hieruit ontstaat kunnen wij niet verantwoordelijk gehouden worden Voor materiële schade of persoonlijk letsel veroorzaakt door ondeskundig gebruik of het niet opvolgen van de veiligheidsvoorschriften zijn wij niet aansprakelijk In dergelijke gevallen vervalt iedere aanspraak op garantie Schade aan accessoires of onder...

Страница 23: ...walifikowaną osobę celem uniknięcia niebezpieczeństwa 5 Nieprawidłowe używanie lub obchodzenie się może prowadzić do awarii urządzenia oraz obrażeń użytkownika 6 W przypadku nieprawidłowego używania lub nieprawidłowego obchodzenia się nie będzie akceptowana żadna odpowiedzialność za uszkodzenia które mogą wystąpić 7 Nie zanurzaj urządzenia ani wtyczki w wodzie lub innych cieczach Może dojść do zag...

Страница 24: ...i 15 Nigdy nie zostawiać urządzenia bez nadzoru podczas użytkowania 16 Nie przechowuj i nie obsługuj urządzenia na otwartym powietrzu 17 Trzymaj urządzenie w suchym miejscu niedostępnym dla dzieci w opakowaniu 18 Nigdy nie wkładaj palców lub innych przedmiotów przez osłonę wiatraka gdy jest on włączony 19 Nigdy nie włączaj produktu gdy osłony wentylatora nie są zamontowane gdyż może to skutkować p...

Страница 25: ... łopatki dokręcając śrubę mocującą 3 w kierunku przeciwnym do ruchu wskazówek zegara Upewnić się że łopatki wentylatora obracają się swobodnie obracając je dłonią Nałożyć osłonę przednią 2 na osłonę tylną 6 i zamocować pierścieniem zaciskowym 1 Upewnić się że pierścień zaciskowy jest ustawiony w prawidłowej pozycji na obręczy osłon wentylatora Dokręcić śrubę na pierścieniu zaciskowym INSTRUKCJA UŻ...

Страница 26: ...óry jest jedyną podstawą złożenia roszczenia gwarancyjnego Producent nie ponosi odpowiedzialności za uszkodzenia powstałe w wyniku nieprzestrzegania instrukcji obsługi Powoduje to unieważnienie gwarancji Producent nie ponosi odpowiedzialności za szkody materiałowe ani obrażenia ciała spowodowane niewłaściwą obsługą urządzenia i nieprzestrzeganiem instrukcji obsługi Uszkodzenie akcesoriów nie oznac...

Страница 27: ...nt standard for service value IEC 60879 1986 corr 1992 EN 60704 1 2010 EN 60704 2 7 2007 EN 50564 2011 Contact details for obtaining more information Emerio Deutschland GmbH Höfferweg 14 51519 Odenthal Germany Satisfies the requirement of the Council Directives COMMISSION REGULATION EU No 206 2012 of 6 March 2012 and Amending COMMISSION REGULATION EU 2016 2282 implementing Directive 2009 125 EC of...

Страница 28: ... Serviceverhältnisses IEC 60879 1986 corr 1992 EN 60704 1 2010 EN 60704 2 7 2007 EN 50564 2011 Kontaktadresse für weitere Informationen Emerio Deutschland GmbH Höfferweg 14 51519 Odenthal Germany Erfüllt die Anforderung der Richtlinien des Rates VERORDNUNG EU Nr 206 2012 DER KOMMISSION vom 6 März 2012 und Anpassung der VERORDNUNG EU 2016 2282 DER KOMMISSION zur Durchführung der Richtlinie 2009 125...

Страница 29: ...a valeur de service IEC 60879 1986 corr 1992 EN 60704 1 2010 EN 60704 2 7 2007 EN 50564 2011 Coordonnées de contact pour tout complément d information Emerio Deutschland GmbH Höfferweg 14 51519 Odenthal Germany Satisfait aux exigences des Directives du Conseil Règlement UE n 206 2012 de la Commission du 6 mars 2012 et amendé par le règlement UE n 2016 2282 de la Commission portant application de l...

Страница 30: ...ätstandard för servicevärde IEC 60879 1986 corr 1992 EN 60704 1 2010 EN 60704 2 7 2007 EN 50564 2011 Kontaktinformation för att erhålla ytterligare information Emerio Deutschland GmbH Höfferweg 14 51519 Odenthal Germany Uppfyller kraven i EU rådets direktiv KOMMISSIONENS FÖ RORDNING EU nr 206 2012 från 6 mars 2012 och ändring av KOMMISSIONENS FÖ RORDNING EU 2016 2282 för genomförande av Europaparl...

Страница 31: ...r sec Meetstandaard voor servicewaarde IEC 60879 1986 corr 1992 EN 60704 1 2010 EN 60704 2 7 2007 EN 50564 2011 Contactgegevens voor meer informatie Emerio Deutschland GmbH Höfferweg 14 51519 Odenthal Germany Voldoet aan de eisen van de Richtlijnen van de raad VERORDENING EU Nr 206 2012 VAN DE COMMISSIE van 6 maart 2012 en VERORDENING TOT WIJZIGING EU 2016 2282 VAN DE COMMISSIE ter uitvoering van ...

Страница 32: ... c 2 09 metry sek Standard pomiaru dla wartości serwisowej IEC 60879 1986 corr 1992 EN 60704 1 2010 EN 60704 2 7 2007 EN 50564 2011 Dane kontaktowe na potrzeby uzyskania dalszych informacji Emerio Deutschland GmbH Höfferweg 14 51519 Odenthal Germany Spełnia wymagania określone w następujących dyrektywach Rady ROZPORZĄDZENIE KOMISJI UE nr 206 2012 z dnia 6 marca 2012 r oraz zmieniające je ROZPORZĄD...

Отзывы: