background image

Using Your eMachines Flat-Panel Monitor

10

Ergonomic guidelines

The recommended screen positioning is based upon the following guildelines. These guidelines 
are based on available scientific literature and published standards.

Screen height

The recommended screen height for displays (except in special circumstances, such as for bifocal 
use) is that the top of the display should be set at or slightly below (about 1 inch or 25 mm) your 
eye level while you are sitting in a comfortable working posture. This guideline places the center 
of the screen at an ideal 15° to 20° viewing angle for most desktop displays. If the display has 
multiple users, the screen height should be easily adjustable to accommodate each user’s height 
and preference.

Screen tilt

The screen should be tilted so your line of sight is perpendicular to the screen. This angle creates 
the most consistent viewing distance when scanning from the top of the screen to the bottom. 
You may need to adjust lighting to avoid screen glare when the screen is tilted upward.

Screen distance from user

The screen should first be placed at arm’s length from the user, then adjusted back and forth to 
suit individual preference.

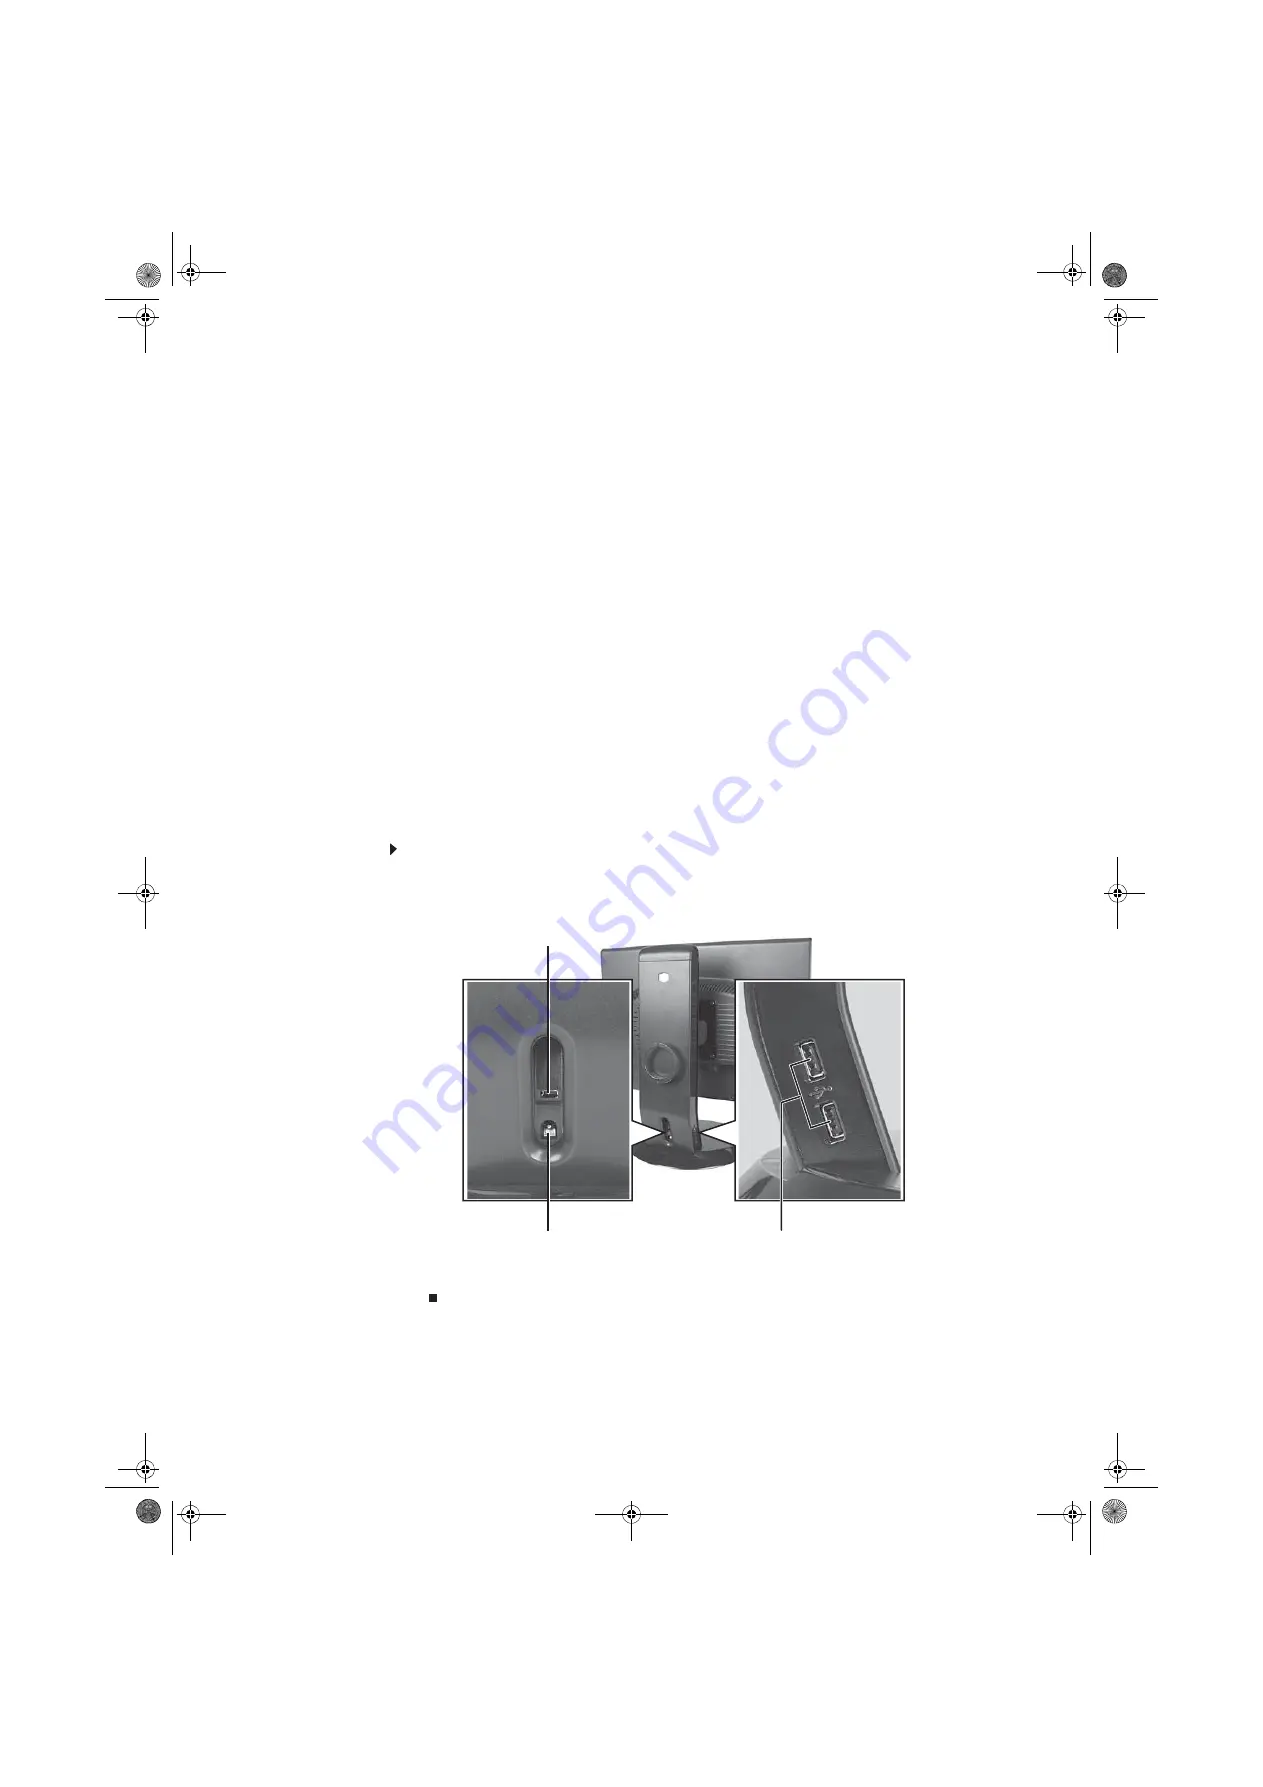
Connecting the USB hub

The optional USB stand has a built-in, 4-port, USB 2.0 hub. To use these USB ports, you need to 
connect the hub to a power outlet and to your computer.

To connect your USB stand’s built-in USB hub:


1

Plug the included USB cable into the USB In port on the back of your USB stand and into a 
USB 2.0 port on your computer. If you connect the stand to a USB 1.1 port on your computer, 
the stand’s USB hub operates in USB 1.1 mode (much slower than USB 2.0).

2

To provide full power to your stand’s USB ports (recommended), connect the AC power 
adapter to the power connector on the back of your USB stand and into an AC power outlet.

USB In port

Power connector

USB 2.0 ports

8512327.book  Page 10  Thursday, May 10, 2007  3:45 PM

Содержание E22T6W

Страница 1: ...Flat Panel Monitor User Guide 8512327 book Page a Thursday May 10 2007 3 45 PM ...

Страница 2: ...8512327 book Page b Thursday May 10 2007 3 45 PM ...

Страница 3: ... 13 Using the eTouch menu buttons 13 Using the shortcut menu 13 Using the main menu 14 Changing Windows screen settings 16 Changing color depth and screen resolution 16 Power management 17 Energy declaration 17 Maintaining 17 Troubleshooting 18 No power 18 No picture 18 Display colors are wrong 18 Picture has shadows or ghosts 19 Color is not uniform 19 Image is not sized or centered correctly 19 ...

Страница 4: ...Contents ii 8512327 book Page ii Thursday May 10 2007 3 45 PM ...

Страница 5: ...onnecting the monitor Setting up the optional stand Setting up the optional speaker bar Starting the monitor Adjusting monitor settings Changing Windows screen settings Power management Maintaining Troubleshooting Specifications 8512327 book Page 1 Thursday May 10 2007 3 45 PM ...

Страница 6: ...one numbers see the label on the back of your monitor Connecting the monitor To set up the monitor first attach the base then make your cable connections Attaching the base To attach the base 1 Slide the monitor s neck onto the base 2 Place the monitor face down on a stable soft non marring surface A non slip mat on a tabletop is ideal Let the monitor neck hang down over the edge of the table 8512...

Страница 7: ...ector DVI connect a DVI video cable not included to the white connector under the back of the display You can buy a DVI video cable from www gateway com OR Tip When using the optional speaker bar described in Setting up the optional speaker bar on page 11 we recommend that you use the included right angle VGA cable for the video connection so the speaker bar does not obstruct the cable If you are ...

Страница 8: ...eo cable to the matching video port on the back of your computer Connecting power To connect power 1 Position your monitor so you can reach the back then connect the power cord to the power connector under the back of the monitor 2 Plug the power cord into a correctly grounded power outlet We recommend using a surge protector to protect your monitor from voltage spikes 8512327 book Page 4 Thursday...

Страница 9: ...nd from www gateway com The stand can be adjusted for height tilt and screen rotation When the stand is connected to your computer s USB port you can connect up to four USB devices to the USB 2 0 ports on the stand To attach the adjustable stand 1 Make sure that the monitor is turned off 2 Place the monitor face down on a stable soft non marring surface A non slip mat on a tabletop is ideal Let th...

Страница 10: ...he LCD panel Save the four screws 5 Slide the adjustable stand s neck onto the base 6 Tighten the thumbscrew under the base with your fingers or a flat screwdriver under the base to secure the neck into place Screw Screw Screw Screw Thumbscrew 8512327 book Page 6 Thursday May 10 2007 3 45 PM ...

Страница 11: ...ever to the left and hold it then remove the bracket from the stand 8 Attach the bracket to the LCD panel using the four screws you removed previously 9 Slide the neck s bracket slot onto the bracket s mounting tab Screws Screws 8512327 book Page 7 Thursday May 10 2007 3 45 PM ...

Страница 12: ...ght for your monitor However if it does not stay in place when you let go you need to change the stand s height tension You also need to adjust the stand if the amounts of force required to raise and lower the monitor are not equal To adjust your monitor s height tension 1 Press the screwdriver access hole cap from below the base to remove it from the base Screwdriver access cap 8512327 book Page ...

Страница 13: ...correct for your size of monitor 4 Adjust the height tension screw so the raising and lowering forces are equal After the forces are equalized turn the tension screw clockwise two to four turns to slightly decrease the lifting tension 5 For optimum viewing adjust the height so the top of the monitor is about 1 inch 2 5 cm below eye level Adjusting monitor tilt tension To adjust your monitor s tilt...

Страница 14: ...st consistent viewing distance when scanning from the top of the screen to the bottom You may need to adjust lighting to avoid screen glare when the screen is tilted upward Screen distance from user The screen should first be placed at arm s length from the user then adjusted back and forth to suit individual preference Connecting the USB hub The optional USB stand has a built in 4 port USB 2 0 hu...

Страница 15: ...r bar s headphone green and microphone pink cables to your computer s headphone and microphone jacks 5 If your computer is not already on turn it on Tip When using the optional speaker bar we recommend that you use the included right angle VGA cable for the video connection so the speaker bar does not obstruct the cable If you are using a DVI connection you can order a right angle DVI cable from w...

Страница 16: ...ot detected for several seconds the power LED changes from blue on to orange standby 2 Turn on your computer Allow about 10 seconds for the display image to appear If the power LED is orange or you do not see a display image check the connections For more troubleshooting information see Troubleshooting on page 18 3 Adjust the tilt of the monitor for the best viewing angle 4 Use the on screen displ...

Страница 17: ...he functionality of the touch buttons depends on the menu that is currently open The shortcut menu lets you quickly change some of the most commonly accessed settings The main menu lets you precisely adjust all available settings Using the shortcut menu To use the shortcut menu 1 Touch the Menu button on the front of your monitor The rest of the button icons appear and the shortcut menu opens Tip ...

Страница 18: ...tor The rest of the button icons light up and the shortcut menu opens 2 To use a button lightly touch its icon For adjusting a setting s values you can touch and hold the buttons as you would press and hold conventional buttons 3 Touch Main Menu The main menu opens 4 Touch the Previous and Next buttons to highlight a setting then touch Select to open the selected menu or setting The on screen butt...

Страница 19: ...r 4 3 Available only in VGA mode Geometry menu available only in VGA mode H Position Moves the display image left and right You can also press the Auto button to configure the horizontal position automatically V Position Moves the display image up and down You can also press the Auto button to configure the vertical position automatically Clock Minimizes any vertical bars or stripes visible on the...

Страница 20: ...puter uses to display images on your monitor The higher the resolution the more information and screen components such as icons and menu bars can be displayed on the monitor To change the color depth or screen resolution 1 Click Start Control Panel then under Appearance and Personalization click Adjust Screen Resolution The Display Settings dialog box opens 2 To change the color depth click the Co...

Страница 21: ...rol Panel The Control Panel window opens If your Control Panel is in Category View click Performance and Maintenance 2 Click Hardware and Sound then click Power Options 3 Click Choose when to turn off the display on the left side of the window click the list of times next to Turn off the display then click on a time delay to select it 4 Click Save Changes Your settings are saved Maintaining To kee...

Страница 22: ...t lets you toggle between your notebook s display an externally attached display and both at the same time See your notebook s user guide for more information If the power LED is orange Make sure that your computer is turned on Move the mouse or press any key on the keyboard to bring the monitor out of sleep mode Restart your computer with the monitor turned on Make sure that the video cable is no...

Страница 23: ...ettings see Changing color depth and screen resolution on page 16 If you are trying to select 1680 1050 but it is not available in the Windows display control panel Make sure that your video card can display at 1680 1050 resolution This may be caused by older video drivers on your computer See the eMachines support Web site www emachines com for updated video drivers for your computer You can also...

Страница 24: ...s are made correctly and the speaker bar is on but there is still no sound Your headphone speaker jack may have been muted using Windows sound controls To check your headphone speaker mute settings click the speaker icon in the Windows taskbar or click Start Control Panel Sounds and Audio Devices the Volume tab then click Advanced For optimum volume control using the speaker bar we recommend that ...

Страница 25: ...Italian Spanish Japanese Dutch Connections and inputs Analog VGA 15 pin mini d sub VGA Digital DVI D 24 pin DVD D supports 480p 720p and 1080i Includes HDCP High bandwidth Digital Content Protection AC power input Included cables 15 pin mini d sub analog VGA right angle Power Power consumption Normal operation 50 W Standby mode 2 W Off 1 W Power input 100 240 VAC 50 60 Hz built in power supply Cer...

Страница 26: ... Hz Available in DVI mode 1 720 400 31 469 70 Y 2 640 480 31 469 60 Y 3 640 480 37 9 72 N 4 640 480 37 5 75 N 5 800 600 35 1 56 Y 6 800 600 37 879 60 Y 7 800 600 48 1 72 N 8 800 600 46 875 75 N 9 1024 768 48 363 60 Y 10 1024 768 56 5 70 N 11 1024 768 60 023 75 N 12 1152 864 67 5 75 N 13 1280 1024 64 60 Y 14 1280 1024 80 75 N 15 1440 900 55 935 60 Y 16 1440 900 70 635 75 N 17 1680 1050 65 29 60 Y 8...

Страница 27: ...Appendix A 23 Legal Notices Important safety information Environmental information Regulatory compliance statements Notices 8512327 book Page 23 Thursday May 10 2007 3 45 PM ...

Страница 28: ...on cord does not exceed the extension cord ampere rating If your system is fitted with a TV Tuner cable or satellite receiver card make sure that the antenna or cable system is electrically grounded to provide some protection against voltage surges and buildup of static charges Care during use Do not walk on the power cord or allow anything to rest on it Do not spill anything on the system The bes...

Страница 29: ...posing of or recycling used batteries properly With your help we can reduce the amount of natural resources needed to produce electrical and electronic equipment minimize the use of landfills for the disposal of end of life products and generally improve our quality of life by ensuring that potentially hazardous substances are not released into the environment and are disposed of properly For addi...

Страница 30: ...y form without prior consent in writing from Gateway The information in this manual has been carefully checked and is believed to be accurate However changes are made periodically These changes are incorporated in newer publication editions Gateway may improve and or change products described in this publication at any time Due to continuing system improvements Gateway is not responsible for inacc...

Страница 31: ...8512327 book Page 27 Thursday May 10 2007 3 45 PM ...

Страница 32: ...MAN E22T6W USR GDE R0 5 07 8512327 book Page 28 Thursday May 10 2007 3 45 PM ...

Отзывы: