background image

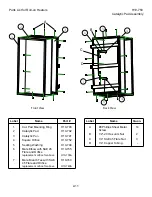
Parts List for Roll-on Heaters

H-X-118T

Wall Mount Open Flame Heater

A1

Label

Name

Part #

1

Open Flame Heater - Basic

(see page A7)

H700/900-XH

2

Dog Legs

H10-107

3

Heater to Wall Bracket

H10-104

4

Upper Wall Bracket

H10-105

5

Lower Wall Bracket

H500-17

Label

Name

Quan.

A

3/4” 3/8”-16 Flanged Hex 

Head Bolt

6

B

1/2” Washer

2

C

1/2” Wing Nut

2

Decal - LP Use Instructions

HD-08

A

B

C

A

6

Owners Manual

HD-32

2

1

3

4

5

6

Содержание H-CAT-700

Страница 1: ...Revision B Printed 2009 Elston Manufacturing CAT 700 and CAT 900 Owners Manual ...

Страница 2: ...ht Doesn t Light 8 Problem B Pilot Light Does Not Create a Hot Spot on the Catalytic Pad 9 Problem C Catalytic Pad Never Gets Hot When Lighting Heater 9 Problem D Catalytic Pad Takes a Long Time to Get to Full Temperature 10 Problem E Heater Goes Out After Running at Least 30 Minutes 11 Problem F Flames are Visible after Pilot Light is Extinguished 11 5 Installation 12 5 1 Overview 12 5 2 Unpackin...

Страница 3: ...times be made to save a load bypassing any safety device may result in fire or explosion For your safety do not temporarily bypass any safety equipment and if you do please fix these temporary measures as quickly as possible Warning Exhaust Gases Do not operate the heater while the trailer is in an enclosed area This heater like all heaters that run on fossil fuel produces exhaust containing carbo...

Страница 4: ...0 stores two 20 or 30lb propane bottles Specifications CAT 700 Model H CAT Dimensions 17 in wide x 76 in tall x 17 in deep Weight w o propane tank 190 lbs Rating 18 000 BTU Tank Storage 1 20lb vapor withdrawal propane tank Fuel Requirement propane vapor LP gas Fuel Consumption 0 7 lbs hr max Hours of Operation with full tank 24 hours minimum Range of Thermostat 50 90 F Specifications CAT 900 Model...

Страница 5: ...look inside the base of a CAT 900 heater you will see the major components shown below in Illustration 2 The CAT 700 has very similar components except it lacks the tank selection and pressure indicator and the tank clamp is a different design 2 Illustration 1 Operating Controls Illustration 2 CAT 900 Base ...

Страница 6: ...spark igniter in once a second until the pilot light ignites If the pilot light does not ignite within 15 seconds release the red knob on the brass valve to stop the flow of gas 4 Wait for the catalytic pad by the pilot light to warm up Wait approximately one minute until a dull red glow appears on the catalytic pad near the pilot flame 5 Push down main control dial and wait for warm area on catal...

Страница 7: ... longer be possible to grab the handle at the top and pivot the heater unto the wheels without meeting resistance from the wall bracket After that slide the heater left or right as necessary so that you can slide the bracket with the wing nuts at the top of the heater into the bracket on the wall Once that bracket is in position tighten the wing nuts to finish securing the heater to the wall Adjus...

Страница 8: ...remove all debris present 2 Check fuel system and turn on propane Check that the propane tank s are not empty and are securely mounted in the base of the heater Check that the fittings between the propane tank s and the heater are tight and undamaged Turn on the valve on the propane tank s 3 Set the thermostat to the maximum value and main control dial to PILOT 4 Light the pilot light Push and hol...

Страница 9: ... catalytic pad The heater should not be used if any flames are visible 9 Set the heater to the desired temperature and secure into the trailer Set the heater to the desired temperature HI is approximately 90 while LO is approximately 50 Secure the heater into the trailer and place the vent tube through the hole in the floor 6 ...

Страница 10: ...that the heater is securely attached to the wall of the trailer and the vent tube is installed through a hole in the floor 3 3 Annually Before the Start of the Winter Season Carefully inspect the propane tank regulator and fuel lines Replace any damaged or deteriorated hoses worn o rings and tighten any loose fittings Check the propane system for leaks Replace any labels that are missing or can no...

Страница 11: ...nk is not empty If you have a CAT 900 check that the tank selection lever is pointing toward a non empty tank When the lever is pointing toward a tank and the valve for that tank is on you should see green in the window on the regulator when the selected tank contains propane Cause Excess flow valve was triggered If the valve on the tank is opened quickly the initial pulse of gas into the gas line...

Страница 12: ...te The pilot light can hit the plate but at least half the flame must touch the pad If more than this portion of the pilot light hits the thermocouple plate loosen the two screw attaching the pilot light assembly and move it to the correct location When retightening the assembly into place make sure that the sparker is more than 1 4 from the frame of the catalytic pad to prevent the spark from jum...

Страница 13: ... pilot light Check that the selection lever is pointing toward a full tank and tank valve is open at least a full turn If you have the tools check that the heater is receiving 11 water column of propane vapor throughout the lighting process Problem D Catalytic Pad Takes a Long Time to Get to Full Temperature Cause Catalytic pad was not sufficiently prewarmed earlier in the lighting process If the ...

Страница 14: ...the pad may be worn out and unable to remain hot enough when the heater is on standby A worn out pad will be nearly white and needs to be replaced Cause The thermocouple is out of position If the thermocouple is more than a 1 8 from the catalytic pad or tilted at an angle more than a few degrees the thermocouple may not remain hot enough when the heater is on standby to allow gas to flow through t...

Страница 15: ...eater unless you have personal knowledge and experience in these areas These instructions were written with the latest standards for the US in mind and are intended to guide you in an installation that meets these standards At the time of writing the latest standard was the 2008 edition of NFPA 58 the Liquefied Petroleum Gas Code and part 393 77 of the Federal Motor Carrier Safety Administration r...

Страница 16: ...trength in a position where the hole for the vent tube will not have to be drilled through one of the supports for the trailer floor Make sure the bracket is firmed attached to wall so that you would reasonable expect the bracket to bend before pulling the screw or bolts out of the wall Install the upper bracket centered above the lower bracket at the location shown in Illustration 3 for your mode...

Страница 17: ...e space to open the door in the base to access the tank shutoff values and allow removal and replacement of the tanks It is also recommended that a X 850 ventilator be mounted on the trailer for proper ventilation Give the installation one final check to make sure nothing has been forgotten or improperly completed If everything looks good the heater is ready to be test fired For instructions on fi...

Страница 18: ...ic Heater top portion of heater H700 900 CIA A10 Inner Assembly for Basic Catalytic Heater H10 715 A11 Catalytic Pad Assembly H700 900 CCP A12 Control Panel Assembly for Basic Catalytic Heater H700 BC A13 Bottle Carrier for CAT 700 H900 BC A14 Bottle Carrier for CAT 900 H700 RA A15 Regulator Assembly for CAT 700 H900 RA A15 Regulator Assembly for CAT 900 15 ...

Страница 19: ...eater Basic see page A7 H700 900 XH 2 Dog Legs H10 107 3 Heater to Wall Bracket H10 104 4 Upper Wall Bracket H10 105 5 Lower Wall Bracket H500 17 Label Name Quan A 3 4 3 8 16 Flanged Hex Head Bolt 6 B 1 2 Washer 2 C 1 2 Wing Nut 2 Decal LP Use Instructions HD 08 A B C A 6 Owners Manual HD 32 2 1 3 4 5 6 ...
Страница 20: ... page A13 H700 BC 3 Heater to Wall Bracket H10 104 4 Upper Wall Bracket H10 105 5 Lower Wall Bracket H10 135 Label Name Quan A 3 4 3 8 16 Flanged Hex Head Bolt 4 B 5 8 5 16 18 Flanged Hex Head Bolt 3 E 1 2 1 4 20 Flanged Hex Head Bolt 4 F 1 2 Washer 2 G 1 2 Wing Nut 2 Owners Manual HD 34 A B E F G 6 Handles H10 470 C 5 16 Flat Washer 3 D 5 16 18 Hex Nut 3 1 2 3 5 4 6 C D ...

Страница 21: ...page A14 H900 BC 3 Heater to Wall Bracket H10 104 4 Upper Wall Bracket H10 105 5 Lower Wall Bracket H10 135 Label Name Quan A 3 4 3 8 16 Flanged Hex Head Bolt 4 B 5 8 5 16 18 Flanged Hex Head Bolt 3 E 1 2 1 4 20 Flanged Hex Head Bolt 4 F 1 2 Washer 2 G 1 2 Wing Nut 2 A B E F G 6 Handles H10 470 Owners Manual HD 34 C 5 16 Flat Washer 3 D 5 16 18 Hex Nut 3 1 2 3 5 4 6 C D ...

Страница 22: ...ater Basic see page A9 H700 900 CH 2 Dog Legs H10 107 3 Heater to Wall Bracket H10 104 4 Upper Wall Bracket H10 105 5 Lower Wall Bracket H500 17 Label Name Quan A 3 4 3 8 16 Flanged Hex Head Bolt 6 B 1 2 Washer 2 C 1 2 Wing Nut 2 Decal LP Use Instructions HD 08 A B C A 6 Owners Manual HD 33 2 1 3 4 5 6 ...

Страница 23: ... page A13 H700 BC 3 Heater to Wall Bracket H10 104 4 Upper Wall Bracket H10 105 5 Lower Wall Bracket H10 135 Label Name Quan A 3 4 3 8 16 Flanged Hex Head Bolt 4 B 5 8 5 16 18 Flanged Hex Head Bolt 3 E 1 2 1 4 20 Flanged Hex Head Bolt 4 F 1 2 Washer 2 G 1 2 Wing Nut 2 Owners Manual HD 35 A B E F G 6 Handles H10 470 C 5 16 Flat Washer 3 D 5 16 18 Hex Nut 3 1 2 3 5 4 6 C D ...

Страница 24: ...page A14 H900 BC 3 Heater to Wall Bracket H10 104 4 Upper Wall Bracket H10 105 5 Lower Wall Bracket H10 135 Label Name Quan A 3 4 3 8 16 Flanged Hex Head Bolt 4 B 5 8 5 16 18 Flanged Hex Head Bolt 3 E 1 2 1 4 20 Flanged Hex Head Bolt 4 F 1 2 Washer 2 G 1 2 Wing Nut 2 A B E F G 6 Handles H10 470 Owners Manual HD 35 C 5 16 Flat Washer 3 D 5 16 18 Hex Nut 3 1 2 3 5 4 6 C D ...

Страница 25: ...ame Quan A 3 4 3 8 16 Flanged Hex Head Bolt 2 B 3 4 1 4 20 Flanged Hex Head Bolt 3 C 8 Sheet Metal Screw 8 D 8 Washer 8 A B C 5 Door w Hinge H10 111 D 6 Door Latch H10 111 7 Service Decal inside of door HD 09 8 Decal Turn off Propane HD 14 9 Decal Must be Vented HD 19 10 Decal Flammables HD 03 11 Decal Do Not Load Above HD 02 1 2 4 3 5 6 7 8 9 10 6 11 13 12 Label Name Part 12 Product of Elston Dec...

Страница 26: ...1 4 Plastic Clip 2 A 6 Orifice H10 41 7 Air Adjustment Disc H10 42 8 Orifice Holder Bracket H10 44 9 Spark Ignition Bracket H10 703 10 Ignitor w Nut H100 13 11 Pilot Light with Spark Probe H10 705 12 Thermocouple H500 13 13 14 Pilot Light Mounting Brkt H10 716 LP Gas Hose not shown H10 303 1 4 Formed Tubing 5 to 12 H10 39A A F 1 2 10 24 Sheet Metal Screw 2 10 Washer 2 H 10 Lock Washer 4 I 3 8 Bras...

Страница 27: ... 8 16 Flanged Hex Head Bolt 2 B 3 4 1 4 20 Flanged Hex Head Bolt 3 C 8 Sheet Metal Screw 8 D 8 Washer 8 A B C 5 Door w Hinge H10 111 D 6 Door Latch H10 111 7 Service Decal inside of door HD 09 8 Decal Turn off Propane HD 14 9 Decal Must be Vented HD 19 10 Decal Meets Requirements HD 01 12 Decal Do Not Load Above HD 02 11 Decal No Flame Visible HD 06 1 2 4 3 5 6 7 8 9 10 6 12 14 13 Label Name Part ...

Страница 28: ...abel Name Part 2 Heat Pick up Shield H10 718 3 Catalytic Pad Holder Assembly see page A11 H10 750 1 Control Panel Assembly see page A12 H700 900 CCP 4 Control Heat Shield H10 718B Label Name Quan A 3 4 1 4 20 Flanged Hex Head Bolt 4 B 1 2 1 4 20 Flanged Hex Head Bolt 6 A B 2 1 3 4 B ...

Страница 29: ...10 752 5 Sealing Washing H10 794 Label Name Quan A 8 Phillips Sheet Metal Screw 14 B 1 2 20 Hex Jam Nut 2 C 1 4 SAE 45 Flare Nut 3 D 1 4 Copper Tubing C D 6 Male Elbow with SAE 45 Flare and Orifice replacement orifice for above H10 735 H10 735A B 7 Male Branch Tee with SAE 45 Flare and Orifice replacement orifice for above H10 740 H10 740A 1 5 4 Front View Back View 2 6 3 7 5 4 A ...

Страница 30: ...Elbow Compression Fitting 2 F A C L M N 3 Standby Orifice H10 500A 8 Thermocouple w Plate H10 725 6 Thermocouple Mnt Bracket H10 712 1 4 Aluminum Tube from 3 to D on top of control 2 H10 714 Hose Assembly attaches to A H10 302 E G 9 Pilot Light Mnt Bracket H10 715 F 3 8 to 1 8 NPT Bushing 1 G 2 3 4 3 8 16 Flanged Hex Head Bolt H 1 4 Plastic Cable Clamp 4 I 1 2 8 32 Machine Screw 4 J 8 Lock Washer ...

Страница 31: ...e H10 137 7 Wheel H10 130 Label Name Quan A 3 4 1 4 20 Flanged Hex Head Bolt 5 B 1 2 Flat Washer and Hair Pin Clip 2 C 1 2 10 24 Hex Head Machine Screw 2 D 10 Lock Washer 2 E 10 24 Hex Nut 2 A B C D E 11 Bottle Hold Down Clip H10 26 8 Wheel Spacer H10 129 10 Decal Open Bottle Slowly HD 07 5 Decal Vent Tube HD 18 4 Compression Latch H10 478 9 Axle H10 128 12 Bottle Hold Spring H10 21 10 2 3 7 9 8 4...

Страница 32: ...e Quan A 3 4 1 4 20 Flanged Hex Head Bolt 6 B 1 2 Flat Washer 1 C 1 2 Lock Washer 1 E 2 1 2 1 2 13 Hex Head Bolt 2 I 1 2 10 24 Hex Head Machine Screw 2 A B F 7 Bottle Hold Down Bracket H10 817 6 Threaded Rod Assembly H10 820 8 1 2 Butterfly Nut H10 630 9 Decal Vent Tube HD 18 11 Decal Open Bottle Slowly HD 07 10 1 2 x 7 Vent Hose H10 137 F 1 2 13 Nylon Lock Nut 2 D 1 2 13 Hex Nut 1 G 10 24 Hex Nut...

Страница 33: ...H10 625 8 Regulator Mounting Brkt H10 482 Label Name Quan H 1 4 Street Elbow 1 Label Name Quan A 1 4 Male Elbow w 45 Flare for 3 8 Tube 1 B 1 4 NPT Bulkhead Fitting 1 C 3 4 14 Hex Jam Nut 2 D 3 4 Internal Lock Washer 1 E 3 8 to 1 4 Hex Nipple 1 F 1 4 45 Street Elbow 1 G 1 4 Female Elbow 1 E E G 2 3 4 7 B C D H I G 5 6 4 A 8 J I 1 4 Male Connector Inverted Flare 2 J 1 4 Male Elbow w 45 Flare 1 A 1 ...

Страница 34: ... found to be defective as referenced above will be corrected as referenced in the previous paragraph at no charge for parts provided by original factory or labor but will include freight paid by buyer Failure to use original factory parts voids this warranty Elston Manufacturing Inc products received by Elston Manufacturing Inc after one 1 year from original shipment date to customer will be corre...

Страница 35: ...ELSTON MANUFACTURING INC 706 N Weber Sioux Falls SD 57103 1 800 845 1385 www elstonmfg com ...

Отзывы: