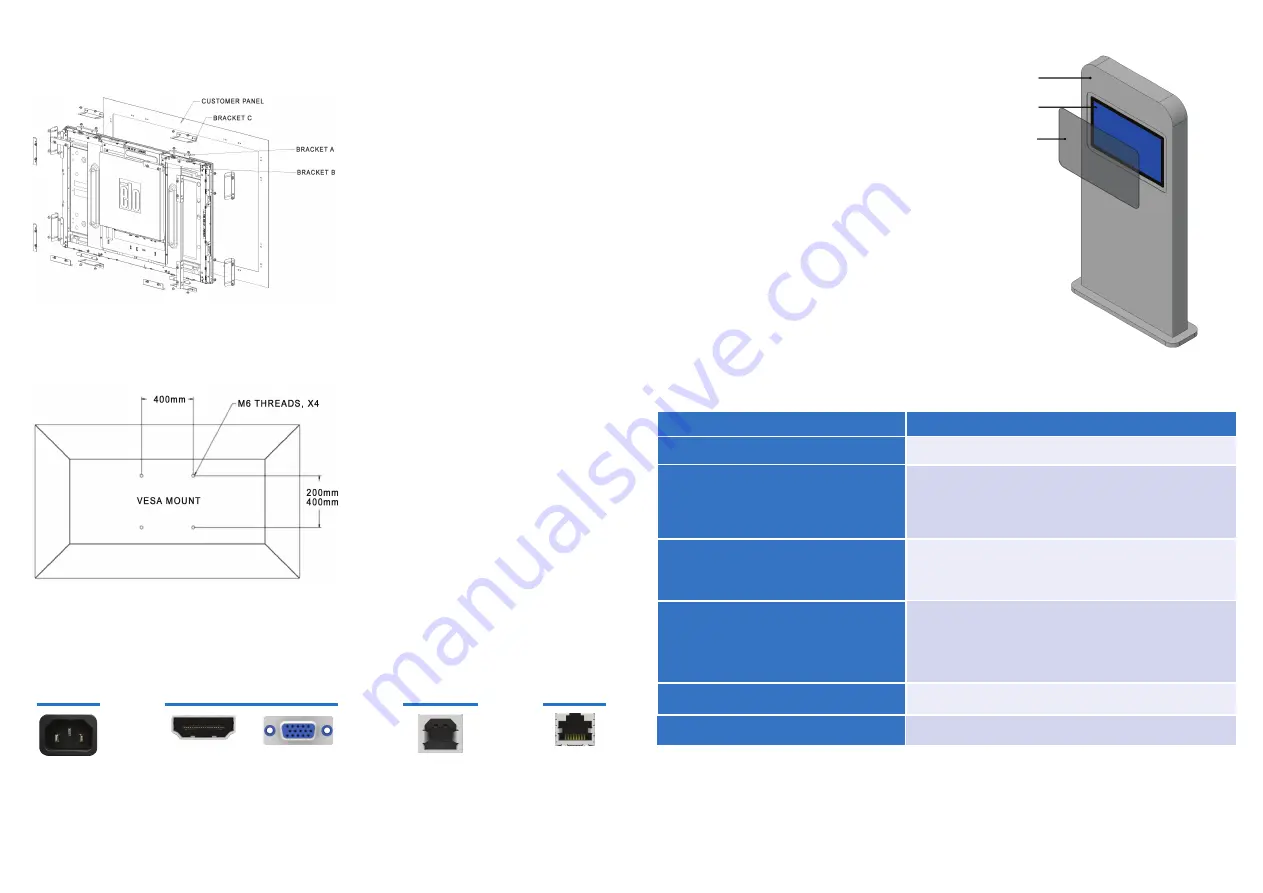
Flush Mount
Bracket shape and quantity varies for each model,
drawing for illustration purposes only.
1. Attach bracket “A” to touchscreen monitor (all four
sides) with M4 screws (included).
2. Attach bracket “C” to customer panel (all four
sides).
3. Attach bracket “B” to bracket “C” on all four sides
with M4 screws (included).
4. Adjust depth of bracket “B” so monitor is flush with
customer panel.
5. Place touchscreen monitor into customer panel
opening.
6. Secure touchscreen monitor to bracket “B” from
behind with M4 screws (included).
Rear VESA Mount
A VESA-compliant mounting pattern for M6 screws is
provided on the rear of the monitor. Pattern varies for
each model. Drawing is for illustration purposes only.
See dimensional drawing for details.
The VESA FDMI-compliant mounting is coded VESA
MIS-F.
Power
Video
Touch
Cover Glass Installation
Elo Open Frame PCAP Touchscreens support protective cover
glass. Cover glass must be installed with no air gap to
the Touchscreen glass. Touch Thru mode must be
enabled to use cover glass.
To enable Touch Thru mode:
1. Press the Menu button on the unit’s tethered OSD
Remote.
2. Navigate to Miscellaneous -> Touch -> Touch Thru.
3. Set to “On”.
4. Add cover glass on top of touchscreen.
5. Power cycle the monitor.
If the cover glass is later removed, this feature should be
set to “Off” and the monitor power cycled for the
touchscreen to work correctly.
OSD
Problem
Troubleshooting
Monitor display is dim
Enclosure
Open Frame
Touchscreen
Cover Glass
- Check that there are no loose cable connections.
Monitor image looks strange or is displaying
an "Out of Range" message
- Adjust your computer’s resolution/timing mode to be within the
allowable timing ranges specified for your touchscreen display.
- Use the Auto Adjust function in the OSD.
- Verify your PC has the latest Elo drivers installed.
- Perform the calibration routine provided with the Elo drivers.
- If the OSD buttons or power button does not respond, check to
see if the OSD lock or power lock functions is on.
Touch functionality doesn’t work
- Check to see if the OSD Touch on Sleep function is disabled.
Can’t wake on touch
- Check to see if the OSD Touch Thru function is on.
Only supports two touches at a time
HDMI
VGA
OR
- If the Power Status LED is blinking, the monitor or Computer
Module maybe in Sleep mode. Press any key / move the mouse
/ touch the touchscreen to see if the image reappears.
- Use the OSD to increase the brightness &/or contrast.
Monitor display is blank


