background image

A-19

A

P P E N D I X

A

C

HAPTER

 4

T

OUCH

 T

ECHNOLOGY

Touchscreens: An Overview

Typically, users communicate with computers by using a mouse, a keyboard, or 
a combination of the two. Users who are not keyboard-literate or mouse-savvy 
can become frustrated with how long human-to-computer interactions take. 

Computer literacy is learned. This is complicated by the fact that using a 
keyboard or a mouse is neither intuitive nor natural for most people. 
Touchscreens cut out the learning curve by eliminating keyboard/mouse 
intermediaries and allowing a natural flow of information to develop between a 
user and a computer.

When a user wants to access information or perform a function on a computer 
with a touchscreen installed, a touch quickly and accurately does the job that 
once required complicated keyboard interactions or precise mouse movements. 

A frustrating experience with a computer during a transaction can create 
dissatisfaction for your customer. Touchscreens help eliminate unpleasant 
transactions by creating a natural flow of information that enhances your 
product or service. Touchscreens speed up user/computer interactions. People 
get what they want faster and are more satisfied with the process.

Содержание Entuitive 2125C Series

Страница 1: ......

Страница 2: ...User Guide Elo Entuitive 2125C Desktop Touchmonitor Revision A P N 008544 ET2125C Series Models Elo TouchSystems Inc 1 800 ELO TOUCH www elotouch com ...

Страница 3: ...presentations or warranties with respect to the contents hereof and specifically disclaims any implied warranties of merchantability or fitness for a particular purpose Elo TouchSystems reserves the right to revise this publication and to make changes from time to time in the content hereof with out obligation of Elo TouchSystems to notify any person of such revisions or changes Trademark Acknowle...

Страница 4: ...iv ...

Страница 5: ... 11 Touchmonitor Controls 12 Using the On Screen Display OSD 12 Brightness 13 Contrast 13 Locking Unlocking the OSD Functions 13 OSD Adjustments 14 Chapter 4 Troubleshooting 17 Monitor Warning Messages 18 Appendix A Touch Technology 19 Touchscreens An Overview 19 IntelliTouch Touchscreens 20 AccuTouch Touchscreens 21 Appendix B Touchmonitor Safety 23 Care and Handling of Your Touchmonitor 24 Regul...

Страница 6: ...vi Copyright 1996 Borland International All rights reserved BORLAND CONFIDENTIAL September 21 2001 9 10 am D Vera new 8544 21 inch Hyundai CRT UG 21inch Hyundai CRTTOC fm ...

Страница 7: ...nd maintenance as recommended in this user s manual to maximize the life of your unit See Appendix B for more information on touchmonitor safety About the Product Your CRT touchmonitor is a color display with the following features 20 inch viewable image 0 25mm dot pitch CDT Supports a widerange of screen refresh rates with flicker free picture quality Plug and Play functionality automatically adj...

Страница 8: ...1 2 E l o E n t u i t i v e T o u c h m o n i t o r U s e r G u i d e ...

Страница 9: ...ouchSystems driver software Unpacking Your Touchmonitor Check that the following 9 items are present and in good condition Quick Installation Guide User s Guide CD Software Base Monitor power cable US Canada User s Guide Quick Install Guide and TouchTools CD ROM Serial touchscreen cable European power cable Video cable CRT Touchmonitor ...

Страница 10: ...turn the touchmonitor right side up Selecting a Suitable Location Place the monitor at least 12 inches from other electrical or heat emitting equipment and allow at least 4 inches on each side for ventilation Place the monitor in a position where no light shines or is reflected directly on the screen To reduce eye strain avoid installing the display unit against a bright background such as a windo...

Страница 11: ...ore connecting the cables to your touchmonitor and PC be sure that the computer and touchmonitor are turned off 1 Connect one end of the video cable to the video connector on your PC and the other end of the cable to the video connector on your monitor Secure the cable by turning the screws on the connector Video cable ...

Страница 12: ...to the AC connector on your touchmonitor To protect your equipment against risk of damage from electrical surges in the power line plug the touchmonitor s power cord into a surge protector and then connect the surge protector to a grounded three pronged AC electrical outlet Video cable Power cable ...

Страница 13: ...propriate port on the back of your PC Connect the other end of the cable to the touchscreen connector on your touchmonitor The touchscreen cable connectors should fit snugly into the connectors on your touchmonitor and PC Video cable Power cable Touchscreen cable ...

Страница 14: ...ter s CD ROM drive to install the appropriate touchscreen driver software Follow the directions starting on the next page to install the driver software Installing the Driver Software Elo TouchSystems provides driver software that allows your touchmonitor to work with your computer Drivers are located on the enclosed CD ROM for the following operating systems Windows 2000 Windows Me Windows 98 Win...

Страница 15: ...utomatically detects the CD and starts the setup program 2 Follow the directions on the screen to complete the driver setup for your version of Windows If the AutoStart feature is not active 1 Click Start Run 2 Click the Browse button to locate the EloCd exe program on the CD ROM 3 Click Open then OK to run EloCd exe 4 Follow the directions on the screen to complete the driver setup for your versi...

Страница 16: ...ministrator access rights to install the driver 1 Insert the Elo CD ROM in your computer s CD ROM drive 2 If the AutoStart feature for your CD ROM drive is active the system automatically detects the CD and starts the setup program 3 Follow the directions on the screen to complete the driver setup for your version of Windows If the AutoStart feature is not active 1 Click Start Run 2 Click the Brow...

Страница 17: ...et your requirements by following the directions in this chapter All adjustments you make to the controls are automatically memorized so you do not need to reset your choices every time you unplug your touchmonitor or power it off and on If there is a power failure your touchmonitor settings will not default to the factory specifications IMPORTANT Do not remove the CRT touchmonitor cover The touch...

Страница 18: ...e top of the menu for your information 2 Push the or button to choose the item you want to adjust The selected item is highlighted 3 Push the SELECT button to adjust the highlighted item 4 Push the or button to adjust the selection 5 Push the SELECT button to return to the previous menu if you are in a submenu The display unit automatically saves the new settings in 3 to 4 seconds after your last ...

Страница 19: ... the power button The factory OSD menu window will appear 3 Use the or button to select the OL option 4 Press the Select button to highlight the Locked option on the menu 5 Press the power button to turn the monitor off then turn it back on To unlock the OSD functions 1 Press the power button to turn the monitor off 2 Press the power button on and press the Menu key for 2 or 3 seconds or until you...

Страница 20: ...owed to the right or the left you can correct the pin cushion balance by using this adjustment V Moire Clears vertical moire if a series of concentric circles or arcs appear on your screen H Moire Clears horizontal moire if a series of concentric circles or arcs appear on your screen Top Corner If the top corner sides of the picture curve in or bulge out you can correct the top corner distortion b...

Страница 21: ...djustment OSD H Position Adjusts the OSD menu s horizontal position on the screen OSD V Position Adjusts the OSD menu s vertical position on the screen Color Control Color temperature affects the tint of the image With lower color temperature the image turns reddish and with higher temperatures bluish There are three color setting available 9300K 6500K or USER With the USER setting you can set ind...

Страница 22: ...stortion or discoloration in the picture Demagnetizing takes place automatically when the display unit is switched on and the unit normally maintains faultless color purity during operation If you have tilted swiveled or moved the display unit you can perform demagnetization During the process the picture is distorted for a few seconds After demagnetization the color impurities have disappeared if...

Страница 23: ... enter power management mode The video signal from the computer does not comply with VESA DPMS standard Either the computer or the graphics adapter is not using the VESA DPMS power management function Screen flickers The screen may seem to flicker when the refresh rate is less than 75Hz See the list of recommended modes in Appendix C page 27 Color defects If your color is not uniform degauss the t...

Страница 24: ...sure the touchscreen cable is securely attached at both ends Message Suggestion Error message OUT OF RANGE The graphics adapter is set for a refresh rate or a line frequency that is too high Select another display mode with lower frequencies as directed by your video card vendor Self diagnostics message NO SIGNAL This message indicates that the signal is missing or faulty Check that the signal cab...

Страница 25: ...oard mouse intermediaries and allowing a natural flow of information to develop between a user and a computer When a user wants to access information or perform a function on a computer with a touchscreen installed a touch quickly and accurately does the job that once required complicated keyboard interactions or precise mouse movements A frustrating experience with a computer during a transaction...

Страница 26: ...sitive to pressure For example a customer in a department store could scroll through a product catalog by increasing or decreasing pressure on an icon IntelliTouch s pressure sensitivity increases the intuitive nature of a user touchscreen interaction by allowing for increased selectivity An IntelliTouch touchscreen is a great choice for point of information or public access applications such as t...

Страница 27: ...even a credit card and you ll receive a fast accurate response every time The surface of an AccuTouch touchscreen is scratch resistant and can withstand spills and other types of wear and tear that often occur in heavy usage environments An AccuTouch touchscreen is best used for clerk or employee activated applications such as Industrial process control Medical equipment Point of sale terminals Tr...

Страница 28: ...A 22 E l o E n t u i t i v e T o u c h m o n i t o r U s e r G u i d e ...

Страница 29: ...nding power cord The power cord plug will only fit into a three pronged safety ground outlet Do not attempt to fit the plug into an outlet that has not been configured for this purpose Do not use a damaged power cord Use only the power cord that comes with your Elo TouchSystems touchmonitor Use of an unauthorized power cord may invalidate your warranty 3 The slots located on the sides and top of t...

Страница 30: ...nit from the power outlet before cleaning Do not use alcohol methyl ethyl or isopropyl or any strong dissolvent Do not use thinner or benzene abrasive cleaners or compressed air To clean display unit cabinet use a cloth lightly dampened with a mild detergent Avoid getting liquids inside your touchmonitor If liquid does get inside have a qualified service technician check it before you power it on ...

Страница 31: ...g the equipment to mains power contact a qualified electrician or the manufacturer Emissions and Immunity Information A Notice to Users in the United States This equipment has been tested and found to comply with Part 15 Class B of FCC Rules for digital devices These limits are designed to provide reasonable protection against harmful interference in a resi dential installation This equipment gene...

Страница 32: ...s equipment is causing the interference try to correct the interference by using one or more of the following measures i Move the digital device away from the affected receiver ii Reposition turn the digital device with respect to the affected receiver iii Reorient the affected receiver s antenna iv Plug the digital device into a different AC outlet so the digital device and the receiver are on di...

Страница 33: ...orizontal 30 107kHz Vertical 50 150Hz Maximum Video Input Bandwidth 261 MHz Display Area Factory Setting approx 380mm x 285mm Input Signal R G B Analog 15 pin D sub BNC optional Input Voltage 100 240 VAC 3 0A Display Colors Analog input unlimited colors Power Consumption 120 watts typical Power Management Compliant with VESA DPMS signaling method Plug and Play Compatibility Compliant with VESA DDC...

Страница 34: ...MATION DEGAUSS BRIGHTNESS CONTRAST Safety Regulations UL cUL DHHS TÜVGS EMI TCO95 FCC Class B FCC Class A for models without touch controllers CE Ergonomics ZH1 618 10 80 DIN EN 2941 3 1993 ISO DIS 9241 7 8 1986 Anti glare screens Part 7 class 1 Clear screens Part 7 class 3 Monitor Dimensions 500mm W x 495mm H x 484mm D Net Weight without touchscreen 13 7kg unpacked 16 7kg packed Ambient Temperatu...

Страница 35: ...esolution All measurements made using USAF 1951 Resolution Chart under 30X magnification with test unit located approximately 1 5 in 38 mm from surface of resolution chart Clear surface Excellent with no noticeable degradation Antiglare surface 6 1 minimum Gloss per ASTM D2457 using a 60 degree gloss meter Clear surface N A Antiglare surface Curved 60 20 gloss units or 75 15 gloss units Environmen...

Страница 36: ...cal Light Transmission per ASTM D1003 Typically 75 at 550 nm wavelength visible light spectrum Visual Resolution All measurements made using USAF 1951 Resolution Chart under 30 X magnification with test unit located approximately 1 5 in 38 mm from surface of resolution chart Clear surface N A Antiglare surface 6 1 minimum Haze per ASTM D1003 Clear surface Less than 1 5 Antiglare surface Less than ...

Страница 37: ...C 31 21 CRT Touchmonitor Dimensions 500 mm 19 7 406 4 mm 16 433 mm 17 304 8 mm 17 484 5 mm 19 495 3 mm 19 5 275 mm 10 8 ...

Страница 38: ...C 32 E l o E n t u i t i v e T o u c h m o n i t o r U s e r G u i d e 70 mm 2 75 484 5 mm 19 ...

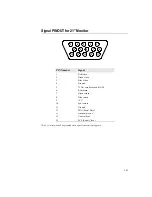
Страница 39: ...tor is plugged in PIN Number Signal 1 Red video 2 Green video 3 Blue video 4 Ground 5 VGA card detection GND 6 Red return 7 Green return 8 Blue return 9 5 V 10 Sync return 11 Ground 12 SDA Serial Data 13 Horizontal Sync 14 Vertical Sync 15 SCL Serial Clock 1 2 3 4 5 7 6 8 10 9 11 13 12 15 14 ...

Страница 40: ...onforms to the Display Power Management System DPMS power down signaling method approved by the Video Electronics Standard Association VESA NOTE The power button does not disconnect the display unit from the mains The only way to isolate the display unit completely from the mains supply is to unplug the mains cable 21 Monitor Mode LED Power consumption W Normal Green 120 Standby Green Orange blink...

Страница 41: ...click on Display 3 Click the Settings tab 4 Click the Advanced button 5 Click on Adapter and select 85 Hz from the list 6 Click on Apply to set the selected value No Resolution Horizontal Frequency Refresh Rate 1 720x400 31 5 kHz 70 Hz 2 640x480 31 5 kHz 60 Hz 3 640x480 63 7 kHz 120 Hz 4 800x600 53 7 kHz 85 Hz 5 1152x864 67 5 kHz 75 Hz 6 1024x768 68 7 kHz 85 Hz 7 1024x768 81 8 kHz 100 Hz 8 1280x10...

Страница 42: ...C 36 E l o E n t u i t i v e T o u c h m o n i t o r U s e r G u i d e ...

Страница 43: ...ve Product and verification by Seller that the Product fails to meet the warranty set forth above Seller shall correct such failure by at Seller s options either i modifying or repairing the Product or ii replacing the Product Such modification repair or replacement and the return shipment of the Product with minimum insurance to Buyer shall be at Seller s expense Buyer shall bear the risk of loss...

Страница 44: ...g the compliance of Buyer s use of the Products with applicable laws regulations codes and standards Buyer retains and accepts full responsibility for all warranty and other claims relating to or arising from Buyer s products which include or incorporate Products or components manufactured or supplied by Seller Buyer is solely responsible for any and all representations and warranties regarding th...

Страница 45: ...y 14 Horizontal Moire 14 Horizontal Position 14 Horizontal Size 14 Humidity 28 I Information 15 Input Signal 27 Input Voltage 27 Installing the Base 4 Installing the Driver Software 8 Installing the Serial Touch Driver for Windows 2000 Me 95 98 and NT 4 0 9 Installing the USB Touch Driver for Windows 2000 Windows Me and Windows 98 9 IntelliTouch Touchmonitor Specifications 29 IntelliTouch Touchscr...

Страница 46: ...blems 17 Surface Durability 29 30 T Technical Specifications 27 Touch Activation Force 29 30 Touchmonitor Controls 12 Touchmonitor Safety 23 Touchmonitor Specifications 27 Touchpoint Density 29 30 Touchscreens An Overview 19 Trapezoid 14 Troubleshooting 17 U Unpacking Your Touchmonitor 3 Using the On Screen Display OSD 12 V Vertical convergence 15 Vertical linearity 14 Vertical Moire 14 Vertical P...

Страница 47: ......

Отзывы: