background image

AMM170TK2/AMM17TK2/AMM18TK2/AMM19TK2/AMM19TK2(HB) 


5

Quick Setup (Macintosh)
Please Read Carefully When Setting Up Your New Monitor

1. Set your Macintosh Adapter on pages 23 and 24.
2. Push the “

APPLE

” icon on the upper left corn and execute Control Panel->

Monitors&Sound.  Select “

Thousands

” for the Color Depth, Select

 “1280X1024, 60Hz,

70Hz, 72Hz or 75Hz” 

for the Resolution.  (60Hz recommended)

*

On some Apple G3 or newer systems, you may not need to use the Macintosh Adapter.

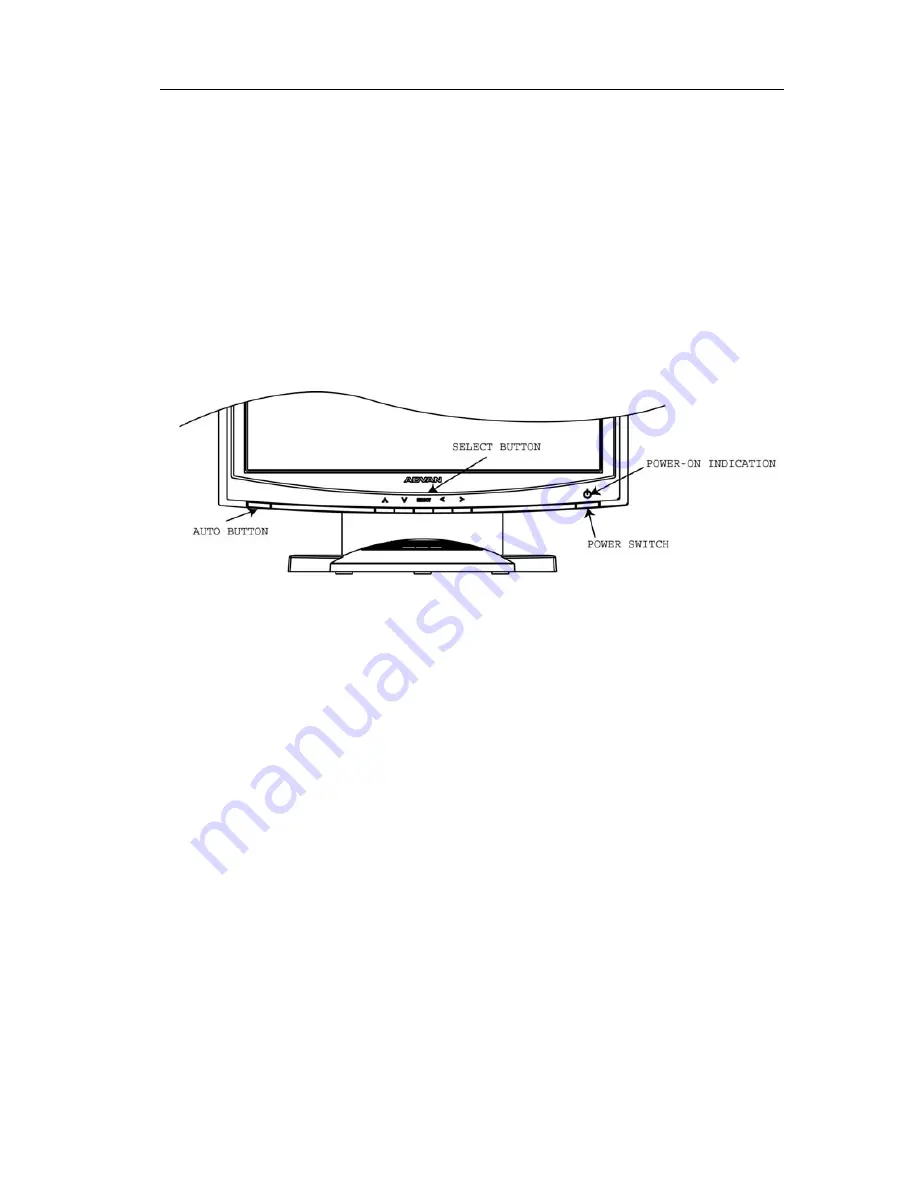
Screen Adjustment Procedure

1. Press the “

AUTO

” button on the monitor.

Содержание AMM170TK2

Страница 1: ...c t a h t s e s u a c e l b i s s o p s t n e i t a p e h t o t e g a m a d y t r e p o r p N O I T U A C f o s r e s u e h t m r o f n i o t d e s u s i N O I T U A C e l t i t e h T h g u o h t l a...

Страница 2: ...r Video and Image Back 18 Connecting with Video Equipment 18 User Controls 19 OSD Screen Basic Section VGA 20 OSD Screen Basic Section DVI 22 OSD Screen Basic Section C Video or S Video 24 OSD Functio...

Страница 3: ...95 98 ME or 2000 press right button on a Mouse to execute the Pop up menu 2 Press Properties to execute the Display Properties 3 Press Setting and change the resolution to 1280 x 1024 4 Press Apply o...

Страница 4: ...uency information To change the resolution to its factory recommended preset 1 On a Windows NT 4 0 press right button on a Mouse to execute the Pop up menu 2 Press Properties to execute the Display Pr...

Страница 5: ...ages 23 and 24 2 Push the APPLE icon on the upper left corn and execute Control Panel Monitors Sound Select Thousands for the Color Depth Select 1280X1024 60Hz 70Hz 72Hz or 75Hz for the Resolution 60H...

Страница 6: ...ronment utilizing numerous ergonomic mounting solutions to allow creative use in conjunction to product application The monitor is able to properly function even in case of upgrade video cards or soft...

Страница 7: ...e you will need to ship or transport the monitor in future AMM170TK2 AMM17TK2 AMM18TK2 AMM19TK2orAMM19TK2 HBLCD Monitor and two video cable 1 VGA HDDB15 cable 1 DVI D cable AC Power cord AC Adapter Co...

Страница 8: ...perating room complies with the applicable IEC and CE requirements Warning Federal law United States ofAmerica restricts this device to use by or on order of a physician TheADVAN Int l CorpAMM170TK2 A...

Страница 9: ...al before assembling or connecting the camera 12 Do not place the monitor or any other heavy object on the power cord Damage to the cable can cause fire or electirc shock 13 Monitor with power supply...

Страница 10: ...or shock 14 The unit is designed for operation in a horizontal position Never operate the unit in a vertical position 15 Keep the unit away from equipment with strong magnets i e a large loudspeaker...

Страница 11: ...AMM170TK2 AMM17TK2 AMM18TK2 AMM19TK2 AMM19TK2 HB 11 Symbol Definitions IPX1 Degrees of protection against the ingress of water...

Страница 12: ...vection ithasnofan For optimum performance do not block the cooling vents Whileunpackingthemonitor inspectitandotherpackagecontentsforshipping damage that could cause a fire or shock hazard Immediatel...

Страница 13: ...N ADJUSTMENT In order to optimize the best viewing position you can adjust the tilt of the monitor by using both of your hands to hold the edges of the monitor as shown in the figure below The moni to...

Страница 14: ...ratch to the screen as screen is fragile CLEANING YOUR MONITOR No specific liquid or chemical necessary when cleaning this LCD monitor However we suggest to clean the monitor with non abrasive cloths...

Страница 15: ...7 85 22 1152 x 864 67 5 75 23 1280 x 960 60 60 24 1280x1024 63 9 60 25 1280x1024 79 75 PRESET MODES To reduce the need for adjustment for different modes the monitor has default setting modes that ar...

Страница 16: ...off mode when the vertical and horizontal sync signals are off for about 10 seconds In this mode the screen goes off and the power LED blinks for 1 seconds On and 1 second Off The screen is displayed...

Страница 17: ...into the AC Adapter and the other end to AC power outlet 4 Then turn the computer on and then the monitor 5 If the monitor still does not function properly please refer to the troubleshooting section...

Страница 18: ...mposite video plug one end of a BNC cable into the video out port on the video equipment then connect the other end to the monitor video input port 4 For S video plug one end of the S video cable into...

Страница 19: ...nt To increase the brightness directly when OSD menu is not activated 7 Right To decrease the value of the parameter in the OSD you have selected for adjustment To increase the brightness directly whe...

Страница 20: ...al then push Select Use Left or Right button to adjust Push Up or Down button to select between OSD Hor Pos OSD Ver Pos OSD Background or User Timeout then push Select Use Left or Right button to adju...

Страница 21: ...tton to execute Information Push the select button to execute the Zoom function Push Up or Down button to select between Analog RGB Digital RGB Composite Video or Super Video Use Left or Right to choo...

Страница 22: ...er Timeout then push Select Use Left or Right button to adjust Push Up or Down button to select between DPMS Auto Source Select or Freeze Frame then push Select Use Left or Right button to adjust Push...

Страница 23: ...to execute Information Push Up or Down button to select between Analog RGB Digital RGB Composite Video or Super Video Use Left or Right to choose the correct mode then push Select button OSD Scren Bas...

Страница 24: ...or User Timeout then push Select Use Left or Right button to adjust Push Select button then Up or Down Push Left or Right button to adjust For OSD display push Up For selecting Icon push Up or Down Pu...

Страница 25: ...he select button to execute Information Push the select button Use Left or Right button to adjust Push the select button Use Left or Right button to adjust Push the select button Use Left or Right but...

Страница 26: ...c n a l a B S M P D S M P D e l b a s i D r o e l b a n E e c r u o S o t u A t c e l e S n o i t c e l e s e c r u o s o t u a e l b a s i d r o e l b a n E e m a r F e z e e r F e m a r f e z e e r...

Страница 27: ...C r o 3 m e t s y S 2 m e t s y S 1 m e t s y S t l u a u f e D n e e w t e b e s o o h C p m e t r o l o c 4 m e t s y S d e R d e R e c n a l a B n e e r G n e e r G e c n a l a B e u l B e u l B e...

Страница 28: ...r o l o C r o 3 m e t s y S 2 m e t s y S 1 m e t s y S t l u a u f e D n e e w t e b e s o o h C p m e t r o l o c 4 m e t s y S d e R d e R e c n a l a B n e e r G n e e r G e c n a l a B e u l B e...

Страница 29: ...t p a d a s c i h p a r g f o n o i t a c i f i c e p s e h t f i k c e h C e b y a m h c i h w e c n a i l p m o c n i s i r o t i n o m d n a h c t a m s i m y c n e u q e r f l a n g i s t u p n i...

Страница 30: ...H 5 8 o t P U z H 5 8 6 5 4 2 0 1 x 0 8 2 1 t a z H 5 7 e z i S y a l p s i D V x H m m 3 3 0 7 2 x m m 2 9 7 3 3 6 0 1 x 3 3 1 s e l a c S y a r G o i t d a R t s a r t n o C s s e n t h g i r B s s...

Страница 31: ...i r B s s e n t h g i r B d r a d n a t S 2 m d c 0 2 2 o i t a R t s a r t n o C p y T 1 0 0 4 s e l a c S y a r G s p e t s 6 5 2 o t p U r o t c e n n o C t u p n I l a n g i S o e d i V o e d i V...

Страница 32: ...0 3 l a c i t r e V o t p u d n a e d o m 8 6 7 x 4 2 0 1 t a z H 5 8 o t P U z H 5 8 6 5 4 2 0 1 x 0 8 2 1 t a z H 5 7 e z i S y a l p s i D V x H m m 7 8 2 x m m 9 5 3 3 1 1 x 3 1 4 1 s e l a c S y...

Страница 33: ...r o H z H k 8 9 9 7 7 4 1 3 l a c i t r e V o t p u d n a e d o m 8 6 7 x 4 2 0 1 t a z H 5 8 o t P U z H 5 8 0 5 4 2 0 1 x 0 8 2 1 t a z H 5 7 e z i S y a l p s i D V x H m m 1 0 3 x m m 6 7 3 9 1 1...

Страница 34: ...9 7 7 4 1 3 l a c i t r e V o t p u d n a e d o m 8 6 7 x 4 2 0 1 t a z H 5 8 o t P U z H 5 8 0 5 4 2 0 1 x 0 8 2 1 t a z H 5 7 e z i S y a l p s i D V x H m m 1 0 3 x m m 6 7 3 9 1 1 x 8 4 1 s e l a...

Страница 35: ...1 none touch model IP X0 touch model Mode of operation Continuous This monitor has been tested to comply with IEC EN 60601 1 IEC EN60601 1 2 and is certified by UL to medical standard UL60601 1 UL cUL...

Страница 36: ...36 User s Guide...

Страница 37: ...AMM170TK2 AMM17TK2 AMM18TK2 AMM19TK2 AMM19TK2 HB 37...

Страница 38: ...38 User s Guide...

Страница 39: ...AMM170TK2 AMM17TK2 AMM18TK2 AMM19TK2 AMM19TK2 HB 39 AMM170TK2 AMM17TK2 AMM18TK2 AMM19TK2 HB...

Страница 40: ...A l a n g i S n i P t n e m n g i s s A l a n g i S n i P t n e m n g i s s A l a n g i S 1 2 a t a D S D M T 9 1 a t a D S D M T 7 1 0 a t a D S D M T 2 2 a t a D S D M T 0 1 1 a t a D S D M T 8 1 0...

Страница 41: ...ned to Advan without prior authorization Buyer will be responsible for packaging and shipping the defective goods to the Advan Service Facility with shipping charges prepaid Limitation of Warranty Mon...

Страница 42: ...o any installation of Advan s product s by Advan any authorized dealer or any other person Technical Assistance For technical assistance please call 510 490 1005 between 8 00 a m and 5 00 p m PST Mond...

Страница 43: ...screen See Driver software for details Introduction TheELOIntelliTouchTouchscreensystemconsistsofatouchscreenandan electronic touchscreen controller The touchscreen may be a flat spherical or cylindri...

Страница 44: ...hardware as described in the Quick start or Touchmonitor installation 3 Start your computer 4 Insert the Windows orWindows NT driver disk into diverAor B 5 Browse for setup exe in the directory to wh...

Страница 45: ...AMM170TK2 AMM17TK2 AMM18TK2 AMM19TK2 AMM19TK2 HB 45...

Отзывы: