background image

User Manual 

 IDS Computer Module 

UM600229 Rev. A, page 7 of 37


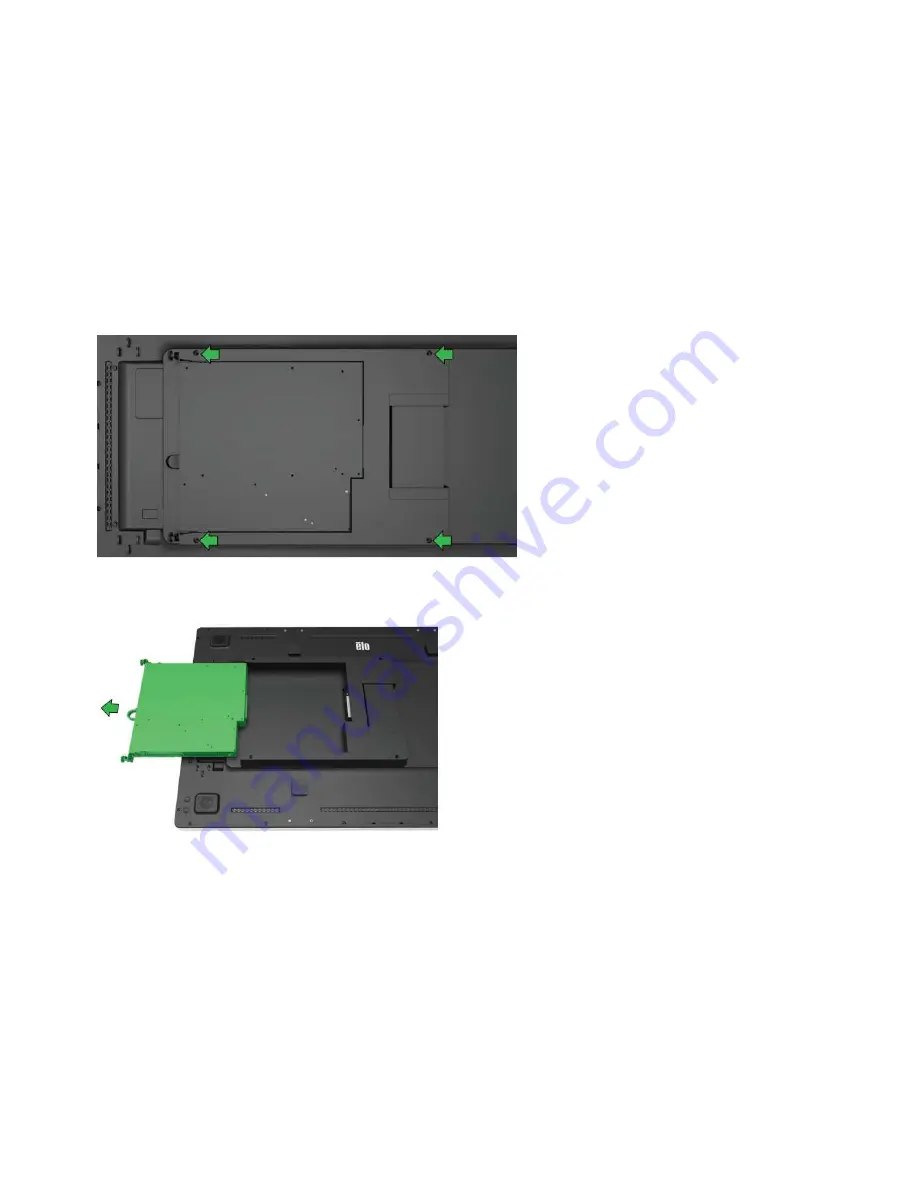
3.  Tighten the four screws to secure the Computer Module onto the back of the touchmonitor. Mount the IDS to any VESA compliant wallmount using 

the extension spacers and screws (included). 


Note: Once the ECM is installed, the ECM can be easily removed for maintenance reasons by loosening the thumbscrews and sliding it out. 


Содержание 3202L

Страница 1: ...USER MANUAL Elo Touch Solutions Interactive Digital Signage IDS ECMG3 For IDS 3202L 4202L 4602L 5502L...

Страница 2: ...The information in this document is subject to change without notice Elo Touch Solutions Inc and its Affiliates collectively Elo makes no representations or warranties with respect to the contents her...

Страница 3: ...ge 3 of 37 Table of Contents Section 1 Introduction 4 Section 2 Unpacking 5 Section 3 Computer Module Installation 6 Section 4 Technical Support 25 Section 5 Safety Maintenance 27 Section 7 Regulatory...

Страница 4: ...By combining the two you can transform your Interactive Digital Signage Touch Display into an all In one touchcomputer Precautions Follow all warnings precautions and maintenance as recommended in th...

Страница 5: ...l IDS Computer Module UM600229 Rev A page 5 of 37 Section 2 Unpacking Unpacking the ECMG3 Check that the following items are present and in good condition Computer Module Quick Install Guide PC Box Ca...

Страница 6: ...e 6 of 37 Section 3 Computer Module Installation Installation 1 Use a Phillips head screwdriver to remove the ECM docking cover plate on the back of the touchmonitor 2 Snap the Computer Module onto th...

Страница 7: ...secure the Computer Module onto the back of the touchmonitor Mount the IDS to any VESA compliant wallmount using the extension spacers and screws included Note Once the ECM is installed the ECM can b...

Страница 8: ...is completely shut off 2 Make any desired connections to the Computer Module connector panel 3 Press the touchmonitor s power button to turn on the Computer Module Operating System Setup Windows 7 Th...

Страница 9: ...page 9 of 37 Selecting the Region and Language English is the default language in Windows menus and dialog boxes You can change this language according to your preference Choosing the computer name Yo...

Страница 10: ...a password for the system You will be prompted to create a password for the system This is optional If no password is desired press the Next button Agreeing to Terms and Conditions You will be prompt...

Страница 11: ...the Windows Update settings You will be prompted to select the Windows Update settings Selecting the Time Zone When the following window appears you can set the Computer Module s time zone date and t...

Страница 12: ...to modify your language preference English is set as the default language but you can change this language according to your preferences To use the language injection feature 1 Power off your system c...

Страница 13: ...User Manual IDS Computer Module UM600229 Rev A page 13 of 37 5 The following User Interface UI will appear 6 Select Inject Language and the following UI will appear...

Страница 14: ...e your keyboard or mouse as this may cause an error in the language injection process 10 After successful installation of the language package press any key to exit the window 11 You should see the ne...

Страница 15: ...ou will need to plug in an external keyboard and or mouse into the Computer Module connector panel to execute these steps To set up the Windows 10 OS for the Computer Module turn on the touchcomputer...

Страница 16: ...A page 16 of 37 Choosing the Windows Settings You will be prompted to select the Windows settings Creating Your Account You will be prompted to create a Username and Password Once set up click Finish...

Страница 17: ...hat driver onto the computer Installing Touchscreen Technology Software Drivers on Elo Computer Modules Visit the Elo Touch Solutions website www elotouch com for The latest versions of our touch driv...

Страница 18: ...ition accidentally gets deleted or becomes inaccessible you can use the recovery flash drive to recover your system The following procedures demonstrate how to create a recovery flash drive 1 Right cl...

Страница 19: ...ged in you will see the below window Click Format Drive to continue the process PLEASE NOTE THAT THIS WILL ERASE ALL DATA CONTAINED IN THE FLASH 5 Click Create Restore Media to proceed This step will...

Страница 20: ...system and press F11 several times to enter the Device Boot Menu Subsequently select to boot from flash drive 8 When the following UI is presented click Install Recovery Solution button 9 Follow the...

Страница 21: ...s to be recovered TO FACTORY SETTINGS you can recover your system by following procedures below PLEASE NOTE THAT ALL CUSTOMER SETTINGS AND DATA WILL BE LOST DURING THIS PROCESS Please be sure to backu...

Страница 22: ...User Manual IDS Computer Module UM600229 Rev A page 22 of 37 4 Select either to Restore OS 32bit or Restore OS 64bit depending on your OS environment 5 The following User Interface UI will appear...

Страница 23: ...store OS The system will automatically test your hardware Once the process completes click the Start button to perform the system recovery function 7 The following process will reformat the primary ha...

Страница 24: ...urn to the main menu of the Elo Recovery Solution Click the Exit button to restart your system All data is deleted during the recovery process The user should back up files when necessary Elo Touch So...

Страница 25: ...e system Monitor display is dim Use the OSD to increase the brightness Use the OSD to increase the contrast Monitor display is blank If thePowerStatusLEDis blinking the monitoror Computer Modulemaybe...

Страница 26: ...in the Support Information section of the Systems Properties menu The Systems Properties menu can be accessed by Right clicking the My Computer icon and selecting Properties from the drop down menu or...

Страница 27: ...ting 0 C to 40 C Storage Transportation 20 C to 60 C Humidity non condensing Operating 20 to 80 Storage Transportation 10 to 90 Altitude Operating 0 to 3 000m Storage Transportation 0 to 12 192m Cauti...

Страница 28: ...if not installed and used in accordance with the instructions may cause harmful interference to radio communications Notice to Users in Canada This equipment complies with the Class A limits for radio...

Страница 29: ...lowingmeasures i Move the digital device away from the affected receiver ii Reposition turn the digital device with respect to the affected receiver iii Reorient the affected receiver s antenna iv Plu...

Страница 30: ...striction of the Use of Hazardous Substances in Electrical and Electronic Products the section below lists out the name and amount of the toxic and or hazardous materials that this product may contain...

Страница 31: ...duct is 10 years The product will not leak or mutate under normal operating conditions listed below so that the use of this electronic information product will not result in any severe environmental p...

Страница 32: ...User Manual IDS Computer Module UM600229 Rev A page 21 of 37 Section 8 Warranty Information For warranty information go to http support elotouch com warranty...

Страница 33: ...User Manual IDS Computer Module UM600229 Rev A page 22 of 37 Notes...

Страница 34: ...User Manual IDS Computer Module UM600229 Rev A page 23 of 37...

Страница 35: ...User Manual IDS Computer Module UM600229 Rev A page 24 of 37 Notes...

Страница 36: ...User Manual IDS Computer Module UM600229 Rev A page 25 of 37...

Страница 37: ...tor Newsletter To find out more about our extensive range of Elo touch solutions go to www elotouch com or call the office nearest you North America Tel 1 408 597 8000 Fax 1 408 597 8001 customerservi...

Отзывы: