background image


User Manual: 2440L 

SW602154 Rev A, Page 6 of 34 


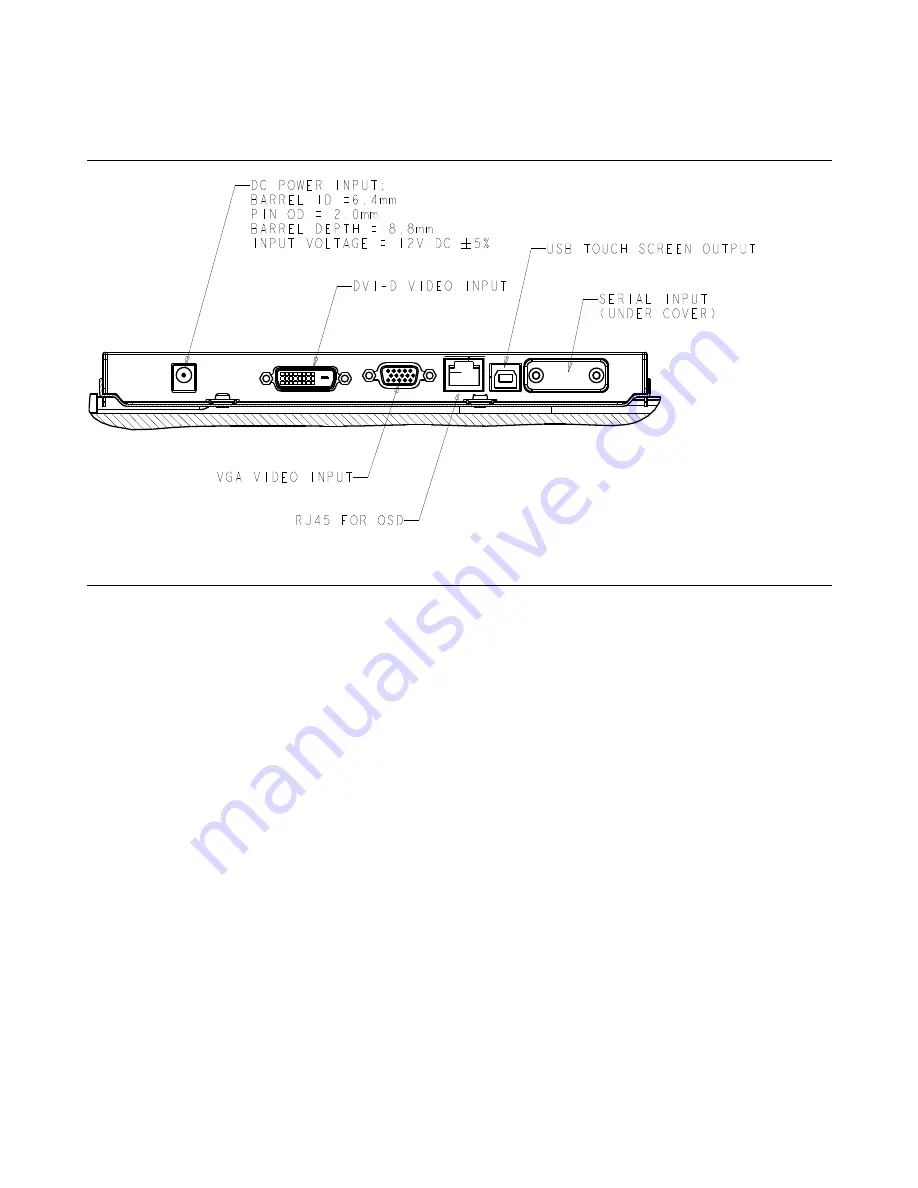
Connector Panel & Interfaces 


Touchmonitor Connections 

1. Connect the DVI or VGA video cables between the monitor’s DVI/VGA input connectors and 
your DVI/VGA video source. Tighten the video cable’s screws for best performance. 

2. Connect the USB or serial touch cable between the monitor’s USB/serial connector and your 
PC’s USB/serial port.   

3. Connect a 12VDC power supply to the monitor’s input power jack.   

4. The touchmonitor ships in an ON state, video should be displayed on your monitor already. 

Содержание 2440L

Страница 1: ...USER MANUAL Elo Touch Solutions 2440L Touchmonitor SW602154 Rev A...

Страница 2: ...without notice Elo Touch Solutions Inc and its Affiliates collectively Elo makes no representations or warranties with respect to the contents herein and specifically disclaims any implied warranties...

Страница 3: ...Table of Contents Chapter 1 Introduction 4 Chapter 2 Installation 5 Chapter 3 Mounting 13 Chapter 4 Operation 16 Chapter 5 Technical Support 24 Chapter 6 Safety Maintenance 26 Chapter 7 Regulatory Inf...

Страница 4: ...ge quality a high quality panel and multiple mounting options Its LED backlight significantly reduces power consumption and eliminates mercury compared to CCFL backlit panels The true flat edge to edg...

Страница 5: ...at the following items are present Touchmonitor with protective sheet for its face User Manuals CD Japanese language regulatory information pamphlet Quick Install Guide VGA cable DVI cable USB cable n...

Страница 6: ...nput connectors and your DVI VGA video source Tighten the video cable s screws for best performance 2 Connect the USB or serial touch cable between the monitor s USB serial connector and your PC s USB...

Страница 7: ...your computer No additional drivers are required for your projected capacitive touchmonitor it uses Windows HID drivers The drivers are available on the Elo Touch Solutions website Visit www elotouch...

Страница 8: ...User Manual 2440L SW602154 Rev A Page 8 of 34 Select the applicable driver from the Elo Touch Solutions website and download For Windows 7 installations double click on EloSetup Installer...

Страница 9: ...fter accepting the end user license agreement the system will initialize to setup installation of drivers To complete setup reboot system by clicking on Reboot Now button Click on One More Minute if m...

Страница 10: ...User Manual 2440L SW602154 Rev A Page 10 of 34 Note System will automatically reboot when Time left counter reaches 0 For Windows XP installations double click on the icon from the desktop...

Страница 11: ...User Manual 2440L SW602154 Rev A Page 11 of 34 Click on Unzip button to unzip files...

Страница 12: ...W602154 Rev A Page 12 of 34 Select one or more of the drivers to install Click on Next After accepting the end user license agreement the drivers will finish installing Reboot your computer after the...

Страница 13: ...eral Mounting Information The OSD text can be rotated through the OSD menu to better suit your mounting orientation Side Bracket Mount IntelliTouch and No Touch models only Threaded holes are provided...

Страница 14: ...r Manual 2440L SW602154 Rev A Page 14 of 34 Flush Bracket Mount iTouch and Projected Capacitive models only Threaded holes are provided on the back of the monitor for mounting using the provided brack...

Страница 15: ...L SW602154 Rev A Page 15 of 34 Rear VESA Mount All models A four hole 200x100mm mounting pattern for M4 screws is provided on the rear of the monitor The VESA FDMI compliant counting is coded VESA MIS...

Страница 16: ...moving the mouse or pressing a keyboard key To improve reliability and reduce wasteful power consumption disconnect the AC power cable from the monitor when long periods of disuse are planned Touch Yo...

Страница 17: ...h Plus touchscreen technology To use multiple IntelliTouch iTouch Plus monitors plug in monitors to calibrate double click on the EloConfig desktop shortcut to run Elo Touchscreen Configuration screen...

Страница 18: ...User Manual 2440L SW602154 Rev A Page 18 of 34 Tap monitor screen to identify monitor s identity as shown below Identity of the monitor will display Click on OK to proceed to calibration...

Страница 19: ...alibrate touch as targets appear on corners of the screen Follow instructions on screen Test touch drag performance to verify calibration accuracy Accept or Retry to redo calibration process Run touch...

Страница 20: ...1080 For computer output resolutions at non native resolutions the monitor will scale the video to its panel s native resolution This involves stretching or compressing the input image as needed in t...

Страница 21: ...your input video allowing intuitive adjustment of the following display parameters Parameter Available Adjustment Brightness Increase decrease monitor brightness Default maximum Contrast Increase decr...

Страница 22: ...menus on the display Default centered OSD V Position Adjusts the vertical location of the OSD menus on the display Default centered OSD Timeout Adjusts how long a period of OSD button inactivity the...

Страница 23: ...e disable the OSD Locking feature When the OSD Locking is enabled pressing any of the Menu or Select keys will have no effect on the system Press and hold the Menu and buttons for two seconds to enabl...

Страница 24: ...linking the monitor or Computer Module may be in SLEEP mode Press any key move the mouse touch the touchscreen to see if the image reappears Check that the signal source device is turned on Check that...

Страница 25: ...t www elotouch com products for technical specifications for this device Visit www elotouch com go websupport for online self help Visit www elotouch com go contactsupport for technical support See th...

Страница 26: ...et use a clean cloth lightly dampened with a mild detergent It is important that your unit remains dry Do not get liquids on or inside the unit If liquid does get inside turn the unit off and have a q...

Страница 27: ...L SW602154 Rev A Page 27 of 34 Waste Electrical Electronic Equipment Directive WEEE This product should not be disposed of with household waste It should be deposited at a facility that enables recove...

Страница 28: ...limits for a Class B digital device pursuant to Part 15 of FCC Rules These limits are designed to provide reasonable protection against harmful interference in a residential installation This equipme...

Страница 29: ...e could void the user s authority to operate the equipment 2 If this equipment appears to cause interference with radio or television reception or any other device a Verify as an emission source by tu...

Страница 30: ...or Hazardous Substances and Elements Lead Pb Mercury Hg Cadmium Cd Hexavalent Chromium Cr6 Polybrominated Biphenyls PBB Polybrominated Diphenyl Ethers PBDE Plastic Parts O O O O O O Metal Parts X O O...

Страница 31: ...ation product will not result in any severe environmental pollution any bodily injury or damage to any assets Operating Temperature 0 40 Humidity 20 80 non condensing Storage Temperature 20 60 Humidit...

Страница 32: ...W602154 Rev A Page 32 of 34 Operating Conditions Temperature 0 C 40 C Humidity 20 to 80 non condensing Altitude 0 to 3 048m Storage Conditions Temperature 20 C 60 C Humidity 10 to 95 non condensing Al...

Страница 33: ...User Manual 2440L SW602154 Rev A Page 33 of 34 Chapter 8 Warranty Information See http www elotouch com Support warranty asp for more information...

Страница 34: ...te at www elotouch com or simply call the office nearest you North America Elo Touch Solutions 1033 McCarthy Blvd Milpitas CA 95035 Tel 800 ELO TOUCH Tel 1 408 597 8000 Fax 1 408 597 8050 customerserv...

Отзывы:

Похожие инструкции для 2440L