background image

66

L

R

L

R

L

R

1

2

3

4

5

6

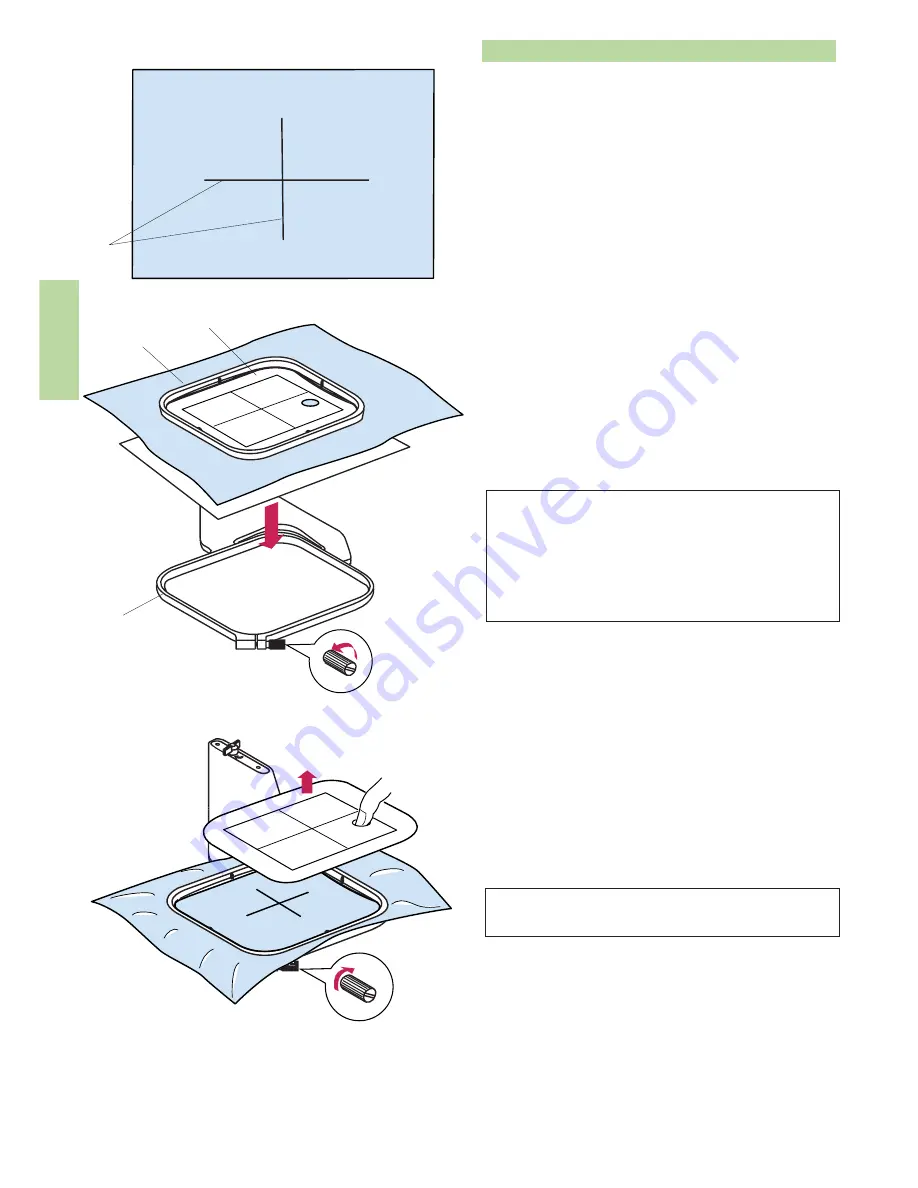
Setting the Fabric in an Embroidery Hoop

Mark the Centerlines on the right side of the fabric with

tailor's chalk.

1 Fabric

2 Centerlines

Loosen the hoop tightening screw on the outer hoop.

Lay the inner hoop and template on the fabric, matching

the centerlines.

3 Hoop tightening screw

4 Inner hoop

5 Template

6 Outer hoop

NOTES:

When placing the fabric on the embroidery hoop, place

the outer hoop on a flat surface.

For thin and stretchy fabrics, use an adhesive type

stabilizer (iron-on type) on the wrong side of the fabric.

More than one layer may be required.

Push them into the outer hoop.

Tighten the screw on the outer hoop to stretch the

fabric. Make sure that the fabric is stretched drum-tight

in the hoop.

Remove the template.

NOTE:

Refer to page 91 for the instructions on hoop AQ.

Содержание 9600 "Haute Couture"

Страница 1: ...is owner s manual Use only attachments recommended by the manufacturer as contained in this owner s manual 3 Never operate this sewing machine if it has a damaged cord or plug if it is not working properly if it has been dropped or damaged or dropped into water Return this sewing machine to the nearest authorized dealer or service center for examination repair electrical or mechanical adjustment 4...

Страница 2: ...rogramming the auto lock stitch 48 Programming French Knot 48 Editing the stitch pattern combination 49 Monogramming 50 Programming a monogram 51 Sewing Applications 52 Rolled hemming 53 Zipper sewing 54 Lapped zipper sewing 54 Concealed zipper sewing 56 Gathering 58 Basting 58 Button sewing 59 Applique 60 Patchwork 60 Quilting 61 Clasp stitch 61 Free quilting 61 Quick Menu Quick Reference 62 Corr...

Страница 3: ...9 Hook cover release button 10 Hook cover plate 11 Needle plate 12 Automatic needle threader 13 Thread cutter holder 14 Face plate 15 Foot pressure dial 16 Bobbin winding thread guide 17 Stylus holder for the touch panel stylus 18 Spool pin 19 Spool holder 20 Needle clamp screw 21 Needle 22 Zigzag foot A 23 Foot holder 24 Thumbscrew 25 Auto needle threader button 26 Bobbin winding button 27 Thread...

Страница 4: ...h 3 Machine socket 4 Carriage release lever 5 USB port for direct PC link 6 USB port for CD ROM drive USB memory key 7 Foot control jack 8 Card ejecting button 9 Card slot 10 Hand wheel 11 Buttonhole lever 12 Retractable carriage arm 13 Hard cover accessory storage ...

Страница 5: ...9 Stabilizers 10 Template sheets for built in embroidery designs 11 USB cable 12 Instruction book 13 Key icon reference chart 14 M860 Tools CD ROM with instruction booklet 15 Handbook CD ROM 16 Cloth guide 17 Embroidery hoop AQ with template and clamps Standard Accessories and Storage The embroidery hoops foot control power supply cord knee lifter etc can be conveniently stored in the hard cover 1...

Страница 6: ...atic buttonhole foot R 11 Embroidery foot P 12 Darning foot P 2 13 Even feed foot with quilting bar 14 Quilting guide bar 15 Spool holder large 16 Spool holder small 17 Extra spool pin 18 Spool supporter 19 Felt cushion 20 Bobbins 21 Set of needles 22 Screwdriver 23 Screwdriver key 24 Scissors 25 Lint brush 26 Seam ripper Buttonhole opener 27 Button shank plate 28 Touch panel stylus The extensiont...

Страница 7: ...o useful for darning socks or mending knees or elbows For free arm sewing 1 Return the carriage to the home position refer to page 69 2 Turn the power switch off 3 Remove the extension table 4 Hook your finger on the bottom of the fillet and draw the fillet out to the left 1 Extension table 2 Fillet For flat bed sewing 1 Return the carriage to the home position 2 Turn the power switch off 3 Insert...

Страница 8: ...ne from the power supply when leaving the machine unattended when attaching or removing parts when cleaning the machine Do not place anything on the Foot Control Operating Instructions The symbol O of a switch indicates the off position of a switch For the U S A and Canada only Polarized plug one blade wider than the other To reduce the risk of electric shock this plug is intended to fit in a pola...

Страница 9: ... automatically stop 3 Needle up down button Press this button to bring the needle bar up or down 4 Auto lock button When sewing stitch pattern U1 U2 U8 or U9 the machine will immediately sew locking stitches and automatically stop when the auto lock button is pressed When sewing all other stitches the machine will sew to the end of the current pattern sew locking stitches and stop automatically Th...

Страница 10: ...ne NOTE This machine is equipped with an automatic shutdown safety feature to prevent overheating whenever the machine is running overloaded Follow the safety instructions that appear on the visual touch screen Screen up down button The visual touch screen can be raised to open clear the space for handling fabrics etc Pressing the button raises the screen while pressing the button lowers the scree...

Страница 11: ...as an exclusive motor for bobbin winding which allows you to wind the bobbin while stitching 1 Slide the hook cover release button to the right and remove the hook cover plate 2 Lift out the bobbin from the bobbin holder 3 Pull the thread from the spool and pass the thread through the thread guide Draw the thread around and under the bobbin winding tension disk 4 Pass the thread through the hole i...

Страница 12: ...ace the bobbin in the bobbin holder with the thread running off counterclockwise 2 Guide the thread into the front notch A on the bobbin holder 3 Draw the thread to the left sliding it between the tension spring blades 4 Continue to draw the thread lightly until the thread slips into the side notch B 5 Pull out about 10 cm 4 of thread to the rear Reattach the hook cover plate NOTE A threading char...

Страница 13: ... down along the right channel and around the bottom of the guide plate 3 Pull the thread up along the left channel to the thread take up lever 4 Firmly draw the thread up to the take up lever and down into its eye from the right to the left while holding the thread at the spool 5 Then pull the thread down along the left channel and through the lower thread guide 6 Slide the thread behind the needl...

Страница 14: ...TES You may need to hold the thread end with your hand when threading certain kinds of threads When threading monofilament thread hang the thread end on the thread holder on the face plate CAUTION Do not turn the handwheel while the automatic needle threader is in the lowered position to prevent it from damage Do not touch the automatic needle threader while it is moving If the automatic needle th...

Страница 15: ... foot lifter 2 Hold the needle thread with your finger and press the up down needle button twice to pick up the bobbin thread 3 Draw up the needle thread to bring up a loop of the bobbin thread 4 Slide 10 cm 4 of both threads to the back under the presser foot ...

Страница 16: ...iffon Georgette Fine Lace Organdy Net Tulle Batiste Voile Lawn Pure Silk Crepe de Chine Sheer Crepe Chambray Handkerchief Linen Gingham Challis Percale Wool Crepe Peau de Soie Taffeta Satin Silk Surah Satin backed Crepe Qiana Single Knits Jersey Swim wear and Tricot Leather Suede Flannel Velour Velvet Muslin Velveteen Poplin Corduroy Broadcloth Linen Chintz Gabardine Felt Terry Burlap Quilted Fabr...

Страница 17: ... presser foot Attaching the knee lifter Match the ribs on the knee lifter with the notches in the knee lifter socket and insert the knee lifter 1 Knee lifter 2 Knee lifter socket Adjusting the knee lifter The angle of knee lifter can be adjusted to fit your knee Loosen the setscrew and slide the angle bar in or out to adjust the angle of the knee lifter Tighten the setscrew to secure the angle bar...

Страница 18: ... foot with your fingers Darning foot P 2 Loosen the thumbscrew and remove the foot holder Attach the darning foot P 2 to the presser bar putting the pin on the needle clamp screw Tighten the thumbscrew firmly with the screwdriver Even feed foot Loosen the thumbscrew and remove the foot holder Attach the even feed foot to the presser bar with the lever over the needle clamp screw and secure it with...

Страница 19: ...sewing mode 2 Embroidery mode key Press this key to enter the embroidery mode 3 Open file key Press this key to open files such as programmed stitch patterns and embroidery designs you have saved 4 Mode setting key Press this key to enter the setting mode In this mode you can customize the machine settings to your prefer ence The machine settings for ordinary sewing em broidery language selection ...

Страница 20: ...mode the machine settings or function for embroidery can be customized or executed 4 Language selection mode Flag mode In this mode you can select one of 10 languages for the messages displayed on the screen Registering the custom settings After customizing the settings press the register key to enable the new settings To cancel the changes to the settings press the exit key and the setting mode w...

Страница 21: ...e screen will turn on the lights and screen The eco mode timer can be set from 1 to 30 minutes by pressing the or key 5 Screen saver Press the on off key to check the box so the screen will show the screen saver instead of entering the eco mode sewing lights do not turn off You can also create an original screen saver for your machine with the Screen Saver tool Save the data in an ATA PC card or U...

Страница 22: ...h screen calibration If you think the touch panel keys are out of alignment you can correct it in the key position adjustment window When you press the key window A will be shown With your finger press the black cross as it appears in order When you press the last black cross the window B will be shown The window will close and go back to the original screen with the new setting being registered 3...

Страница 23: ...rogrammed 3 Sewing monogram 4 Sewing the pictograph patterns 5 Color options Press the key to select one of the 3 colors for the pattern selection keys which will display in the color shown To change the screen background color press the key to open the custom color window To select the hue press one of the 24 color tiles To change the shade of the selected color press and drag the slider up or do...

Страница 24: ...ile the machine is running NOTE Reduce the sewing speed when sewing patterns with narrow zigzag stitches that tend to distort at high speed 6 Thread selection There are four brands of embroidery thread to choose from Press the key of the thread you wish to use The color code of the selected brand will be shown on the color part key along with the name of the color 7 Auto thread cutting The machine...

Страница 25: ...ower off will be resumed when the power is turned on again To enable Resume Mode press the on off key to check the box on When you turn the power on the confirmation window will open Press the OK key to resume the last sewn pattern Language Selection Flag mode You can select one of the following 10 languages by pressing the corresponding key 1 English 2 French 3 Spanish 4 Italian 5 Dutch 6 German ...

Страница 26: ...e thumbnail and the movie window will open Press the play key to start the movie and press the stop key to stop playing You can search the movie in forward or reverse direction by pressing the fast forward key or rewind key Pressing the full screen key enlarges the movie window to full screen Press the exit key to close the current window X Auto Needle Threader Auto Needle Threader X ...

Страница 27: ...f 5 categories i e Q patchwork quilting H heirloom stitches cross stitches S decorative satin stitches D decorative stitches and P pictograph stitches These stitches and patterns are programmable 4 Monogramming You can sew letterings as well as combination of characters and symbol patterns 5 Sewing application You can select the proper stitch for a specific sewing project from the designated stitc...

Страница 28: ...ck button on the zigzag foot locks the foot in the horizontal position This is helpful when you start sewing at the extreme edge of thick fabrics or sewing across a hem Lower the needle into the fabric at the point where you wish to start sewing Lower the foot while pushing in the black button The foot will be locked in the horizontal position to avoid slipping Changing sewing direction Stop the m...

Страница 29: ...bbin threads to the back under the presser foot Use the thread cutter on the face plate to cut the specialized or thick threads if the auto thread cutter does not work well To use the thread cutter on the face plate remove the fabric and draw it to the back Pull the threads up and slip them between the thread cutter and face plate from behind Pull the threads toward you to cut Using the seam guide...

Страница 30: ...nvisible locking stitch is needed Lower the needle close to the front edge of the fabric The machine will sew several locking stitches in place and continue sewing forward When you press the reverse button at the end of the seam the machine will sew several locking stitches in place then stop sewing automatically U5 Triple stretch stitch This strong durable stitch is recommended for areas where bo...

Страница 31: ... increase the tension Press the key to decease the tension Manual stitch settings When you press the adjust key the screen shows the manual setting window You can alter the needle drop position of the straight stitches stitch length and needle thread tension Press the key to move the needle drop position to the right Press the key to move the needle drop position to the left Press the or key in th...

Страница 32: ...ng overcasting These stitches can be used on most woven fabrics A dense zigzag stitch can also be used for appliqué Manual stitch settings When you press the adjust key the screen shows the manual setting window You can alter the stitch width or needle drop position of the straight stitches stitch length and needle thread tension Press the or key below the property that you wish to change ...

Страница 33: ...reen will show a warning message Press the OK key The cloth guide adjustment window will open Press the or key to move the cloth guide to the desired position The cloth guide position is indicated on the scale bar and the distance from the center needle drop position is indicated by millimeter or inch Press the OK key to register the setting and close the cloth guide adjustment window NOTE The mac...

Страница 34: ...ch is recommended for sewing such fabrics as synthetic knits and stretch velour as it provides the greatest amount of elasticity and strength Sew along the fabric edge leaving an adequate seam allowance After sewing trim the seam allowance close to the stitches U12 Double overedge stitch Overedge foot C This stitch is excellent for fabrics that tend to fray extensively such as linens and gabardine...

Страница 35: ...2 To sew Position the fabric so that the fold comes to the left side of the guide on the foot Lower the presser foot Adjust the position of the needle drop if necessary Sew guiding the fold along the guide After sewing is finished open fabric flat The seam on the right side of the fabric is almost invisible Adjusting the needle drop position Press the adjust key to open the manual setting window P...

Страница 36: ...ttern U17 Fold and press a single hem Place the fabric with the right side up Sew along the fold at the desired depth Trim an excess on the wrong side 4 Utility U 6 2 3 5 7 8 10 11 12 13 14 15 1 17 Knit Stitch 9 F 16 19 18 21 20 B ...

Страница 37: ...s It is also suitable for larger and thicker buttons B6 Rounded keyhole buttonhole This buttonhole is used for thicker buttons on medium weight fabrics B7 Tailored buttonhole This buttonhole is durable and used for thick buttons and heavy fabrics B8 Keyhole buttonhole tapered reinforced end This buttonhole is used for tailored clothing woven cloth etc B9 Keyhole buttonhole heavy reinforced end Thi...

Страница 38: ...hole by pulling the button holder back a little The length of the buttonhole will be increased 3 Pull the buttonhole lever down as far as it will go 4 Press the start stop button to sew the buttonhole NOTE A warning message will appear and the machine will stop automatically if you start to sew a buttonhole without pulling down the buttonhole lever Press the exit key and pull down the buttonhole l...

Страница 39: ...ep 2 Depress the foot control The machine will automatically tack and sew down the right side of the buttonhole Stop the machine when you are directly opposite the starting point Press the reverse button Step 3 Keep the foot control depressed The machine will bartack lock the stitches and automatically stop when the buttonhole is completed To make the next buttonhole position the fabric and step d...

Страница 40: ...onhole Each side of the buttonhole and the bartacks will be sewn over the cord The machine stops automatically when finished Remove the fabric from the machine and cut the sewing threads only Pull the left end of the filler cord to tighten Thread the end of the cord through a darning needle and draw it to the wrong side of the fabric and cut NOTES Set the stitch width in accordance with the thickn...

Страница 41: ...wing until the machine stops automatically 3 Sew another layer of darning over the first layer at a right angle to it NOTE The maximum length of darning is 2 cm 3 4 and the maximum width is 0 7 cm 1 4 To sew the same size darning Simply depress the foot control to sew another darning in the same size To sew the next darn in a different size press the exit key To adjust the evenness of darning stit...

Страница 42: ...rol and sew to the required length then press the reverse button The tacking length has now been determined NOTE The maximum length of tacking is 1 5 cm 5 8 To sew the same size tack To sew another tack in the same size simply depress the foot control until the machine stops automatically To sew the next tack in a different size press the exit key X AUTO Restart for the same size Different size ...

Страница 43: ...r the needle at the bottom of the zipper fly Sew the stitch until the machine stops automatically Eyelet The Eyelet is used for belt holes etc Select the pattern B19 B20 or B21 and attach the satin stitch foot F Depress the foot control to sew The machine will stop automatically when completed Open the eyelet with an awl puncher or pointed scis sors To correct the shape of an eyelet If the eyelet ...

Страница 44: ...thread from the spools do not get tangled NOTES Make sure each thread winds off from the spools as shown Threading from points 1 to 5 is the same as for a single needle Slip one of the threads through the needle bar thread guide on the left and the other one on the right Thread the needles from the front to back NOTES The Automatic needle threader cannot be used for the twin needle When changing t...

Страница 45: ...ve satin stitches S The stitches in this group can be elongated up to 5 times of their original length while the stitch density remains the same To elongate the stitch press the adjust key to open the manual setting window Press the key to increase the elongation ratio or press the key to decrease the elongation ratio The stitch density and width can also be altered Press the OK key to register th...

Страница 46: ...f cording under the spring on the foot Make sure to pass each strand separately under the spring 1 Spring Pull 10 cm 4 of strands under the foot and to the rear The grooves on the bottom of the foot will hold cording in place while stitching over the cording Sew carefully over the cording while guiding the strands parallel and even For a single strand cording insert a strand into the center groove...

Страница 47: ...or use with the zigzag foot and the other is for even feed foot To attach the quilting guide bar for the zigzag foot Loosen the screw on the back of the foot holder and insert the quilting bar into the hole of the foot holder Set the quilting guide bar at the desired spacing and retighten the screw Sew rows of stitching while tracing the previous row of stitching with the quilting guide bar To att...

Страница 48: ...ct a pattern to delete or adjust 3 Delete key Press this key to delete the selected pattern 4 Mirror image key Press this key to program a mirror image of the selected pattern 5 Page keys Press key to view the previous page Press key to view the next page 6 Save file key Press this key to save the programmed pattern combination 7 Memory check key Start over key Press this key to review the program...

Страница 49: ...ewing mode setting the machine will trim the threads after the auto lock stitch refer to page 22 Programming French Knot Example Expanding the space between French Knots Press the program key Select the pattern D13 French Knot Select the pattern D1 Two counts of straight stitch will be inserted Select the pattern D13 Select the pattern D2 Three counts of straight stitch will be inserted Start to s...

Страница 50: ... patterns S19 D61 and mirror image of S19 Saving the pattern combination Pressing the save file key opens the save file window to allow you to save the programmed pattern combination as a file To open the saved file press the open file key NOTE Refer to pages 94 95 for detailed instructions 4 Satin S 1 2 6 2 3 5 7 8 9 10 11 12 13 14 15 16 17 18 19 1 M F Decorative 55 Decorative D 4 8 57 53 54 56 5...

Страница 51: ...he memory check key will display the entire pattern combination After starting the machine the key will change to the start over key 5 Save file key You can save the monogramming or text as a file 6 Cursor keys These keys are for editing your monogram Press the left arrow key to move the cursor to the left Press the right arrow key to move the cursor to the right 7 Delete key Press this key to del...

Страница 52: ...ter C 3 Press the letter case key to switch to the lower case Press the letter size key to select the original size letters Enter a and f 4 Press the next page key twice Enter é NOTE Insert a space after a symbol if a symbol and character overlap Editing the monogram Example to replace of the above example with 5 Press the left cursor key to move the cursor under 6 Press the delete key and will be...

Страница 53: ...hine will automatically set up for the selected project There are 12 applications that you can choose from the menu 1 Seaming 2 Overedge 3 Blind Hem 4 Rolled Hem 5 Zipper Sewing 6 Gathering 7 Basting 8 Button Sewing 9 Tacking 10 Appliqué 11 Patchwork 12 Quilting NOTE Do not press the sewing application key while programming a pattern combination otherwise the programmed pattern combination will be...

Страница 54: ... then press Place the fabric aligning the hem edge with the guide of the foot Lower the foot and sew several stitches slowly while pulling on the threads to assist feeding the fabric Stop the machine and lower the needle into the fabric Raise the foot and insert the folded portion of the fabric into the curl of the foot Lower the foot and sew while lifting the edge of the fabric to keep it feeding...

Страница 55: ... the left hand side Fabric preparation Add 1 cm 3 8 to the zipper size This is the overall opening size Place the right sides of the fabric together and sew to the end of the opening with a 2 cm 13 16 seam allowance Reverse stitch to lock the seam Manually increase the stitch length to 5 0 and baste the zipper opening with the thread tension loosened To sew 1 Fold back the left seam allowance Turn...

Страница 56: ...ic Raise the foot and open the zipper Lower the foot and stitch the remainder of the seam 4 Close the zipper and spread the fabric open flat with the right side of the fabric facing up Baste the opened fabric and zipper tape together 5 Attach the zipper foot E to the left pin Backstitch across the end of opening to 1 cm 3 8 Stitch through the garment and zipper tape guiding the zipper teeth along ...

Страница 57: ... opening size Attach the zigzag foot A Place the right sides of the fabric together and sew to the end of the opening with a 2 cm 13 16 seam allowance Press the reverse button to lock the seams Press the basting icon key and baste the opening 0 3 cm 1 8 inside of the seam line Place the right zipper teeth next to the fold and pin it in place Fold up the left seam allowance to the bodice Open the z...

Страница 58: ...tom 3 Press the second stitching tape icon key Raise the foot and reattach it with the left side of the pin Turn and fold the bodice to the left Seamalong the edge of the right zipper tape and reverse the stitches 2 cm 3 4 before the zipper bottom 4 Press the left of teeth icon key Raise the foot and replace it with the concealed zipper foot Remove the basting stitches and open the zipper complete...

Страница 59: ...e Make sure not to make gathers in the sleeve top Basting Auto This stitch is used for basting zipper tape or fitting of garments Sew in the same way as that of straight stitch sewing Basting Manual Quilting Attach the darning foot P 2 When the basting is selected the feed dog will be automatically lowered NOTE Refer to page 17 for how to attach the darning foot P 2 To sew Hold the fabric taut and...

Страница 60: ...d Lower the foot to hold the button in place aligning the direction of the button Raise the needle by turning the handwheel until the needle bar swings to the right Press the or key so the needle enters into the right hole in the button Lower the needle into the fabric and push the button shank plate into between the button and fabric Start the machine to sew until it stops automatically Remove th...

Страница 61: ...o sew in a different size You can seam patchwork pieces at the desired angle without marking by using the angle scale on the needle plate Applique Cornering for applique You can select the normal start over or cornering start over for applique stitches Cornering start over is very helpful when sewing an applique with sharp corners Press the cornering key and the start over key will change to the c...

Страница 62: ... clasp stitch Attach the satin stitch foot F The machine will automatically stop after sewing one cycle of the stitch Free quilting Attach the darning foot P 2 refer to page 17 To Sew Lower the foot then guide the fabric with your hands to stitch along the pattern marked on the fabric ...

Страница 63: ...tch quickly and easily You can jump to the desired page of the menu by pressing one of the page keys Each page covers the following groups Page 1 Utility U 1 Buttonholes B 2 Quilting Q 3 6 Page 2 Heirloom H 7 9 Satin S 10 11 Decorative D 12 Page 3 Decorative D 13 18 Page 4 Decorative D 19 Pictograph P 20 21 Monogram 22 Sewing Applications 23 ...

Страница 64: ... Decorative stretch stitch patterns If the pattern is compressed turn the dial in the direction of If the pattern is drawn out turn the dial in the direction of Letters and numbers If the pattern is compressed turn the dial in the direction of If the pattern is drawn out turn the dial in the direction of Stitch balance of the auto buttonhole The stitch balance of the right and left rows on the aut...

Страница 65: ... Design Card Nos 1001 and up 7 Starting point for built in designs 8 Starting point for monogram in horizontal orientation 9 Starting point for monogram in vertical orientation Embroidery hoop SQ This is the large size hoop with a 20 cm 8 by 20 cm 8 embroidery area for sewing large size designs and combined designs 1 Outer hoop 2 Inner hoop 3 Attaching knob 4 Hoop tightening screw 5 Template Templ...

Страница 66: ... to make it easier to peel off the excess stabilizer after stitching Ironing temperatures vary depending on kind of adhesive type stabilizer Type Tear away Iron on Cut away Water soluble Sticky Usage Stable woven fabrics Knits and all kinds of unstable fabrics Knits and all kinds of unstable fabrics Cutwork or lace embroidery Right side of looped fabrics such as towel to avoid loops coming through...

Страница 67: ...g screw 4 Inner hoop 5 Template 6 Outer hoop NOTES When placing the fabric on the embroidery hoop place the outer hoop on a flat surface For thin and stretchy fabrics use an adhesive type stabilizer iron on type on the wrong side of the fabric More than one layer may be required Push them into the outer hoop Tighten the screw on the outer hoop to stretch the fabric Make sure that the fabric is str...

Страница 68: ... it is fully extended Release the carriage release lever Press the embroidery mode key The visual touch screen will show a warning message Press the OK key The carriage will move to the position for setting the hoop NOTE Be sure to set the carriage arm in the extended position before pressing the embroidery mode key CAUTION Do not push or lift the carriage once it is set in the extended position t...

Страница 69: ...position Always provide sufficient clearance for the embroidery carriage behind your machine before starting embroidery Never try to move the carriage with hand or touch the carriage while it is moving Make sure to return the carriage to the stored position before turning the power off Thread Holder To avoid sewing on the needle thread place the thread end on the thread holder Pass the needle thre...

Страница 70: ...screen will show the warning message Press the OK key and the carriage will move to the home position The visual touch screen will show the ordinary sewing mode Retract the carriage in the stored position CAUTION Do not return the carriage with the hoop attached Please remove hoop Carriage will now move to home position Return to ordinary sewing Unsaved design s will be erased X ...

Страница 71: ...esigns 2 Monogramming Press the monogramming key to open the monogramming window You can sew monograms in 12 different fonts plus border designs and stitch patterns similar to the ordinary sewing refer to page 74 3 PC Design card Press the PC design card key to sew the designs from the PC Design cards optional items 4 Quick design menu Quick Reference You can select the desired embroidery design f...

Страница 72: ...tion The machine will automatically stop sewing and trim the threads if the auto thread cutting is activated when one part of the embroidery design is finished Change the thread and start sewing again Sewing the specific color section by skipping You can sew only the specific color sections of the design by pressing the next page key until the desired section is displayed 2 3 1 1 Peppermint 2390 1...

Страница 73: ...s the key to move the hoop back to a previous sewing point Press the key to move the hoop ahead The hoop will move one stitch each time the key is pressed Hold down the key to travel faster and jump 10 or 100 stitches at a time 3 Jog ST key Press this key to switch the jog keys to the stitch back forward keys or vice versa To use the jog keys after sewing has started stop the machine and return th...

Страница 74: ...se to the beginning of the starting point and lower the presser foot 1 Loose thread Press the start stop button to start sewing again The machine will stop and trim the threads if the auto thread cutting is activated automatically when the first color section is finished Change the thread and sew the next section Sewing results The embroidery pattern is sewn over the centerlines on the fabric as s...

Страница 75: ...letter is memorized and the cursor is moved to the right 1 Cursor NOTE Use the standard hoop ST for monogramming Font selection You can change the type of font for monogramming by pressing the font key The font selection window will open 2 Font key To select the desired font press one of the following options 1 Gothic font 2 Script font 3 Cheltenham font 4 Hollowblock font upper case only 5 Bauhau...

Страница 76: ...ey Pressing this key opens the file save window and allows you to save the text or monogram as a file 5 Lettering orientation key Pressing this key will select the horizontal or vertical orientation alternately 6 Letter size key You can select the following 3 letter sizes by pressing this key L Large 30 mm M Medium 20 mm S Small 10 mm 7 Letter case key Pressing this key changes the letter case upp...

Страница 77: ...shifts to the right and is automatically memorized 5 Press the letter size key and select large size 6 Enter B the cursor shifts to the right and B is automatically memorized 7 Press the OK key 8 The screen will change to the Ready to Sew screen 9 Press the start stop button to start sewing the monogram The machine will stop automatically after sewing is finished NOTE Use the jog keys to adjust th...

Страница 78: ... justify center justify and right justify 1 Left Justify Press the key to start sewing from the left end reference line on the template 2 Center Justify Press the key to sew in the center of the hoop 3 Right Justify Press the key to sew from the right end reference line on the template Color change You can sew a multi colored monogram by changing the thread color of each letter if you press the co...

Страница 79: ...n Press the font key Select 2 letter Select the octagon Enter A Enter B Press the OK key and the screen will change to the Ready to Sew screen Press the start stop button to start sewing The machine will stop automatically when the monogram is completed NOTES The 3 letter monogram will be sewn in the same way as the 2 letter monogram The starting position for the 2 letter and 3 letter monogram is ...

Страница 80: ...r Press the cursor key to shift the cursor under A Enter E The letter E will be inserted before A Editing a monogram 㻧 Gothic 1 4 㻤 㻤 㼄 㻥 㻦 㻧 㻨 㻩 㻪 㻫 㻬 㻭 㻮 㻯 㻰 㻱 㻲 㻳 㻴 㻵 㻶 㻷 㻸 㻹 㻺 㻻 㻼 㻽 㻑 㻉 㻓 㻔 㻕 㻗 㻗 㻘 㻙 㻚 㻛 㻜 㻖 㻤 㻲㻮 㻤㻥 㻤㻥 㻤㻥 㻤㻥 㻯㻰㻶 A Z 㻤㻥 ST 126x110mm 㻰㻨㻤 㻷 㻧 Gothic 1 4 㻤 㻤 㼄 㻥 㻦 㻧 㻨 㻩 㻪 㻫 㻬 㻭 㻮 㻯 㻰 㻱 㻲 㻳 㻴 㻵 㻶 㻷 㻸 㻹 㻺 㻻 㻼 㻽 㻑 㻉 㻓 㻔 㻕 㻗 㻗 㻘 㻙 㻚 㻛 㻜 㻖 㻤 㻲㻮 㻤㻥 㻤㻥 㻤㻥 㻤㻥 㻯㻰㻶 A Z 㻤㻥 ST 126x110mm 㻰㻤㻵 㻷...

Страница 81: ...s the edit key to enter the editing mode Move the letters to the ccenter Press the arc key to open the arc layout window 1 Upward arrow key Press this key to make a lower arc 2 Downward arrow key Press this key to make an upper arc 3 Outward double head arrow key Press this key to enlarge an arc 4 Inward double head arrow key Press this key to shrink an arc Gothic 1 4 A Z ST 126x110mm ...

Страница 82: ...irection makes the arc shallower NOTE The curvature will change when pressing the downward or upward arrow key but the arc length will remain the same Press the double head arrow key to adjust the size of the arc Move the arc to the desired position by pressing the layout keys or dragging the arc with your fingertip After choosing the shape of the arc press the OK key in the arc layout window to a...

Страница 83: ...hoop MA 200 mm by 280 mm optional item Embroidery hoop RE 140 mm by 200 mm optional item Embroidery hoop HH 100 mm by 90 mm optional item The editing window will open in the selected hoop size NOTE To select the embroidery hoop HH first you need to select the hoop RE Please refer to the instruction sheet of the Hat Hoop for how to use it Opening the embroidery designs You can open the built in des...

Страница 84: ...ip NOTE Do not drag the pattern on the screen with a sharp pointed object You can move the selected pattern also by pressing the layout keys Press the layout keys to move the pattern to the desired position in the editing window The carriage will not move when you press the layout keys since the pattern position will move relatively to the hoop not to the machine 1 Layout key Duplicating a pattern...

Страница 85: ...K key to confirm the rotation Flipping a pattern Press the flip key to open the flip option window Press one of the flip keys to flip the selected pattern horizontally or vertically Press the OK key to confirm the flipping Resizing a pattern When you press the resize key the resize window will open You can change the size of embroidery pattern from 80 to 120 of the original pattern size The size w...

Страница 86: ...t the color section of the design you wish to change by pressing the page keys To select the hue press one of the 24 color tiles To change the shade of the selected color press and drag the slider up or down You can assign a name to the customized color for the color section by pressing the name key The assigned name will be displayed instead of the name and code of the thread color in the embroid...

Страница 87: ...e up Press the duplicate key Press the horizontal flip key Press the layout key to move the duplicate to the right 6 Press the OK key and the embroidery window for the combined patterns will open NOTE Press the exit key to return to the previous screen without grouping the color NOTE The starting point of the edited design is always in the center of the hoop NOTE Patterns with a custom color canno...

Страница 88: ...ottom corner of the backdrop Press the duplicate key 5 Lay the duplicate along the backdrop 6 Repeat the above steps to form a heart shape with a series of patterns NOTE Patterns Template1 to 14 are used as backdrops for the chain of the patterns The template patterns can be resized from 50 to 150 of the original size 7 Press the color grouping key to unite the color sections of the same color 8 P...

Страница 89: ...page 89 Step 4 Save the adjusted AQ design pattern and print template sheets using AQ Print Tool included in M860 Tools Step 5 Mark the centerlines and the up mark on the quilt top and place the template sheets to check the arrangement of the AQ design patterns Mark the reference lines for the first pattern in the center of the quilt Step 6 Position the quilt layers on the hoop AQ using the AQ tem...

Страница 90: ...ey to select the width or length Press the OK key to calculate the optimum size of the design pattern The adjusted overall size and the number of patterns to fill the embroidery area will be shown Adjust the number of patterns by pressing the or key if necessary Press the key to view the distance between the centers of the neighboring patterns To return to the previous display press the key Press ...

Страница 91: ...imum pattern size Select the desired element patterns Stippling Parts 1 to 20 and arrange them to fill up the desired base area completely You may duplicate a 60x90 mm pattern and combine them to make a larger pattern NOTE Leave an outer margin grey area when laying out element patterns since the AQ Calculator will adjust the pattern size to 90 110 of the original size Press the OK key if the layo...

Страница 92: ...the centerlines on the quilt top and mark an arrow head to indicate orientation Place the template sheets on the quilt to check the general arrangement Mark reference lines for the first section on the quilt top in the center Sew the center section first then neighboring sections one by one outward Setting quilt layers in the hoop AQ Position the quilt layers on the hoop AQ Place the AQ template w...

Страница 93: ...this step until the entire area is filled with the stippling pattern If you need to sew the quilt upside down flip the design pattern in the editing mode after setting the hoop If the outer edges of each section do not align with each otherdue to shrinkage adjust the pattern size of the outer most section To adjust the pattern size select the current pattern again and press the key to open the sin...

Страница 94: ...quare frame Option 2 Motif with stippling without the frame Option 3 Motif only NOTE The designs SD 1 to 24 are in conventional embroidery stitch data not supported by the AQ Calculator To combine or link these designs use the template sheets included in the standard accessories If you open these designs in the editing mode there will be blank spaces above and below the design Stippling designs 17...

Страница 95: ...r to select The save file window will open The file name will automatically be assigned starting from M_001 in order Press the OK key and the file will be saved in the selected folder To return to the previous screen press the exit key X Creating a new folder You can create your own folder and assign the desired name to it Press the new folder key and the keyboard window will open to allow you to ...

Страница 96: ... key to overwrite the existing file Press the exit key if you do not wish to overwrite it When the memory is full the warning message will appear Press the OK key and delete the file or folder that you do not need Rename X Deleting the file or folder You can delete the folder or file no longer needed Press the delete key then select the folder or file to delete The confirmation window will appear ...

Страница 97: ...e only Open the folder that contains the file you wish to open by pressing the folder icon A file list of the selected folder will be displayed Press the next page key to view the remaining files Press the file icon and the screen will display the Ready to Sew window of the saved design or programmed pattern combination NOTES The USB memory keys optional item are available from computer shops and ...

Страница 98: ...ries The PC Folder Tool allows you to transfer the data bilaterally between the machine and PC NOTE Refer to the instruction booklet of the M860 Tools CD R for more details Start up the machne and PC and insert the type A USB connector into the PC Insert the type B connector into the machine Press the PC link tab to establish the communication between the machine and PC Now you can save and open t...

Страница 99: ...ct button to eject the PC card Take out the PC Card from the machine NOTE When turning the power switch on with the PC card inserted it will take a few moments to start up the machine Importing embroidery designs from a PC Design card Press the card tab in the embroidery mode The pattern selection window of the PC Design card will open Press the next page key to view the rest of the card contents ...

Страница 100: ...PC card into the card slot of the machine Press the open file key and the open file window will open Press the ATA card tab and the folder list will be displayed on the screen Press the desired folder icon to open Select the desired pattern by pressing the pattern icon CAUTION Do not turn the power off eject the card or remove the USB memory key while a warning message has been displayed on the sc...

Страница 101: ...he type A USB port on the machine CAUTION Do not turn the power off eject the card or remove the USB memory key while a warning message has been displayed on the screen Otherwise the saved data will be lost or the memory will be damaged Press the open file key and the open fie window will open Press the USB memory tab and the folder list will be displayed on the screen Press the desired folder ico...

Страница 102: ... USB port on the ma chine The CD ROM drive does not need external power since it is supplied from the machine via the USB cable Turn on the machine and press the open file key The open file window will open Press the CD ROM tab and select the folder that contains embroidery design data in the Jef format Select the desired pattern by pressing the pattern icon NOTES The hoop size of the design will ...

Страница 103: ...n this page 1 Remove the setscrews with the screwdriver key supplied with the machine Remove the needle plate 1 Setscrews 2 Needle plate 2 Take out the bobbin and bobbin holder 3 Bobbin holder 3 Clean the bobbin holder with a lint brush 4 Lint brush 4 Clean the feed dog and auto thread cutter device with the lint brush 5 Feed dog 6 Auto thread cutter device 5 Clean the hook race with a soft dry cl...

Страница 104: ...ly with cotton threads which generate large amount of lint clean the hook race and inside the face plate more frequently 8 9 10 11 6 7 Assembling the hook race 6 Insert the bobbin holder so that the knob fits next to the stopper in the hook race Insert the bobbin 8 Knob 9 Stopper 7 Reattach the needle plate aligning the guide holes on the needle plate with the needle plate guide pins and tighten t...

Страница 105: ...y 1 The needle is inserted incorrectly 2 The needle is bent or blunt 3 The needle and or threads are not suitable for the work being sewn 4 A blue tipped needle is not being used for sewing stretch very fine and synthetics 5 The needle thread is not threaded properly 6 A defective rusted burred needle eye needle is used 7 The embroidery hoop is not set properly 8 The fabric is not stretched tightl...

Страница 106: ...hitting something around the machine 7 The fabric is not stretched tightly enough on the embroidery hoop 8 The fabric is caught or trapped when sewing embroidery 9 The embroidery foot is trapped with a jump thread 1 The stitch length is not suitable for the fabric being sewn 2 The feed balancing dial is not set properly 3 Interfacing is not used with stretch fabric 1 The electronic control circuit...

Страница 107: ...2 23 24 25 26 35 36 37 38 31 30 32 29 33 34 27 28 L S 39 43 44 40 41 42 L S L S 14 13 15 1 2 3 5 4 7 8 9 11 12 6 10 16 17 18 19 20 21 22 23 24 25 26 L S 13 1 2 3 5 4 7 8 9 11 12 6 10 14 15 16 18 19 20 21 22 23 24 25 26 31 30 32 29 27 28 17 L S 35 36 37 38 33 34 51 49 50 47 48 L S 46 45 39 43 44 40 41 42 L S L S 53 74 75 76 77 78 79 80 81 82 83 L S 90 91 92 93 L S L S 14 13 15 1 2 3 5 4 7 8 9 11 12...

Страница 108: ... 17 9 10 11 12 6 5 7 8 24 23 22 21 13 14 15 16 26 25 27 28 44 43 42 41 33 34 35 36 30 29 31 32 48 47 46 45 51 50 49 37 38 39 40 1 2 3 4 5 6 7 8 9 11 10 12 13 14 15 16 17 18 20 19 DESIGN CHART ST for Hoop ST SQ for Hoop SQ ...

Страница 109: ... 3 4 5 6 7 8 9 11 10 12 13 14 1 2 3 4 5 6 1 2 3 4 5 6 7 8 9 10 11 12 13 14 15 16 17 18 19 20 21 22 23 24 25 26 27 28 29 30 31 DESIGN CHART FA for Free arm Hoop FA TP Template Pattern for Hoop SQ MA for Hoop MA ...

Страница 110: ...8 17 9 10 11 12 6 5 7 8 13 14 15 16 1 2 3 4 5 6 7 8 9 11 10 12 13 14 15 16 17 18 20 21 22 23 24 19 DESIGN CHART 1 2 3 4 SD Stippling Designs for Hoop AQ AQ AQ Design Patterns for Hoop AQ SP Stippling Patterns for Hoop AQ ...

Страница 111: ...110 Script Cheltenham Hollowblock Bauhaus Galant Gothic ...

Страница 112: ...111 Normal Sew Typist Brush First Grade Jupiter 3 letters 2 letters Program border ...

Отзывы: