background image

15

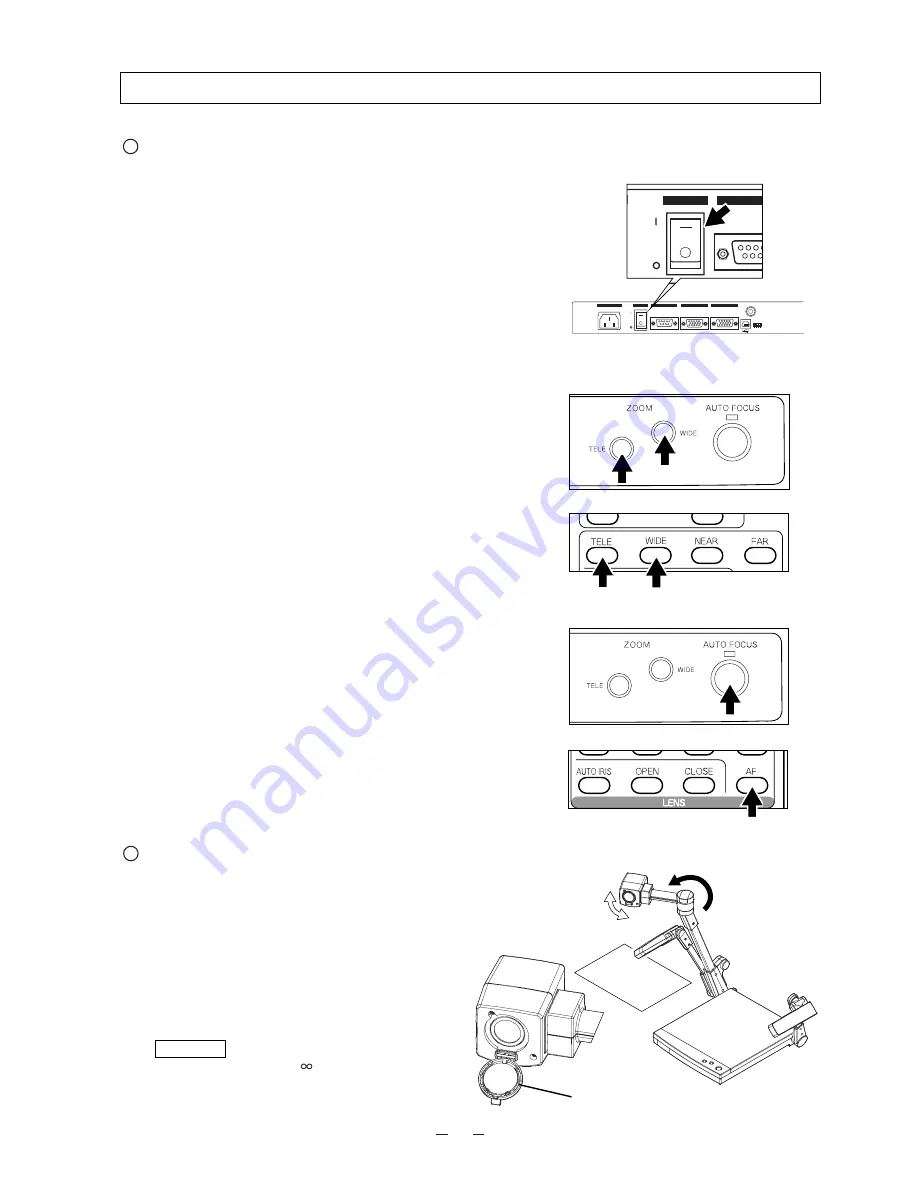
When the camera head arm is turned as shown in the
right figure, material outside the stage can be
photographed. When the camera head unit is set in the
horizontal position, wall view, distant view, etc. can be
photographed.
When the object is far away, open the close-up lens
holder to your side.

Reference

The focus can be achieved from 0.5 m
(20 in.) to 

.

Convenient use of the camera

5. OPERATION PROCEDURES

(1) Turn ON the power switch.

Note:

Before turning ON the power switch,
connection to the monitor should have been
completed.

Note:

If the power switch is turned ON immediately
after being turned OFF, the Visual Presenter
may not operate.  For restarting, turn ON the
power switch several seconds after turning
OFF.

(2) Place the object on the stage.  Adjust the image size

according to the object size using the zoom buttons

[TELE/WIDE]

on the operation panel or wireless

remote control, watching the image on the monitor.

(3) Press the button 

[AUTO FOCUS]

on the front

operation panel or the auto focus button 

[AF]

on

remote control for focusing.

Note:

The auto focus function works up to a height of
approx. 15 cm (5.9 in.) above the stage
surface on the maximum side of the zoom

[TELE]

(when a close-up lens is attached).

Simple steps for presenting printed material

Front operation panel

Remote control

Front operation panel

AC IN

RGB IN

RGB OUT

ON

OFF

RS-232C

POWER

VIDEO

OUT

USB

0
1

A B C D

ON

OFF

RS-232

POWER

Remote control

Close-up lens
holder

Содержание HV-3000XG

Страница 1: ...VISUAL PRESENTER INSTRUCTION MANUAL Please read this instruction manual carefully before using this Visual Presenter and keep it for future reference...

Страница 2: ...ended to operate from battery power or other sources refer to the operating instructions Grounding or Polarization This product may be equipped with either a polarized 2 wire AC line plug a plug havin...

Страница 3: ...TIC ENVIRONMENT THIS PRODUCT MAY CAUSE RADIO INTERFERENCE IN WHICH CASE THE USER MAY BE REQUIRED TO TAKE ADEQUATE MEASURES INFORMATION This equipment has been tested and found to comply with the limit...

Страница 4: ...re 5 C 40 C 41 F 104 F Humidity 30 85 No condensation Use a soft dry cloth for cleaning Do not use any volatile solvent such as thinner or benzine Do not directly point the camera lens into the sun or...

Страница 5: ...isual Presenter 11 Connection to the monitor and the projector 12 RGB input signal 14 RGB output signal 14 5 OPERATION PROCEDURES 15 Simple steps for presenting printed material 15 Convenient use of t...

Страница 6: ...MMUNICATION THROUGH RS 232C 24 Setting up 24 Cable connection 25 RS 232C connector specifications DSUB 9P 25 Data format specifications 26 Transmission specifications 26 Table of the communication com...

Страница 7: ...Close up Lens Holder 6 Lighting Arm L 7 Front Operation Panel 8 Remote Control Storage Compartment 9 Infrared Sensor 5 Lighting Unit Attach this holder for normal use Swing away this holder for viewi...

Страница 8: ...GB out Terminal RGB OUT 14 Power Switch POWER 17 RGB in Terminal RGB IN 19 Video out Terminal VIDEO OUT 18 USB Terminal USB 20 In Out Selector Switch Name Function ReferencePage 13 Power Cord Receptac...

Страница 9: ...her output equipment P 12 VIDEO OUT 20 In Out Selector Switch To select In Out as follows P 10 P12 A key To select the image output from RGB out terminal RGB OUT XGA output TV output Note When TV outp...

Страница 10: ...key of the In Out selector switch in the rear the video image on TV cannot be changed 28 TELE To zoom in 29 WIDE To zoom out 30 NEAR To move the focus near 31 FAR To move the focus far 32 AUTO IRIS To...

Страница 11: ...receiving area to the front of the wireless remote control rightward leftward upward and downward respectively Preparation Remove the battery case cover by pressing downward on the mark part in the d...

Страница 12: ...he column is fully raised up it may not be locked when it is fallen 2 Raise the lighting arm R unit and turn the camera head to direct the lens unit to the stage 3 Turn the lighting unit 5 Plug the po...

Страница 13: ...ly adjusting the dot clock frequency on the projector side Note When the connected equipment requires 5 connections of R G B H and V select XGA in the A key of the In Out selector switch When the conn...

Страница 14: ...terminal S VIDEO OUTPUT of the Column of the Presenter and the video in terminal of other equipment with the supplied S video cable Note The image output from the S video output terminal S VIDEO OUTP...

Страница 15: ...Blue NC GND Name GND NC Horizontal synchronizing Composite synchronizing signal Vertical synchronizing signal NC 6 7 8 9 10 Pin No 11 12 13 14 15 Pin No RGB input signal Signal assignment 1 2 3 4 5 Pi...

Страница 16: ...senter may not operate For restarting turn ON the power switch several seconds after turning OFF 2 Place the object on the stage Adjust the image size according to the object size using the zoom butto...

Страница 17: ...he lighting unit to the position shown in the right figure Note Be sure to return the lighting unit to its original position as shown in the right figure If it is in any other position when it is put...

Страница 18: ...effectively moved Note When the lightness of the material surface is not sufficiently high or a 3 D object is presented a sharp image with good color rendering can be obtained with the lighting unit...

Страница 19: ...activate the auto focus operation and the image will become sharper Reference OSD menu P 22 Front operation panel Remote control Front operation panel Remote control Video pointer When the pointer but...

Страница 20: ...OSD menu P 22 Note If the screen looks dark press the iris button OPEN on the wireless remote control to adjust the brightness of the screen Remote control However the objects listed below may not be...

Страница 21: ...hite balance When the auto white balance button AWB on the wireless remote control is pressed the white balance will be automatically adjusted according to the color temperature Reference OSD menu P 2...

Страница 22: ...r the image from the RGB out terminal RGB OUT Display of the OSD menu and the operation of the mouse When the left button of the mouse is clicked the OSD menu and the pointer appear Each function item...

Страница 23: ...he still setting Note Clicking the other icons for each function except Pointer also cancels the pause mode The object is automatically brought in focus When this icon is clicked with the left button...

Страница 24: ...hen the OSD menu is displayed for the first time the image enhancer setting is maintained The aparture has been set to ON before factory shipment The gamma selection 0 6 1 0 is switched When the OSD m...

Страница 25: ...re of the connection shown below Note To protect the Presenter and the PC be sure to turn OFF all the power switches of all equipment before connecting 2 Start the PC and set the communication mode of...

Страница 26: ...be sent from the Presenter as a result of failing to receive correctly When the communication format is correctly received the Presenter sends ACK Normal Acknowledgement 06H Transmission Command PC P...

Страница 27: ...election Command to select Color B W 0 AW Auto White Balance Command to execute the one push auto white balance 0 MAIN 1 RGB1 AV Input selection Command to select the Input 0 OFF 1 ON PO Pointer displ...

Страница 28: ...ion command Default ON Add CR command Command to add CR 0Dh to the end of the acknowledge data Default OFF 0 OFF 1 ON FZ 0 OFF 1 ON LL Pause Command to pause the image Local lockout Command to invalid...

Страница 29: ...elector switch is not correctly selected according to connected equipment See P 8 and 13 Out of focus The object is too close to the lens Check if it does not stand higher than 15 cm 5 9 in above the...

Страница 30: ...nal frequency XGA Horizontal frequency 48 363kHz Vertical frequency 60 004Hz 1024 x 768 60Hz VESA conformable White balance Auto One push Manual Electronic shutter speed selection Provided Provided Co...

Страница 31: ...d trademarks of ELMO CO Ltd Item Specifications Lighting High frequency lighting mode Model FPL9EX N Name Quantity 1 1 1 1 1 1 1 1 1 2 1 1 1 Power cord RCA video cable Analog RGB cable BNC connector V...

Страница 32: ...LMO Mfg Corp 1478 Old Country Road Plainview NY 11803 5034 Tel 516 501 1400 Fax 516 501 0429 E mail elmo elmousa com web http www elmousa com Canada ELMO Canada Mfg Corp 44 West Drive Brampton Ontario...

Отзывы: