background image


Elma B-Scope 500 

side 34 


M

ove the cursor with Right/Left button to the functions you want to set up, then press 

”SNAP” and “RECORD” to adjust the date and time.

 Select “OFF” on “Time” interface to 

end up the Time and Date display both on the “System Setup” interface and in the camera 
mode. 

Press ”OK” button to save the time setting and return to main interface or press 

”ESC” to back up to camera mode.


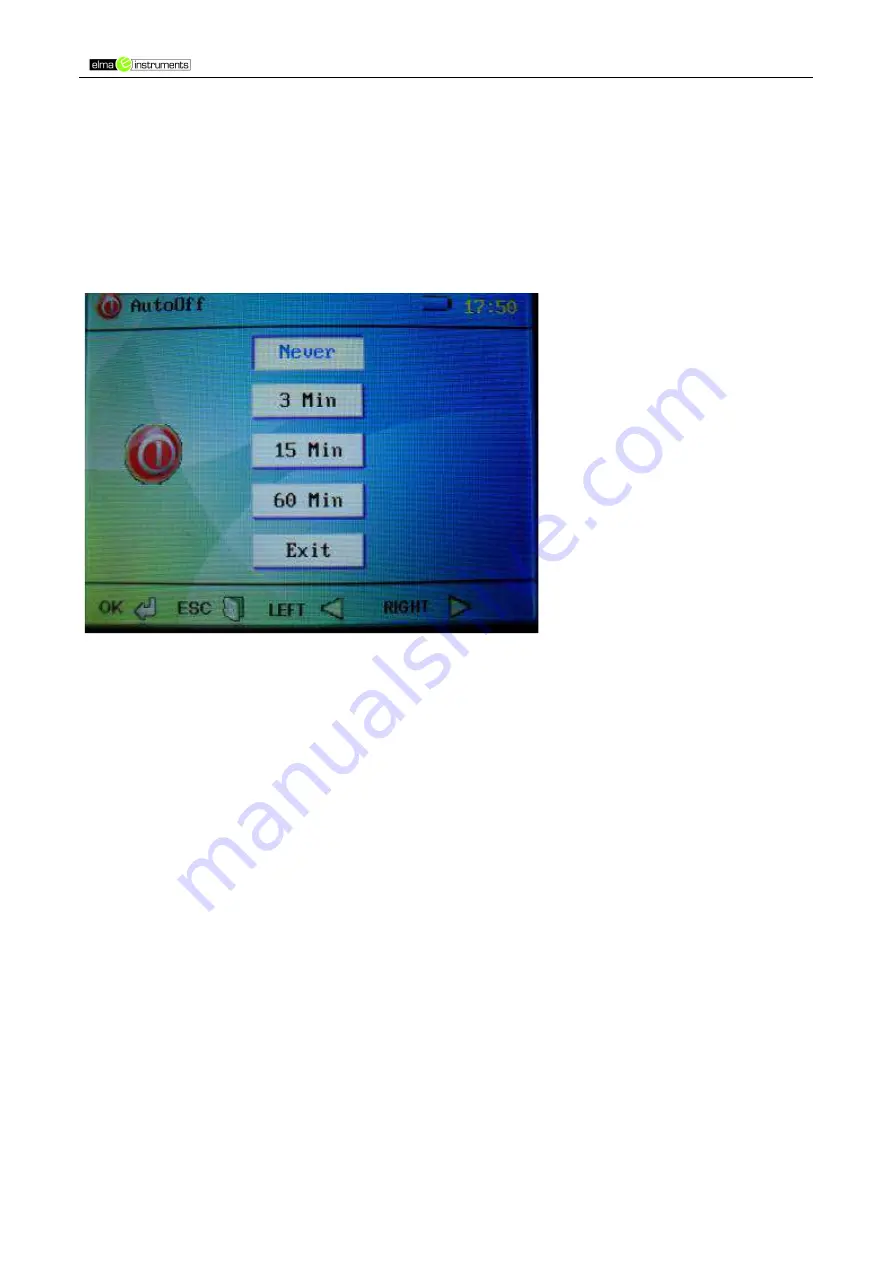
5) Automatic Shut Down Setting. 

System Setup/Auto Off/”OK” button, enter into Automatic Shut Down Setting. 


“Never”: Turn off the auto-off function. 
“3Min/15Min/60Min”: The instrument will turn off upon 3min/15min/60min non-operation. 
“Exit”: Back up to the Main Menu 
“OK” button: Save automatic shut down setting and return to Main Menu. 
 Auto-off function will not be activated when recording or playing video.  
 
6) TV-OUT  
System Setup/TV-OUT/”OK” button, enter into TV-OUT Setting. 

Insert the TV-OUT video cable into the earphone, and plug the other side of the cable into 
the TV VIDEO, both left channel and right channel (yellow for VIDEO, the red and white for 
left and right channels)


Содержание Elma B-Scope 500

Страница 1: ...Elma B Scope 500 Dansk norsk manual Side 4 14 Svensk manual Sida 15 25 English usermanual Page 26 39 DK 63 98 206 455 SE 42 10 561 NO 80 62 162 EAN 5706445840076...

Страница 2: ...s tning 8 Systemvalg 8 Forbindelse til computer 13 Opladning 13 Reset funktion 14 Vigtige informationer 14 Svensk manual 15 S kerhetstips 15 Reparation och underh ll 15 S kerhetssymboler 15 Funktionsb...

Страница 3: ...ication 26 Maintenance and Cleaning 26 Safety Sybomls 26 Function Description 26 Specifications 27 Buttons and Functions 28 Operation 31 Operation under Video Mode 31 System Setting 32 Connection to C...

Страница 4: ...ykk p op ned piletasterne i videofunktionen Billedvisning med nuv rende tid og dato Sletning af billede eller videooptagelse enkeltvis Optagelse af billede og video SD Kort 32GB Ekstern hukommelse Fla...

Страница 5: ...atur 20 60 C Opbevaringsfugtighed 15 til 85 RH Dataudgang USB datakabel SD kort Str mforsyning 1 x 3 7V 2000mAh batteri St rrelse lxbxh 240 x 100 x 160mm Tilbeh r medleveret Betjeningsvejledning UK DK...

Страница 6: ...side 6 Hul til d ksel for beskyttelse af stikkene H ndtag med Li batteri Slange Probe Stikforbindelse til instrumentet Kamera TV OUT og h retelefon stik SD Kort Reset knap USB port for opladnings port...

Страница 7: ...umentet ved igen at holde trykke p T nd sluk P Av knappen i ca 3 sek 2 Juster baggrundsbelysningen Man kan justere baggrundsbelysningen s videoendoskopet kan anvendes i alle omgivelser For g baggrunds...

Страница 8: ...vil blinke i verste venstre hj rne indikerende at en videooptagelse er p begyndt Samtidigt vil hukommelsesstatussen blive vist i nederste venstre side p displayet s man altid kan se hvor meget hukomme...

Страница 9: ...til venstre Ikonerne kan ogs v lges cirkul rt ved vedvarende tryk p enten h jre eller venstre piletaster b I Explorer funktionen i systemops tningerne bruges h jre venstre piletast som op ned funktio...

Страница 10: ...ekr fte valget her kommer man tilbage til systemmenuen Success vil blinke i nederste venstre hj rne for bekr ftelse V lg ON hvis man nsker angivelse igen 6 Automatisk auto sluk ops tning Systemops tni...

Страница 11: ...rmvisning n r man er TV OUT funktionen Hvis man v lger NTSC eller PAL uden at videokablet er forbundet til fjernsynet vil der komme sort sk rm Tryk trykk nu et langt tryk p T nd P knappen for at sluk...

Страница 12: ...kk p ESC for at returnere I Video billede biblioteket trykkes der p BRIGHT knappen hvis man nsker at slette p g ldende video billede hvert tryk trykk sletter 1 video billede Tryk trykk p EXIT for at r...

Страница 13: ...2 sek n r man har forbundet USB kablet vil instrumentet automatisk slukke sl es av og det er nu ikke muligt at anvende instrumentet Instrumentet vil t nde igen s snart man fjerne USB kablet fra compu...

Страница 14: ...igen fungere efter hensigten Vigtige informationer 1 Proben m ikke bukkes for voldsomt ellers vil den g i stykker og v re ude af stand til at reparere 2 Tag batteriet ud af instrumentet hvis dette ik...

Страница 15: ...upp ned pilknapparna i videofunktionen Bildvisning med nuvarande tid och datum Radering av enstaka bilder eller videoupptagningar Upptagning av bil och video SD kort 32GB Externt minne Flash kort 8GB...

Страница 16: ...temperatur 20 60 C Max fukt vid f rvaring 15 till 85 RH Datautg ng USB datakabel SD kort Str mf rs rjning 1 x 3 7V 2000mAh batteri Storlek lxbxh 240 x 100 x 160mm Tillbeh r medlevererat Manual UK DK N...

Страница 17: ...Elma B Scope 500 side 17 H l f r fasts ttning av skydd f r anslutningar Slang Prob Kamera TV OUT och ljudutg ng SD kort Resetknapp USB port f r laddning och kommunikation...

Страница 18: ...Justera bakgrundsbelysningen Man kan justera bakgrundsbelysningen s att videoendoskopet kan anv ndas i alla omgivningar ka bakgrundsbelysningen genom att trycka p BRIGHT knappen f r nskad niv 10 r h...

Страница 19: ...indikerar att en videoupptagning p g r Samtidigt visas minnesstatusen i nedre v nstra delen av displayen s man har kontroll p kvarvarande minneskapacitet N r minnet r helt anv nt ppnas en dialogruta s...

Страница 20: ...knappen flyttar mark ren till v nster Ikonerna kan ocks v ljas cirkul rt med flera tryck p h ger eller v nster pilknapp d I Explorer funktionen i systeminst llningarna anv nds h ger v nster pilknapp s...

Страница 21: ...lj OFF om du nskar att ta bort datum och tid p displayen tryck p OK knappen f r att bekr fta valet terg r till systemmenyn V lj ON om man nskar visning igen 17 Automatisk avst ngning inst llning Syst...

Страница 22: ...terg till sk rmvisning n r man r i TV OUT funktionen Om man v ljer NTSC eller PAL utan att videokabeln r ansluten visas en svart sk rm Tryck ett l ngt tryck p P Av knappen f r att st nga av instrument...

Страница 23: ...d bild Tryck p ESC f r att terg I Video bild biblioteket trycker man p BRIGHT knappen om man nskar att radera aktuell video bild varje tryck raderar 1 video bild Tryck p EXIT f r att terg 21 Inst llni...

Страница 24: ...ilder samt man kan radera och kopiera Efter 2 sek n r man har anslutit USB kabeln sl s instrumentet av automatiskt och det r nu inte m jligt att anv nda instrumentet S snart USB kabeln tas bort fr n d...

Страница 25: ...a sida Efter terstart skall instrumentet fungera som normalt igen Vigtig information 6 Proben f r inte anv ndas med v ld 7 Om instrumentet inte skall anv ndas under en l ngre period skall batterierna...

Страница 26: ...ntenance should be operated only by qualified professionals Please clean the camera after use and no detergents should be used in cleaning Safety Sybomls Complied with European CE safety standards Fun...

Страница 27: ...F Photo Format JPEG Camera Video Format 3GP Saved Image Format JPG 640 480 SD Card MAX 32GB Flash Memory MAX 8GB Working Voltage Li battery 3 7V 2000mA Video Working Current Approx 380mA Static Curren...

Страница 28: ...Elma B Scope 500 side 28 Buttons and Functions 3 2inch TFT LCD UP Button Backlight Decrease Button Quit Button OK Button ON OFF Button Hand Shank with Li battery Down Button Backlight Increase Button...

Страница 29: ...Elma B Scope 500 side 29 SD Card Goose neck Socket connects to the motherboard Camera Reset Button Jack TV OUT and Earphone hole USB Port and Charging Port Silicon Gel Jack...

Страница 30: ...Elma B Scope 500 side 30 Motherboard Socket Camera Socket Photo Button Video Button...

Страница 31: ...a mode press up down button to adjust the angle on the screen to get a suitable image displayed Image angle can be rotated from 0 to 180 with up down button which will greatly facilitate the detection...

Страница 32: ...a MENU dialog box Select Yes with the left right button and then press OK button to enter into Main Interface System Setup System Setting 1 Under the camera scanning mode press OK button and the foll...

Страница 33: ...Video selection interface the Right Left button is used in up and down selection 3 Language Setting System Setup Language OK button enter into Language Setting Select different languages with Right L...

Страница 34: ...em Setup Auto Off OK button enter into Automatic Shut Down Setting Never Turn off the auto off function 3Min 15Min 60Min The instrument will turn off upon 3min 15min 60min non operation Exit Back up t...

Страница 35: ...to LCD display If NTSC or PAL is selected with no video cable connecting to the television long press the power button to turn off the LCD display and press again to turn on 7 Memory Options System Se...

Страница 36: ...er Video Player and OK button videos interface Picture View and OK button Picture interface Press ESC to return to Explorer from picture and video playing In the video Picture directory press BRIGHT b...

Страница 37: ...s not suggested for the instrument has been best calibrated before delivery Press Default to return to the best calibrated default value 10 Saving Power Mode Set the corresponding time under the savin...

Страница 38: ...turns off The LCD lights up again when USB cable is disconnected or charging is completed Remark Connect to the USB cable under any mode of Power off System Setup main menu any submenu or camera inte...

Страница 39: ...diameter less than 5 inch or it will be irreparable 2 Take out the battery when the instrument is not in use for a long time to avoid corruption caused by the battery fluid leakage 3 Clean the camera...

Страница 40: ......

Отзывы: