M1G Installation and Programming
Page 50
4.1.2 Check for Conflicts
During the connect and disconnect process RP performs an automatic check of the data stored in the control and compares it
the database. If there are any conflicts (differences), a pop-up resolution window display them and allows corrections to be
made. ELK regards “Check for Conflicts” to be an especially important feature. It can point out any changes that have
occurred such as a user having added or changed a code. The resolution window allows you to receive the control’s data into
the database (accept the local version) or send the RP data to the control (accept the database version).
NOTE: Checking for
conflicts adds considerable time to the connect/disconnect process, especially on dial-up connections. For this reason,
the automatic check for conflicts may be disabled from the SETUP menu. A manual Check for Conflicts can be selected
from the Send/Rcv icon.
4.1.3 Sending and Receiving Data
RP allows many options and groups of options to be sent or received individually, which greatly reduces the on-line connect
time if there are only a few items to be changed. However, a full send or receive occurs very quickly, thanks to the M1’s built-in
V.22 bis “True” Modem. RP features easy to use menus & toolbar icons and makes extensive use of the right mouse button
to perform operations. Try right clicking on any item or icon to see the available options.
4.2 Update/Verify Firmware in the Control and Peripherals
The control stores it’s operating firmware in “Flash” memory. This state-of-the-art memory allows electronic field updates to
the control and its peripherals, and eliminates the old fashion method of changing IC chips or shipping boards back to the
factory. As new firmware updates become available, they will be posted on ELK’s website [www.elkproducts.com] in a
password restricted “M1 Dealers ONLY” location.
NOTE: Firmware updating can only be done from a Direct to PC Com port
connection or an optional Ethernet Network connection. Due to the amount of data that has to be transferred, Dial-up
connections cannot be used to perform firmware updates.
How to Update Firmware:
1.
Connect a 9 pin serial cable from the Computer’s Serial Port to the 9 Pin RS232 Connector on the control.
2.
Start RP and open the account belonging to that particular control. Click on the Connection menu icon and establish
a connection using the
Direct using Com_
option.
3.
Click on Update/Verify Firmware from the Send/Rcv menu icon.
4.
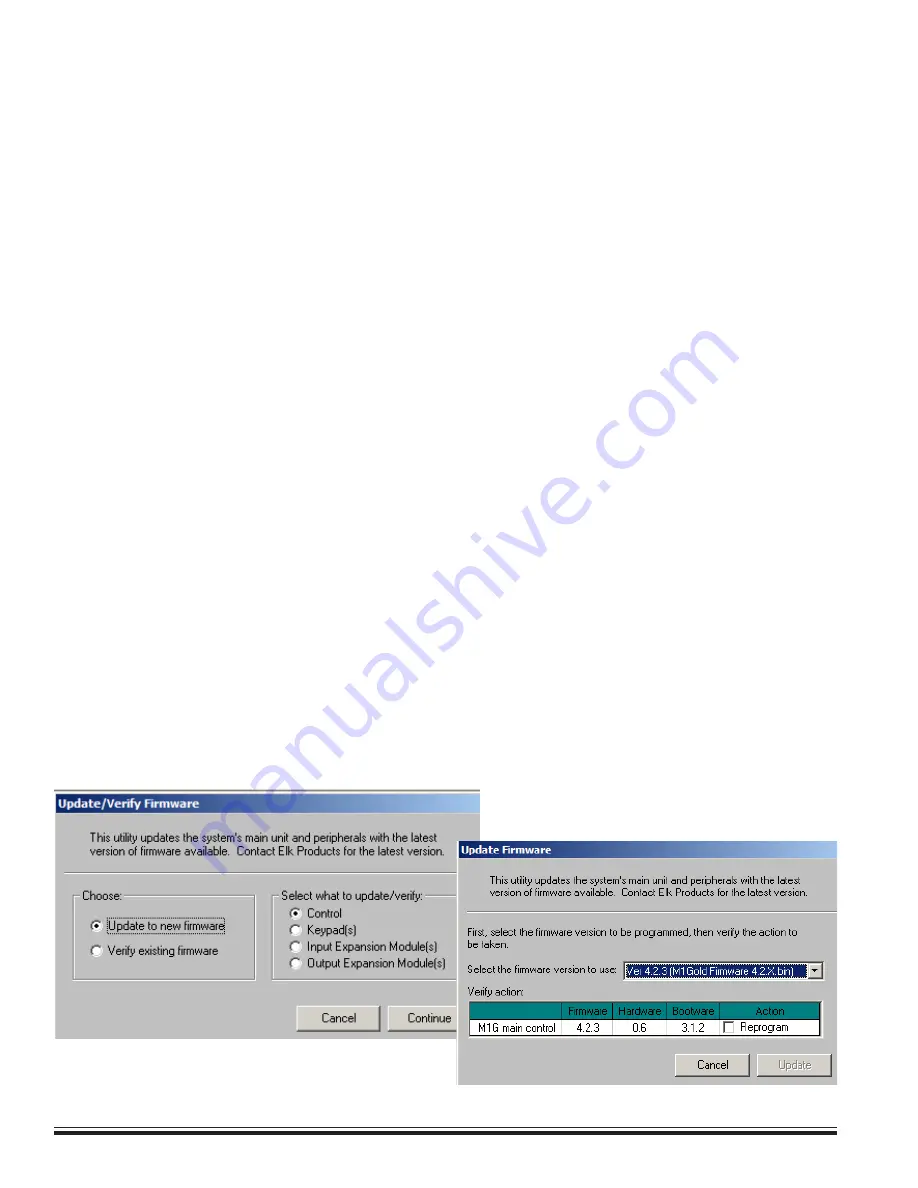
On the Update/Verify screen, select the device to be updated (Control, Keypad, etc.) along with the “Update to new
firmware” option. Then click Continue.
5.
The Update Firmware screen displays the device name, the current Firmware, Hardware, and Bootware version, and
a pull down window for selecting the firmware version to use on the update. Always select the latest firmware version
(highest number). Be sure to save all update (.bin) files that are downloaded or received via CDROM into the
~Program Files\ElkRP\Updates directory on your computer. This is where RP looks for all update files.
6.
Click on the check box for “Update”. If “Reprogram” or “Rollback” is displayed the firmware file is the same as OR
older that what is in the control. Reprogramming with the same firmware is a waste of time but was included for
factory testing purposes. Rollback is not recommended except under the guidance of Elk Technical Support.
NOTE: The option for “Verify existing firmware” on the Update/Verify screen is normally not required except for
factory diagnostics. If the control has multiple keypads, expanders, etc., RP will display the details about each
one onscreen with a check box for selecting units for updating.
Содержание ELK-M1G
Страница 72: ...www elkproducts com Printed in USA...


