IMPORTANT
• do not block the rotation of the bicycle wheel
by using caliper or disk brake. This seriously
damages the roller and the tire.
• use slick tires with a 23 mm or wider rigid
casing when using the home-trainer. Tire
pressure must range between 7-8 atm for
racing tires (4 for MTb tires). A tire that is
too narrow and/or insufficient tire pressure
will cause serious damage to the Elastogel
roller and tire.
• use a slick wheel on mountain bikes too (it
will improve traction, reduce tire and roller
wear, reduce the noise level and vibrations).
• The wheel must not slip on the roller. If this
happens, make the action on the pedals more
progressive. Training with a tire that slips
regularly can seriously damage the Elastogel
roller and tire.
• While using the crono Fluid Elastogel trainer,
a slight sign of wear of the roller is normal
and does not effect performance. The tests
performed in Elite show that after 20.000 km of
constant use the wear of the roller is equal to
0.1 mm, and being the roller think 13 mm, even
a wear greater than 0.1 mm would not effect
the functionality of the trainer. Warranty claims
due to improper use of the trainer are void.
INTROducTION
Remove the pieces from the box and confirm their
presence:
• Fluid Resistance Unit
• Stand
• Unit Accessory Bag
a. 2 M6 x 25 mm screws
b. 2 Ø 6.3 x 14 mm washers
c. 1 5 mm hexagonal key
• Quick release
AssEMbly
The Fluid stand is already completely assembled.
You just have to put it on a level surface with
the front stanchion
in a vertical position and
the base in a horizontal position. If the friction
between the base
and the stanchion
is not
sufficient to keep the stand open, even without the
bike, you only need to tighten the two screws that
act as a hinge between the two parts.
Resistance unit Assembly
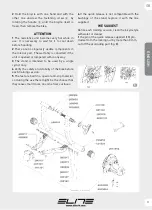
1 Place the unit on the support
. Fasten the
resistance unit to the support by using the M6 x 25
screws and the Ø 6.3 x 14 washers from the lower
side of the support, as show in Ill. 2. Use the most
suitable couple of holes for the rear wheel of the
bike. Front holes for small diameter wheels and
rear holes for bigger wheels. For a 28” (Ø 670 mm
circa) race wheel, we suggest the use of the cen-
tral couple of holes. For 700 mm diameter wheels,
we suggest the use of the rear couple of holes.
bicycle Installation
1 Substitute the quick release of the rear wheel
with the model supplied with the trainer.
2 Make sure that the quick release of the rear
wheel is tight.
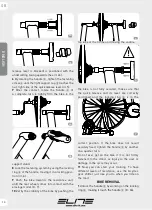
3 Place the locking ring
of the handle
as
seen on illustration 3a and unscrew the fastening
screw until the right support cup
touches the
frame stand (illustration 3b).
4 Make sure that the front legs
of the stand are
in a vertical position.
5 Position the bike by inserting the left edge of the
quick release in the left support cup
(ill. 4a). To
have a safe locking of the bike on the stand, make
sure that the left support cup
(where the quick
GB
ENGLISH
9
2


