background image

6

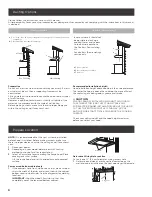
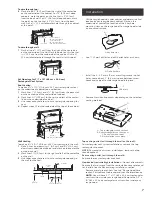
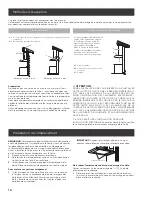
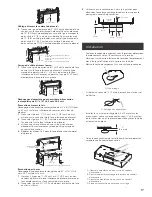
Ducting Options

Closely follow the instructions set out in this manual. 

All responsability, for any eventual inconveniences, damages or fires caused by not complying with the instructions in this manual, 

is declined.

Ducting version

Ductless (Recirculating)

a) 

3

¹

4

” x 10” (8.3 x 25.4 cm) rectangular vent through the roof/wall (purchased 

separately).

b) 

Roof/wall cap (purchased separately)

A

B

A

B

Roof Venting

Wall Venting

In cases where it should not 

be possible to discharge 

cooking fumes and vapour 

to the outside, purchase 

the Ductless Recirculating 

Kit. 

For ductless (Recirculating) 

version only.

a) 

Charcoal filter

b) 

Recirculation cover plate

c) 

Cabinet

A

B

C

Preparation

Do not cut a joist or stud unless absolutely necessary. If a joist 

or stud must be cut, then a supporting frame must be

constructed.

Fittings material is provided to secure the hood to most types 

of walls/ceilings.

However, a qualified technician must verify suitability of the 

materials in accordance with the type of wall/ceiling.

Before making cutouts, make sure there is proper clearance 

within the ceiling or wall for exhaust vent.

Recommended installation height: 

Hood installation height above cooktop is the users preference. 

The lower the hood is above the cooktop, the more efficient 

the capturing of cooking odors, grease and smoke.

I     

CAUTION

FOR GAS RANGES INSTALLATION: MOUNT THIS HOOD SO 

THAT THE BOTTOM IS NOT LESS THAN 27” (68.6 CM). 

FOR ELECTRIC RANGES INSTALLATION: MOUNT THIS HOOD 

SO THAT THE BOTTOM IS NOT LESS THAN 24” (61 CM)

AND NOT MORE THAT 30” (76.2 CM) ABOVE THE COOKING 

SURFACE.

Check your ceiling height and the hood height maximum 

before you select your hood.

Prepare Location

NOTE: 

It is recommended that the vent system be installed 

before hood is installed. Before making cutouts, make sure 

there is proper clearance within the ceiling or wall for exhaust 

vent.

Disconnect power.

Depending on your model, determine which venting  


method to use: roof, wall or recirculating.

Select a flat surface for assembling the range hood. Place 


covering over that surface. 


Lift the range hood and set it upside down onto covered 

 surface. 


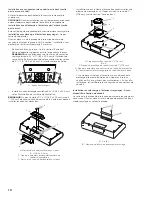
For recessed bottom cabinet only

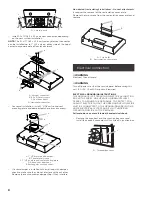
If the cabinets have front, side or back trim, make 2 wood 

shims the width of the trim and attach them to the cabinet 

bottom recess on both sides. See the diagramas for marking 

locations.

IMPORTANT: 

Align the wood filler strips so that they  

completely cover the recessed bottom cabinet.

Wood shims

Determine Wiring Hole Location


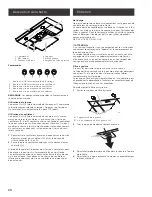
Cut only one 1

1

4

” (3.2 cm) diameter wiring access hole.

Determine and clearly mark a vertical centerline on the 


wall and cabinet in the area the vent opening will be made. 

A. Centerline

A

Содержание ENM230S1

Страница 1: ...lisation d entretien et d installation Guía de instalación uso y mantenimiento READ AND SAVE THESE INSTRUCTIONS LISEZ CES INSTRUCTIONS ET CONSERVEZ LES LEA Y CONSERVE ESTAS INSTRUCCIONES LIB0138588 Printed in Mexico 10 17 Models ENM230S1 ENM236S1 ...

Страница 2: ...y 11 APPROVED FOR RESIDENTIAL APPLIANCES FOR RESIDENTIAL USE ONLY READ AND SAVE THESE INSTRUCTIONS PLEASE READ ENTIRE INSTRUCTIONS BEFORE PROCEEDING INSTALLATION MUST COMPLY WITH ALL LOCAL CODES IMPORTANT Save these Instructions for the Local Electrical Inspector s use INSTALLER Please leave these Instructions with this unit for the owner OWNER Please retain these instructions for future reference...

Страница 3: ... spaces within walls ceilings attics crawl spaces or garages IWARNING TO REDUCE THE RISK OF FIRE USE ONLY METAL DUCT WORK Install this hood in accordance with all requirements specified IWARNING To reduce the risk of fire or electric shock do not use this hood with any external solid state speed control device IWARNING TO REDUCE THE RISK OF A RANGE TOP GREASE FIRE a Never leave surface units unatt...

Страница 4: ...and at the junction box Copies of the standards listed may be obtained from National Fire Protection Association Batterymarch Park Quincy Massachusetts 02269 CSA International 8501 East Pleasant Valley Road Cleveland Ohio 44131 5575 BEFORE INSTALLING THE HOOD 1 For the most efficient air flow exhaust use a straight run or as few elbows as possible CAUTION Vent unit to outside of building only 2 At...

Страница 5: ...ct 31 4 x 10 8 3 x 25 4 cm with back draft damper 1 4 5x13 mm 4 Grease filter 1 3 5x6 5 mm 2 Parts no supplied Tools Materials required Drill 11 4 3 0 cm drill bit 1 8 3 0 mm drill bit for pilot holes Pencil Wire stripper or utility knife Tape measure or ruler Caulking gun and weatherproof caulking compound Saber or keyhole saw Metal snips Screwdrivers Phillips Flat blade Optional accessories and ...

Страница 6: ...e cooktop the more efficient the capturing of cooking odors grease and smoke I CAUTION FOR GAS RANGES INSTALLATION MOUNT THIS HOOD SO THAT THE BOTTOM IS NOT LESS THAN 27 68 6 CM FOR ELECTRIC RANGES INSTALLATION MOUNT THIS HOOD SO THAT THE BOTTOM IS NOT LESS THAN 24 61 CM AND NOT MORE THAT 30 76 2 CM ABOVE THE COOKING SURFACE Check your ceiling height and the hood height maximum before you select y...

Страница 7: ...de of cabinet and mark on the centerline on the back wall 2 Mark lines 5 13 3 cm to the right and left of the centerline on the wall 3 Use saber or keyhole saw to cut a rectangular opening in the wall for the vent Cabinet front 41 4 10 8 cm 1 8 0 3 cm Centerline 51 4 13 3 cm 51 4 13 3 cm Installation Lift the range hood up under cabinet and determine final location by centering beneath cabinet Mar...

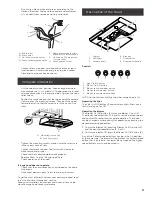
Страница 8: ...r flap if they interfere Non ducted recirculating installations No vent attachments It requires the removal of the recirculation cover plate Remove the two screws from the recirculation cover plate and remove A B A Screws 2 B Recirculation cover plate Electrical Connection IWARNING Electrical Shock Hazard IWARNING Turn off power circuit at the service panel before wiring this unit 120 VAC 15 or 20...

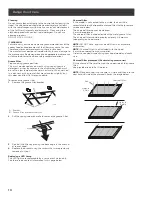
Страница 9: ... range hood does not operate Check that the circuit breaker is not tripped or the house fuse blown Disconnect power supply Check that wiring is correct To get the most efficient use from your new range hood read the Use and Care Information section Keep your Installation Instructions and Use and Care Guide close to range hood for easy reference Description of the Hood 3 6 1 2 3 4 5 1 Control 2 LED...

Страница 10: ...t B A A Bracket B Grease filter bracket screws 2 2 Pull the spring release handle to remove the grease filter A 3 Reinstall the filter by placing the back edge in the channel at rear of hood 4 Replace the bracket using the screws that were previously removed in step 1 Replacing a LED Lamp The LED lights are replaceable by a service technician only See the service contact information in this page b...

Страница 11: ... Wear to finish due to operator abuse improper maintenance use of corrosive or abrasive cleaning products pads and oven cleaner products WHO IS COVERED This warranty is extended to the original purchaser for products purchased for ordinary residential use in North America Including the United States Guam Puerto Rico US Virgin Islands Canada This warranty is non transferable and applies only to the...

Страница 12: ...CES INSTRUCTIONS ET CONSERVEZ LES VEUILLEZ LIRE CES INSTRUCTIONS AU COMPLET AVANT DE COMMENCER L INSTALLATION DE L APPAREIL DOIT RESPECTER TOUS LES CODES EN VIGUEUR IMPORTANT Conservez ces instructions afin de pouvoir les remettre à l inspecteur électricien de votre région INSTALLATEUR Veuillez laisser ces instructions avec l appareil pour le propriétaire PROPRIÉTAIRE Veuillez conserver ces instru...

Страница 13: ...nt toutes les exigences mentionnées I AVERTISSEMENT Pour réduire les risques d incendie et de choc électrique n utilisez pas cette hotte avec un contrôleur de vitesse à semi conducteurs I ATTENTION Dispositif à commande automatique pour réduire le risque de Blessure Débrancher de l alimentation électrique avant la maintenance I AVERTISSEMENT POUR RÉDUIRE LES RISQUES D INCENDIE DE GRAISSE SUR LES C...

Страница 14: ...AVANT D INSTALLER LA HOTTE 1 Pour assurer la ventilation la plus efficace possible installez la conduite en ligne droite ou avec le moins de coudes possibles ATTENTION La sortie de la conduite de ventilation doit donner sur l extérieur 2 Deux personnes sont nécessaires pour effectuer l installation 3 La quincaillerie fournie permet de fixer la hotte à la plupart des murs et des plafonds consultez ...

Страница 15: ...aire de 31 4 x 10 8 3 x 25 4 cm 1 4 5x13 mm 4 Filtre à graisse 1 3 5x6 5 mm 2 Pièces non fournies Outils nécessaires Perceuse Foret de 11 4 3 0 cm Foret de 1 8 3 0 mm pour avant trous Crayon Pince à dénuder ou couteau utilitaire Ruban á mesurer ou règle Pistolet à calfeutrage et composé de calfeutrage résistant aux intempéries Tournevis à lame plate Tournevis Philips Scie sauteuse ou scie à guiche...

Страница 16: ...RTE QUE LE REBORD INFÉRIEUR EST PAS MOINS DE 24 61 CM SUR LA SURFACE DE CUISSON IL EST RECOMMANDÉ D INSTALLER CETTE HOTTE PLUS DE 30 76 2 CM AU DESSUS DE LA SURFACE DE CUISSON PAR POUCE 2 54 CM SUPÉRIEURE À 30 76 2 CM DIMINUERA L EFFICACITÉ DE LA CAPTURE DE LA FUMÉE ET DE L HUMIDITÉ ET LA PERFORMANCE DE VENTILATION S IL VOUS PLAÎT LIRE L INSTALLATION POUR UNE INSTALLATION SPÉCIFIQUE Avant de chois...

Страница 17: ...age du conduit d évacuation 4 Répéter les étapes 1 à 3 pour la face inférieure du sommet du placard Ouvertures découpées dans le placard 1 2 5 cm À partir du mur et non du cadre du placard 5 12 7 cm 51 4 13 3 cm 51 4 13 3 cm Évacuation par le mur Découpage d une ouverture rectangulaire de 41 4 x 10 10 8 cm x 26 7 cm dans le mur 1 Mesurer 2 lignes de 1 8 0 3 cm et 41 16 10 3 cm en des cendant à par...

Страница 18: ...5 4 cm selon l installation du système de ventilation REMARQUE On peut installer 3 4 x 10 8 3 x 25 4 cm jusqu à 1 2 5 cm de chaque côté du centre de la hotte pour pouvoir installer les conduits décentrés B B C A D A Raccord de conduit vertical avec clapet B Vis 6 5 x 9 5 mm C Opercule amovible rectangulaire arrière du conduit d évacuation D Raccord de conduit horizontal avec clapet Installations p...

Страница 19: ...a terre vert ou nu du câble d alimentation du domicile à la vis verte de liaison à la terre dans la boîte de connexion et bien serrer Installer le couvercle du boîtier de connexion Achever l installation À l aide d au moins deux personnes soulever la hotte et la placer à son emplacement final Insérer suffisamment de câble électrique à travers le serre câble de homologa tion UL ou CSA pour établir ...

Страница 20: ...esse de ventilateur inférieure les boutons de vitesse supérieure ne doivent pas être enfoncés Entretien Nettoyage Ne pas vaporiser de nettoyants directement sur le panneau de contrôle lors du nettoyage de la Hotte La hotte doit être régulièrement nettoyée à l intérieur et à l ex térieur au moins à la même fréquence que pour l entretien des filtres à graisse Pour le nettoyage utiliser un chiffon hu...

Страница 21: ... filtres à charbon doivent être remplacés après 4 à 6 mois en fonction de l utilisation de la hotte REMARQUE NE PAS rincer ou mettre les filtres à charbon au lave vaisselle REMARQUE Les filtres à charbon NE sont PAS inclus dans la hotte Ils doivent être commandés chez votre revendeur Commander le kit nécessaire en spécifiant votre modèle de hotte et sa largeur Placement du filtre au charbon Access...

Страница 22: ...filtres métalliques ou au charbon et toute autre pièce consommable Usure normale Usure due à une mauvaise utilisation du propriétaire un entretien incorrect une utilisation de substances nettoyantes QUI EST COUVERT Cette garantie s étend à l acheteur original de produits achetés pour un usage domestique habituel en Amérique du Nord Y compris Etats Unis Guam Porto Rico les Iles virgin Américaines l...

Страница 23: ...OMÉSTICO SÓLO PARA USO DOMÉSTICO LEA Y GUARDE ESTAS INSTRUCCIONES ANTES DE CONTINUAR LEA LAS INSTRUCCIONES POR COMPLETO LA INSTALACIÓN DEBE CUMPLIR TODA LA NORMATIVA LOCAL IMPORTANTE Guarde estas instrucciones para su uso por parte del inspector de electricidad local INSTALADOR Entregue al propietario estas instrucciones junto con la unidad PROPIETARIO Conserve estas instrucciones para futuras con...

Страница 24: ...ados en el interior de muros techos desvanes sótanos de pequeña altura o garajes I ADVERTENCIA PARA REDUCIR EL RIESGO DE FUEGO UTILICE SOLAMENTE TUBOS METÁLICOS Instale esta campana de acuerdo con los requisitos especificados I ADVERTENCIA Para reducir el riesgo de fuego o descarga eléctrica no utilice esta campana con ningún dispositivo externo en estado sólido para el control de la velocidad I A...

Страница 25: ...nes ANTES DE INSTALAR LA CAMPANA 1 Para obtener una circulación del flujo de aire más eficaz utilice un tubo de tramo recto o el menor número posible de tubos acodados PRECAUCIÓN el conducto de ventilación solamente debe tener salida hacia la parte exterior del edificio 2 Para realizar la instalación se necesitan al menos dos personas 3 La campana se ajusta mediante material adecuados para la mayo...

Страница 26: ... 1 Transición rectangular de 31 4 x 10 8 3 x 25 4 cm 1 4 5x13 mm 4 Filtro de grasa 1 3 5x6 5 mm 2 Partes no Suministradas Herramientas necesarias Taladro Broca 11 4 3 0 cm Broca para orificios piloto 1 8 3 0 mm Lápiz Pinzas para cortar y pelar cable Cinta métrica regla o flexómetro Pistola selladora y resanador a prueba de agua Destornillador plano Destornillador Phillips Caladora o sierra Tijeras...

Страница 27: ...INSTALACIÓN DE ESTUFAS DE GAS INSTALE ESTA CAMPANA DE TAL MANERA QUE LA CORNISA INFERIOR SE ENCUENTRE A 27 68 6 CM SOBRE LA SUPERFICIE DE COCCIÓN PARA LA INSTALACIÓN DE ESTUFAS ELÉCTRICAS INDUCCIÓN INSTALE ESTA CAMPANA DE TAL MANERA QUE LA CORNISA INFERIOR SE ENCUENTRA A NO MENOS DE 24 61 CM SOBRE LA SUPERFICIE DE COCCIÓN Y NO MAYOR DE 30 76 2 CM SOBRE LA SUPERFICIE DE COCCIÓN POR FAVOR LEA EL MAN...

Страница 28: ... de la parte superior del gabinete Recortes del gabinete 1 2 5 cm De la pared no del gabinete 5 12 7 cm 51 4 13 3 cm 51 4 13 3 cm Ventilación a través de la pared Para realizar un corte rectangular de 41 4 x 10 10 8 cm x 26 7 cm en la pared 1 Marque 2 líneas al medir 1 8 0 3 cm y 41 16 10 3 cm abajo de la parte inferior del gabinete y marque en la línea central en la pared trasera 2 Marque líneas ...

Страница 29: ... cubierta de pared con válvula asegúrese de que ambas no interfieran entre sí Remueva la cubierta de la transición si interfieren Instalación sin conducto de descarga recirculación No se necesitan accesorios de ventilación Se debe remover la cubierta de la salida recirculante Remueva la cubierta quitando los 2 tornillos A B A Tornillos 2 B Cubierta de la salida recirculante Conexión eléctrica I AD...

Страница 30: ...ón Mantenimiento Para disponer de una referencia sencilla siga las Instrucciones de instalación y la Guía de uso y mantenimiento Descripción de la campana 3 6 1 2 3 4 5 1 Controles 2 Lámparas LED 3 Paneles laterales 4 Estafa del filtro de grasa 5 Filtro de grasa 6 Manija del filtro de grasa Controles 1 Botón de encendido apagado de la luz 2 Botón de encendido apagado del motor 3 Botón de la veloci...

Страница 31: ...a cada filtro jalando la manija y después bajando el filtro A 3 Para reinstalar el filtro de grasa vuelva a subir el filtro desde el borde posterior 4 Vuelva a colocar la estafa usando los tornillos que fueron previamente retirados en el paso 1 Reemplazo de las lámparas LED Las luces LED son reemplazables sólo por un técnico de servicio Vea la sección A quién contactar para la información de conta...

Страница 32: ... consumible Desgaste normal Desgaste terminal debido a abusos del usuario mantenimiento inadecuado uso de productos toallas de limpieza corrosivos o abrasivos y por uso de limpiadores para hornos QUIÉN ESTÁ CUBIERTO Esta garantía se extiende al comprador original de productos adquiridos para uso residencial en Norte América incluyendo Estados Unidos Guam Puerto Rico Islas Vírgenes de EU y Canadá E...

Отзывы: