background image

3

I


IMPORTANT SAFETY NOTICE

I     

CAUTION

FOR GENERAL VENTILATING USE ONLY. DO NOT USE TO 

EXHAUST HAZARDOUS OR EXPLOSIVE MATERIALS OR 

VAPOURS.

I

 WARNING

TO REDUCE THE RISK OF FIRE, ELECTRIC SHOCK, OR

INJURY TO PERSONS, OBSERVE THE FOLLOWING:

A.  Use this unit only in the manner intended by the   

manufacturer. If you have questions, contact the   

manufacturer.

B.  Before servicing or cleaning the unit, switch power off  


at service panel and lock service panel disconnecting  


means to prevent power from being switched on  

 accidentally. 


When the service disconnecting means cannot be  


locked, securely fasten a prominent warning device, 


such as a tag, to the service panel.

C.  Installation work and electrical wiring must be done by  


qualified person(s) in accordance with all applicable 


codes & standards, including fire-rated construction.

D.  Sufficient air is needed for proper combustion and 


exhausting of gases through the flue (Chimney) of fuel 


burning equipment to prevent back- drafting.  


Follow the heating equipment manufacturers guideline  


and safety standards such as those published by the  


national fire protection association (NFPA), the american 


society for heating, refrigeration and air conditioning 


engineers (ASHRAE), and the local code authorities.

E.  When cutting or drilling into wall or ceiling, do not  


damage electrical wiring and other hidden utilities.

F.  Ducted systems must always be vented to the outdoors. 

I     

CAUTION

To reduce risk of fire and to properly exhaust air, be sure to 

duct air outside - do not vent exhaust air into spaces within 

walls, ceilings, attics, crawl spaces, or garages.


I

 WARNING

TO REDUCE THE RISK OF FIRE, USE ONLY METAL DUCT 

WORK.

Install this hood in accordance with all requirements specified.

I

 WARNING

To reduce the risk of fire or electric shock, do not use this 

hood with any external solid state speed control device.

I

 WARNING

TO REDUCE THE RISK OF A RANGE TOP GREASE FIRE.

a)  Never leave surface units unattended at high settings. 


Boilovers cause smoking and greasy spillovers that may 


ignite. Heat oils slowly on low or medium settings.

b)  Always turn hood ON when cooking at high heat or when 


flambeing food (I.e. Crepes Suzette, Cherries Jubilee,  


Peppercorn Beef Flambe’).

c)  Clean ventilating fans frequently. Grease should not be 


allowed to accumulate on fan or filter.

d)  Use proper pan size. Always use cookware appropriate 


for the size of the surface element.

I

 WARNING

TO REDUCE THE RISK OF INJURY TO PERSONS, IN THE 

EVENT OF A RANGE TOP GREASE FIRE, OBSERVE THE 

FOLLOWING:

a

a)  SMOTHER FLAMES with a close-fitting lid, cookie sheet,  


or other metal tray, then turn off the gas burner or the 


electric element. BE CAREFUL TO PREVENT BURNS. If the 


flames do not go out immediately, EVACUATE AND CALL 


THE FIRE DEPARTMENT.

b)  NEVER PICK UP A FLAMING PAN - you may be burned.
c)  DO NOT USE WATER, including wet dishcloths or towels - 


a violent steam explosion will result.

d)  Use an extinguisher ONLY if:

1)  You know you have a class ABC extinguisher, and  


you already know how to operate it.

2)  The fire is small and contained in the area where it 

 started.
3)  The fire department is being called.
4)  You can fight the fire with your back to an exit.

e)  Ducted fans must always be vented to the outdoor.

aBased on “Kitchen Fire Safety Tips” published by NFPA.


I     

CAUTION

Automatically Operated Device - To Reduce The Risk Of

Injury Disconnect From Power Supply Before Servicing.

Содержание EMD530S3

Страница 1: ...lisation d entretien et d installation Guía de instalación uso y mantenimiento READ AND SAVE THESE INSTRUCTIONS LISEZ CES INSTRUCTIONS ET CONSERVEZ LES LEA Y CONSERVE ESTAS INSTRUCCIONES LIB0139633 Printed in Mexico 12 17 Models EMD530S3 EMD536S3 ...

Страница 2: ...PLIANCES FOR RESIDENTIAL USE ONLY READ AND SAVE THESE INSTRUCTIONS PLEASE READ ENTIRE INSTRUCTIONS BEFORE PROCEEDING INSTALLATION MUST COMPLY WITH ALL LOCAL CODES IMPORTANT Save these Instructions for the Local Electrical Inspector s use INSTALLER Please leave these Instructions with this unit for the owner OWNER Please retain these instructions for future reference Safety Warning Turn off power c...

Страница 3: ...s IWARNING TO REDUCE THE RISK OF FIRE USE ONLY METAL DUCT WORK Install this hood in accordance with all requirements specified IWARNING To reduce the risk of fire or electric shock do not use this hood with any external solid state speed control device IWARNING TO REDUCE THE RISK OF A RANGE TOP GREASE FIRE a Never leave surface units unattended at high settings Boilovers cause smoking and greasy s...

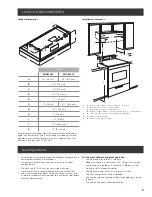
Страница 4: ...del serial rating plate is located inside the liner behind the filter on the left wall of the range hood Range hood location should be away from strong draft areas such as windows doors and strong heating vents Cabinet opening dimensions that are shown must be used Given dimensions provide minimum clearance Consult your cooktop range manufacturer installation instructions before making any cutouts...

Страница 5: ...r 36 76 2 cm or 91 4 cm min cabinet opening width D 12 30 5 cm cabinet depth E 36 91 4 cm base cabinet height Ducting Options Vent system must terminate to the outdoors except for no vented recirculating installations Do not terminate the vent system in an attic or other enclosed area Do not use a 4 10 2 cm laundry type wall cap Rigid metal vent is recommended Plastic or metal foil vent is not rec...

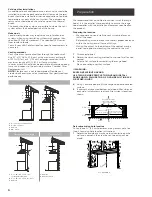
Страница 6: ... cm rectangular transition B 31 4 x 10 8 3 x 25 4 cm duct C Cabinet A B A Cabinet B Charcoal filters Preparation We recommend that a qualified technician install the range hood It is the installer s responsibility to ensure the range hood complies with the installation clearances specified for the product Preparing the location We recommend you install the vent system before you install the hood B...

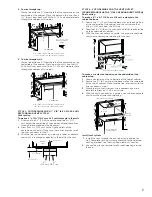
Страница 7: ...the vent Centerline Cabinet front 23 4 7 0 cm 63 4 17 1 cm 51 4 13 3 cm 51 4 13 3 cm STYLE 2 CUT OPENINGS FOR TOP VENT OUTLET FROM RECTANGULAR TO 6 15 2 CM ROUND VENT SYSTEM Roof venting To make a 61 2 x 8 16 5 cm x 21 6 cm rectangle in the cabinet bottom 1 Draw a line 1 3 cm from the back wall on the centerline of the underside of the cabinet and then draw another line 61 2 16 5 cm from the first...

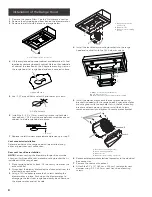
Страница 8: ...th the range hood 1 Place range hood on its back Fit the vent system over the exhaust outlet 2 Disconnect the blower motor electrical connector from the electrical box connector 3 Using a T20 adapter remove the 4 screws holding the blower motor in place Push up on the blower motor to disengage the tabs from range hood cavity back Remove the blower motor and set it aside C B A A Range hood canopy i...

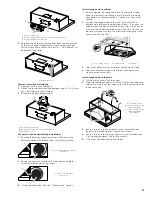
Страница 9: ...g 2 people lift range hood into final location Feed enough electrical wire through the strain relief to make connections in the terminal box Tighten the strain relief screws 2 Position the range hood so that the large end of the keyhole slots are over the mounting screws Then push the hood toward the wall so that the screws are in the neck of the slots The hood should be against the wall Tighten t...

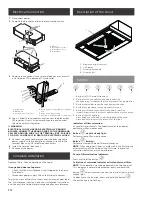
Страница 10: ...your Installation Instructions and Use and Care Guide close to range hood for easy reference Description of the Hood 2 4 1 3 1 Blower and light controls 2 LED lamps 3 Grease filter handle 4 Grease filter Control 1 2 3 4 5 6 1 Button ON OFF motor stand by 2 Button for low speed suction power selection When flashing it indicates that you must wash the grease filter 3 Button for medium speed suction ...

Страница 11: ...filters may cause fire risks Therefore we recommend oserving these instructions The manufacturer declines all responsibility for any damage to the motor or any fire damage linked to inappropriate maintenance or failure to observe the above safety recommendations Grease filter Traps cooking grease particles This must be cleaned once a month using non aggressive detergents either by hand or in the d...

Страница 12: ...h Wear to finish due to operator abuse improper maintenance use of corrosive or abrasive cleaning products pads and oven cleaner products WHO IS COVERED This warranty is extended to the original purchaser for products purchased for ordinary residential use in North America Including the United States Guam Puerto Rico US Virgin Islands Canada This warranty is non transferable and applies only to th...

Страница 13: ...ILLEZ LIRE CES INSTRUCTIONS AU COMPLET AVANT DE COMMENCER L INSTALLATION DE L APPAREIL DOIT RESPECTER TOUS LES CODES EN VIGUEUR IMPORTANT Conservez ces instructions afin de pouvoir les remettre à l inspecteur électricien de votre région INSTALLATEUR Veuillez laisser ces instructions avec l appareil pour le propriétaire PROPRIÉTAIRE Veuillez conserver ces instructions pour pouvoir vous y référer pl...

Страница 14: ...SSEMENT POUR RÉDUIRE LES RISQUES D INCENDIE DE GRAISSE SUR LES CUISINIÈRES a Ne laissez jamais la cuisinière sans surveillance lorsqu elle est réglée à une haute température Les débordements par bouillonnement causent de la fumée et des débordements de gras qui peuvent s enflammer Faites chauffer l huile lentement à une température basse ou moyenne b Faites toujours fonctionner la hotte lorsque vo...

Страница 15: ...gauche de la hotte Installer la hotte de cuisinière à distance de toute zone exposée à des courants d air comme fenêtres portes et bouches de chauffage Respecter les dimensions indiquées pour les ouvertures à découper dans les placards Ces dimensions tiennent compte des valeurs minimales des dégagements de séparation Avant d effectuer des découpages consulter les instructions d installation de la ...

Страница 16: ...lacard du bas Exigences concernant l évacuation Le circuit d évacuation doit décharger l air à l extérieur excepté pour les installations sans décharge à l extérieur recyclage Ne pas terminer le circuit d évacuation dans un grenier ou dans un autre espace clos Ne pas utiliser une bouche de décharge murale de 4 10 2 cm normalement utilisée pour un équipement de buanderie Utiliser un conduit métalli...

Страница 17: ... D 90 coude Évacuation horizontale Recyclage B A C A Transition de 31 4 x 10 8 3 x 25 4 cm B Conduit de 31 4 x 10 8 3 x 25 4 cm C Placard A B A Placard B Filtres à charbon Préparation Nous recommandons qu un technicien qualifié installe la hotte Il est de la responsabilité de l installateur de s assurer que la hotte de cuisine est conforme aux tolérances d installation spécifiées pour le produit P...

Страница 18: ...UIT PAR LE HAUT DÉCOUPAGE D OUVERTURE POUR UN SYSTÈME D ÉVACUATION RECTANGULAIRE À ROND DE 6 15 2 CM Évacuation à travers le toit Découpage d une ouverture rectangulaire de 61 2 x 8 16 5 cm x 21 6 cm dans le mur 1 Mesurer lignes de 1 2 1 3 cm et 61 2 16 5 cm en descen dant à partir de la face inférieure du placard et marquer leur emplacement sur l axe central du mur arrière 2 Tracer des lignes à 4...

Страница 19: ... de ventila tion sur la sortie d échappement 2 Débrancher la prise électrique du moteur du ventilateur du boîtier de connexion 3 À l aide d un tournevis et d un embout Torx T20 retirer les 4 vis qui maintiennent en place le moteur du ventilateur Pousser le moteur du ventilateur vers le haut pour dégager les pattes de montage de l arrière de la cavité de la hotte Retirer le moteur du ventilateur et...

Страница 20: ...et le fixer à la plaque de montage avant Installer les vis de montage du ventilateur A B A Opercule arrachable de la plaque de montage avant B Ventilateur 4 Installer les filtres à charbon Voir la section Entretien Installation al cabinet 1 À l aide de deux personnes soulever la hotte et la placer à son emplacement définitif Insérer suffisamment de câble électrique dans le serre câble pour pouvoir...

Страница 21: ...ion 6 Installer le couvercle du boîtier de connexion 7 Reconnecter la source de courant électrique Achever l installation Mettez en place le filtre à graisse Vérifier le fonctionnement de la hotte Si la hotte ne fonctionne pas Vérifiez que le disjoncteur ne s est pas déclenché ou que le fusible n est pas grillé Débranchez l alimentation Vérifiez que les raccords électriques ont été effectués corre...

Страница 22: ...Hotte La hotte doit être régu lièrement nettoyée à l intérieur et à l extérieur au moins à la même fréquence que pour l entretien des filtres à graisse Pour le nettoyage utiliser un chiffon humidifié avec un détergent liquide neutre Ne pas utiliser de produit contenant des abrasifs NE PAS UTILISER D ALCOOL I ATTENTION Il y a risque d incendie si vous ne respectez pas les instructions concernant le...

Страница 23: ...s filtres métalliques ou au charbon et toute autre pièce consommable Usure normale Usure due à une mauvaise utilisation du propriétaire un entretien incorrect une utilisation de substances nettoyantes QUI EST COUVERT Cette garantie s étend à l acheteur original de produits achetés pour un usage domestique habituel en Amérique du Nord Y compris Etats Unis Guam Porto Rico les Iles virgin Américaines...

Страница 24: ...Y GUARDE ESTAS INSTRUCCIONES ANTES DE CONTINUAR LEA LAS INSTRUCCIONES POR COMPLETO LA INSTALACIÓN DEBE CUMPLIR TODA LA NORMATIVA LOCAL IMPORTANTE Guarde estas instrucciones para su uso por parte del inspector de electricidad local INSTALADOR Entregue al propietario estas instrucciones junto con la unidad PROPIETARIO Conserve estas instrucciones para futuras consultas Advertencia de seguridad Antes...

Страница 25: ...stado sólido para el control de la velocidad I ADVERTENCIA PARA REDUCIR EL RIESGO DE INCENDIO OCASIONADO POR GRASA a No deje nunca ninguna unidad externa desatendida y con valores de fuego altos La cocción puede causar humo o reboses de grasa que pueden prender fuego Caliente el aceite a fuego lento o medio b Encienda siempre la campana cuando cocine a una temperatura alta o cuando realice flamead...

Страница 26: ...ared izquierda de la campana para cocina La ubicación de la campana para cocina deberá estar lejos de zonas con corrientes fuertes de aire tales como ventanas puertas u orificios de calefacción con un flujo intenso Deben usarse las dimensiones de la abertura del armario que se muestran Las dimensiones proporcionadas proveen los espacios mínimos Consulte las instrucciones de instalación del fabrica...

Страница 27: ...te D 12 30 5 cm profundidad del gabinete E 36 91 4 cm altura del gabinete inferior Requisitos de ventilación El sistema de ventilación debe terminar en el exterior excepto para las instalaciones sin ducto de escape con recirculación No dirija la salida del sistema de ventilación hacia el desván u otra área cerrada No utilice una cubierta de pared de tipo para lavandería de 4 10 2 cm Utilice ducto ...

Страница 28: ... Descarga Vertical C B A B D A A Transición redonda 6 15 2 cm B Ducto de 6 15 2 cm C Gabinete D Codo de 90 Descarga Horizontal Recirculante B A C A Transición rectangular de 31 4 x 10 8 3 x 25 4 cm B Ducto de 31 4 x 10 8 3 x 25 4 cm C Gabinete A B A Gabinete B Filtros de carbón Preparación Se recomienda que un técnico cualificado instale la campana Es la responsabilidad del instalador asegurarse q...

Страница 29: ... de escape Línea central Frente del Gabinete 23 4 7 0 cm 63 4 17 1 cm 51 4 13 3 cm 51 4 13 3 cm ESTILO 2 ABERTURAS DE CORTE PARA UN DUCTO DE ESCAPE DE LA PARTE SUPERIOR DE UN SISTEMA DE VENTILACIÓN RECTANGULAR A UNO REDONDO DE 6 15 2 CM Ventilación a través de techo Para hacer un recorte rectangular de 61 2 x 8 16 5 cm x 21 6 cm en el lado de abajo de la parte inferior del gabinete 1 Marque líneas...

Страница 30: ...a de cocina usando el ducto de escape superior o posterior Instalación de la transición para la ventilación posterior NOTA Para una ventilación posterior la posición del motor de aire debe cambiarse Se necesitará la el soporte de montaje del motor posterior la cual es incluida en la campana 1 Quite el precorte removible posterior 2 Gire la campana de manera que se vea la parte posterior de ésta Aj...

Страница 31: ... más personas levante la campana en la posición final Alimentar suficiente cable eléctrico a través de la UL o aprobado por CSA para realizar las cone xiones en la caja de terminales Apriete los tornillos de seguridad 2 Deslice la parte superior de la campana al gabinete ajuste los tornillos de montaje Asegúrese de que la cabeza de los tornillos estén en la parte angosta de los orificios de instal...

Страница 32: ...erminales 7 Reconecte el suministro de energía Completar la Instalación Vuelva a colocar los filtros de grasa Verifique el funcionamiento de la campana Si la campana extractora no funciona Compruebe si el disyuntor está desconectado o se han fundido los fusibles Desconecte el suministro eléctrico Compruebe si el cableado es correcto Para conseguir el funcionamiento más eficaz de la nueva campana e...

Страница 33: ... con la misma frecuencia con la que se realiza el mantenimiento de los filtros de grasa Para la limpieza utilice un paño impregnado de detergente líquido neutro No utilice productos que contengan abrasivos NO UTILICE ALCOHOL IATENCIÓN De no observarse las instrucciones dadas para limpiar el apa rato y sustituir el filtro puede producirse un incendio El fabricante recomienda leerlas y respetarlas a...

Страница 34: ...e consumible Desgaste normal Desgaste terminal debido a abusos del usuario mantenimiento inadecuado uso de productos toallas de limpieza corrosivos o abrasivos y por uso de limpiadores para hornos QUIÉN ESTÁ CUBIERTO Esta garantía se extiende al comprador original de productos adquiridos para uso residencial en Norte América incluyendo Estados Unidos Guam Puerto Rico Islas Vírgenes de EU y Canadá ...

Страница 35: ......

Страница 36: ......

Отзывы: