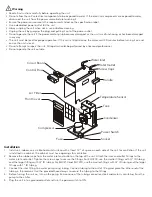
Displaying Current Temperature and Temperature Setting
Press the “Set” button to alternately display the current temperature and
the programmed temperature. The temperature indicator light blinks when
the programmed temperature is displayed.
Selecting Temperature Setting
Hold the “Set” button for 3 seconds. The programmed temperature will
appear on the display. Use the “Up” and “Down” arrow buttons to adjust
the setting. Press the “Set” button again or wait for 8 seconds to accept the
setting.
Correcting Temperature Error
If the actual water temperature is different from the current temperature
displayed by the chiller, correct the error by holding the “Up” and “Down”
arrow buttons simultaneously for 6 seconds until “0” appears on the screen.
Use the “Up” and “Down” arrow buttons to select the difference between
the displayed temperature and the actual water temperature. Use the “Up”
and “Down” arrow buttons to adjust the displayed temperature.
Note:
Use
this function only if necessary.
Compressor Operation
The compressor will begin operating when the water temperature reaches 1.8°F above the temperature setting. The compres-
sor will stop operating automatically when the water temperature is at or below the temperature setting.
To prevent damage to the compressor, the unit enters protection mode when the compressor stops and will not restart the com-
pressor for 3 minutes. The operation indicator light illuminates when the compressor is operating and blinks when the unit is in
protection mode.
Replacing the Fuse
Disconnect the unit from the power source. Unscrew the panel on the side of the unit where the power cord attaches. Pull out
the fuse and replace it with the included replacement fuse. Replace the panel and reconnect the unit to the power source.
Cleaning and Storage
• The unit should be cleaned every 1-2 months to maintain optimal performance. Always disconnect the unit from the power
source before cleaning it.
• Rinse debris from the water inlet and outlet fittings.
• Clean the front of the unit using a vacuum cleaner or brush.
• To clean the air filter, loosen the screw on the front cover panel and remove
the panel. Loosen the screws holding the air filter, then remove the filter
and clean it using a vacuum cleaner or brush. Replace the filter and front
cover panel.
• To store the unit when not in use, remove the inlet and outlet fittings. Tilt the unit to the side to allow the water to drain.
Clean all parts with a soft dry cloth. Cover the unit and store it in a dry location.
Troubleshooting
The unit isn’t operating and the display isn’t illuminated.
If the power cord is plugged in and the unit is turned on, the fuse may need to be replaced. See the “Replacing the Fuse” sec-
tion.
The unit turns on or off unexpectedly.
Ensure the unit is connected to a power source with the correct voltage and frequency. If the unit has recently been turned off,
the compressor will not restart for 3 minutes.
The unit is not cooling the water sufficiently or at all.
Ensure the temperature setting is lower than the current water temperature. Clean the air inlet and outlet if necessary. If the
problem persists, the water in the reservoir may need to be reduced, the fan may need to be replaced, or the refrigerant may
be low. All repairs should be performed by a licensed professional.
The unit is vibrating or operating noisily.
Ensure the unit is installed on a stable and level horizontal surface.
Decrease Temperature
Increase Temperature
Setting Temperature
Temperature Indicator
Temperature Display
Operation Indicator
Operation Panel


