RW873 User Manual
65
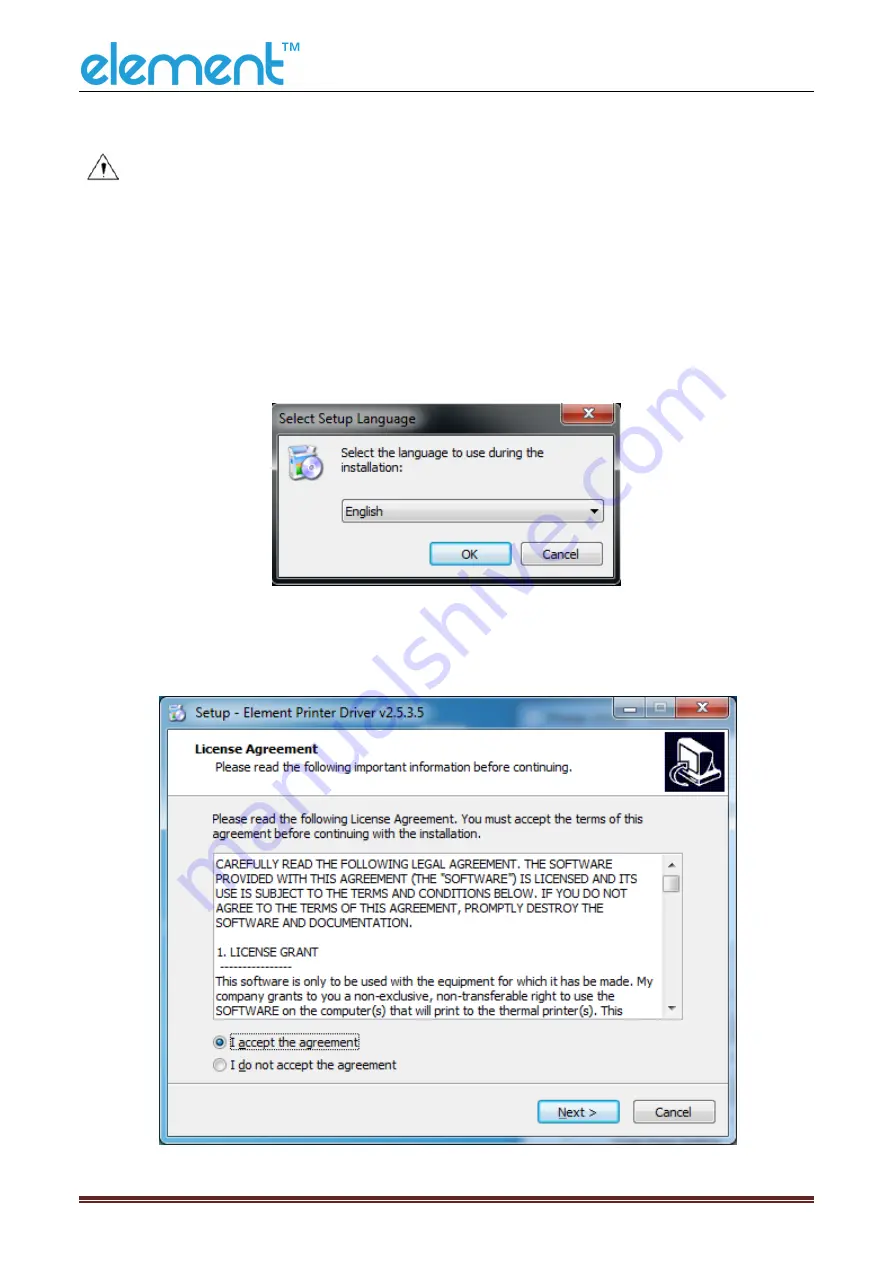
9.4 Windows Driver Installation
Warning:
Under different operating system and different type of driver, the screen has slight
difference. Please operate it according to the tips. Take RW873(Windows 7) as
example.
1)
Double click Windows Driver.
2)
Choose “English” and click “OK”.
3)
Choose “I accept the agreement”, then click “Next”.
Содержание RW873
Страница 1: ...RW873 User Manual ...
Страница 8: ...RW873 User Manual 5 2 2 Appearance and Components Front Back Inside Bottom ...
Страница 12: ...RW873 User Manual 9 3 2 3 Cutting Position Type Paper Cutting Position L1 RW873 14 5mm ...
Страница 22: ...RW873 User Manual 19 5 5 Ethernet Interface PIN NO Signal Name 1 TX 2 TX 3 RX 4 5 6 RX 7 8 ...
Страница 29: ...RW873 User Manual 26 4 Click Next 5 Select start menu folder Click Next ...
Страница 30: ...RW873 User Manual 27 6 Click Install 7 Click Finish Utility Tool is installed successfully ...
Страница 32: ...RW873 User Manual 29 2 Choose the appropriate printer type and port Then click OK Take RW873 for example ...
Страница 44: ...RW873 User Manual 41 2 Click Send by Hex input the content Convert text to HEX or send ESC command ...
Страница 45: ...RW873 User Manual 42 8 2 2 3 Manage Images ...
Страница 47: ...RW873 User Manual 44 Note Total memory 256K each bitmap should be below 40K ...
Страница 52: ...RW873 User Manual 49 Function Setting ...
Страница 61: ...RW873 User Manual 58 Figure Host IP Address 2 Set the same network segment Figure Printer IP Address ...
Страница 63: ...RW873 User Manual 60 USB Port Setting Click Virtual serial port setting and restart the printer ...
Страница 65: ...RW873 User Manual 62 3 Return to the printer utility and click Modify Printer 4 Change the port to COM7 ...
Страница 72: ...RW873 User Manual 69 2 According to the different needs choose Paper Offset Rotate Effect Copies in Page ...
Страница 74: ...RW873 User Manual 71 Cut Paper ...
Страница 75: ...RW873 User Manual 72 Feed Paper Cash Drawer ...
Страница 76: ...RW873 User Manual 73 Custom Command Logo Note this setting needs to be set in utility here are the steps ...
Страница 77: ...RW873 User Manual 74 Open the utility and click Manage Images ...
Страница 78: ...RW873 User Manual 75 Click Download Click Add to add a logo BMP format is recommended ...
Страница 80: ...RW873 User Manual 77 Select Printer properties in Devices and Printers then click Preference ...
Страница 81: ...RW873 User Manual 78 Click the Advanced then click Logo ...
Страница 83: ...RW873 User Manual 80 Then click OK ...
Страница 84: ...RW873 User Manual 81 Click Print Test Page to view the printing effect ...
Страница 85: ...RW873 User Manual 82 Buzzer Code Page ...
Страница 86: ...RW873 User Manual 83 3 Click Watermark Set watermark to print ...
Страница 87: ...RW873 User Manual 84 4 Click Halftone to set the halftone ...
Страница 89: ...RW873 User Manual 86 ...
Страница 91: ...RW873 User Manual 88 Add Barcode firstly ...
Страница 92: ...RW873 User Manual 89 Set the Font Name and the Barcode Option ...
Страница 93: ...RW873 User Manual 90 Click the Printer Setting Choose the Display Language for Properties ...
Страница 95: ...RW873 User Manual 92 ...
Страница 96: ...RW873 User Manual 93 ...
Страница 97: ...RW873 User Manual 94 ...
Страница 99: ...RW873 User Manual 96 Set the Printing preferences ...
Страница 100: ...RW873 User Manual 97 Click the Printer Setting Choose the Display Language for Properties ...
Страница 101: ...RW873 User Manual 98 Turn on the Font Substitution ...
Страница 102: ...RW873 User Manual 99 Select the System Font for example Arial ...
Страница 103: ...RW873 User Manual 100 Select the font to that you want to replace ...
Страница 104: ...RW873 User Manual 101 Click Set ...
Страница 105: ...RW873 User Manual 102 ...
Страница 107: ...RW873 User Manual 104 2 Choose General click Print Test Page then it will print the current settings ...
Страница 108: ...RW873 User Manual 105 3 Click Port to choose another port or add port ...
Страница 109: ...RW873 User Manual 106 2 Click Advanced to set the available time for printing ...
Страница 111: ...RW873 User Manual 108 3 Choose RW873 click Next 4 Click Yes then it is complete to uninstall ...


