background image


Element 455W User Manual Page 22 of 

34


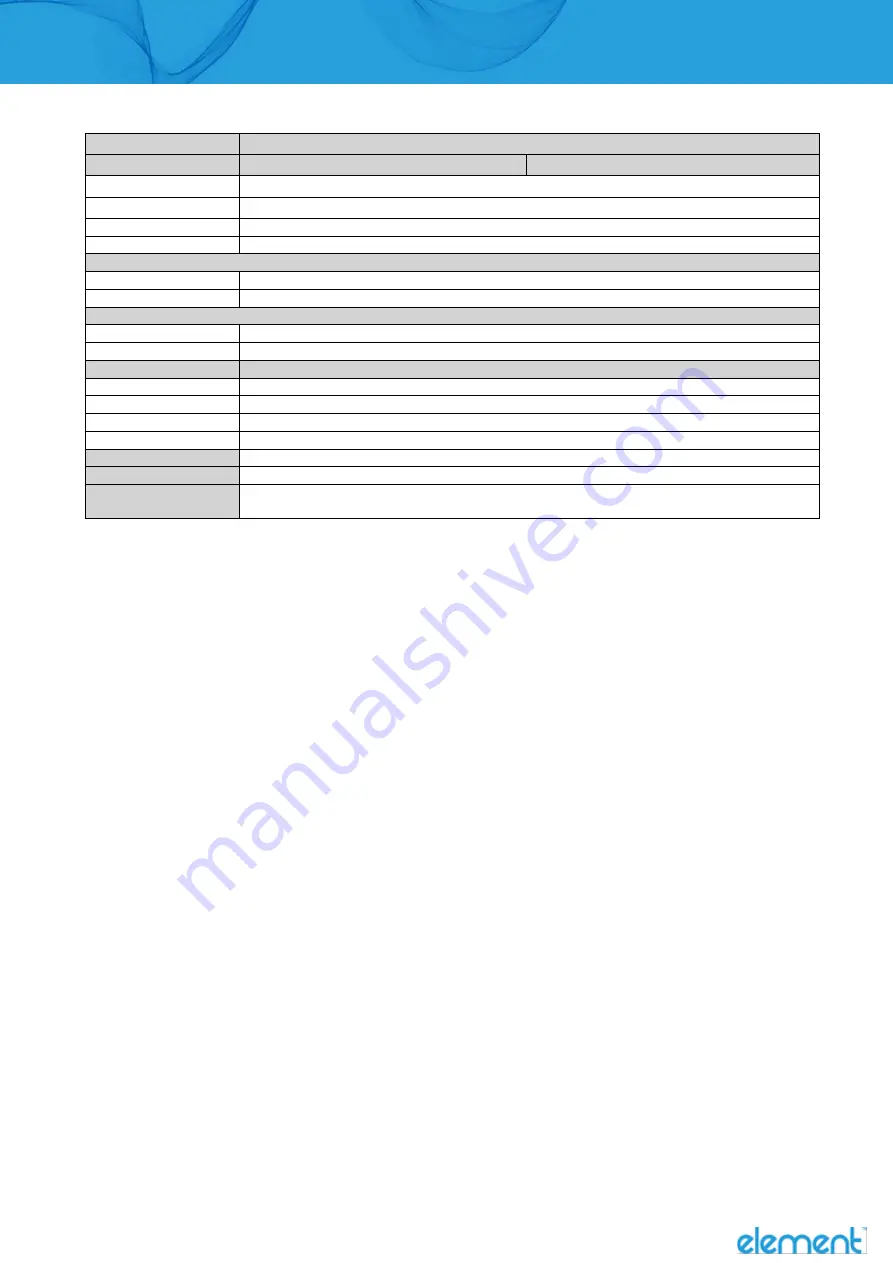
Model Name 
Mainboard 

iButton 
Second display 


455W 

F34 


F64U 

1 (USB) (blade type) 

11.6

” LED Second dis

play (touch option) 


Customer display 
Speaker 

Control/Indicator 

Power button 
Power LED 

Certificate 

EMC & Safety 
ESD 

Environment 

Sealing 
Operating temperature 
Storage temperature 
Humidity 

Dimension (W x D x H) 
Weight 

OS supported 

Flush mount LCM display 2 x 20 characters (USB) 

1 x 3W 


1 (Blue) on the touch screen 


FCC, Class A, CE, LVD 

4 KV contact discharge, 8 KV air discharge 


IP54 (front side) 

0°C ~ 35°C (32°F ~ 95°F) 

-20°C ~ 60°C (-4°F ~ 140°F) 

20% ~ 85% RH non-condensing 

369 x 201 x 262mm 

4.3kg 

Windows 10 (64-bit), Windows IOT 10(64-bit) 

Linux: UbuntuAfter15.10, Fedora After 23, OpenSUSE42.1 no support (Kernel 4.1) 

* This specification is subject to change without prior notice. 


Содержание 455W

Страница 1: ...Element 455W User Manual Page 1 of 34 USER MANVERSION 1 0 July 2021 455W POS Terminal User Manual ...

Страница 2: ...ers 1 To disconnect the machine from the electrical power supply turn off the power switch and remove the power cord plug from the wall socket The wall socket must be easily accessible and in close proximity to the machine 2 Read these instructions carefully Save these instructions for future reference 3 Follow all warnings and instructions marked on the product 4 Do not use this product near wate...

Страница 3: ...5 of the FCC rules Operation is subject to the following two conditions 1 This device may not cause harmful interference 2 This device must accept any interference received including interference that may cause undesired operation There is a danger of explosion if the battery is replaced incorrectly Replace only with the same or equivalent type recommended by the manufacturer Discard used batterie...

Страница 4: ...heir components The crossed dust bin symbol on the device means that it should not be disposed of with other household wastes at the end of its working life Instead the device should be taken to the waste collection centers for activation of the treatment collection recycling and disposal procedure To prevent possible harm to the environment or human health from uncontrolled waste disposal please ...

Страница 5: ...Element 455W User Manual Page 5 of 34 Changes to the original user manual are listed below Revision Description 1 0 Initial release Date July 2021 ...

Страница 6: ...Element 455W User Manual Page 6 of 34 ...

Страница 7: ...Element 455W User Manual Page 7 of 34 ...

Страница 8: ...Element 455W User Manual Page 8 of 34 ...

Страница 9: ...Element 455W User Manual Page 9 of 34 a b c a System b Power adapter c Power cord Note Power cord will be supplied differently according to various region or country ...

Страница 10: ...Element 455W User Manual Page 10 of 34 a b c d e a MSR module b Fingerprint module c iButton module d Customer display e 11 6 2nd display ...

Страница 11: ...55W User Manual Page 11 of 34 1 2 3 4 6 5 No Description 1 Touch screen 2 Fingerprint option 3 MSR option 4 Power button 5 Stand 6 Stand front cover 1 2 3 No Description 1 VESA top cover 2 SSD door 3 Cable cover ...

Страница 12: ... FeDP 2nd display b LAN c DC 19V in d USB 2 0 x 2 e USB Type C x 2 USB2 0 f USB 3 0 x 2 g COM x 2 h Cash drawer F64U Motherboard a b c d e f g h No Description a FeDP 2nd display b LAN c DC 19V in d USB 2 0 x 2 e USB Type C x 2 USB3 0 f USB 3 0 x 2 g COM x 2 h Cash drawer ...

Страница 13: ...Element 455W User Manual Page 13 of 34 415 mm 369 mm 217 mm 201 mm ...

Страница 14: ...age 14 of 34 1 Loosen the thumb screw x1 and slide the stand towards the IO panel to release it from the system 2 Reverse the steps above to attach stand to the system 1 Pull the cable cover upwards to release it from the system ...

Страница 15: ...Please pull the front cover of the stand outwards 2 Place the system face down Making sure not to scratch the touchscreen 3 Connect the power adapter to the 19V DC IN port and then route the cable as shown in the picture 4 Replace the front cover 1 To replace the M 2 SSD card please disassemble the stand firstly as steps described in chapter 3 1 2 Remove the screw x1 to release the SSD dummy cover...

Страница 16: ...eripherals MSR Fingerprint and iButton modules can be installed to each side of the system depends on your preference 2 Remove the dummy cover first 3 Insert the MSR Fingerprint iButton module in place and fasten the screws x2 on the back to secure the module ...

Страница 17: ...M module to system by fastening the thumb screw x1 4 Route the USB cable through the hole of the stand as picture shown 5 Attach the stand to the LCD panel and fasten the thumb screw x1 6 Connect the USB cable to the USB port on the systems IO panel Make sure the system is powered off Please note the cable cover and the stand front cover refer to Chapter 3 2 and 3 3 have to be removed before routi...

Страница 18: ... module to system by fastening the thumb screw x1 4 Route the mini display cable through the hole of the stand as picture shown 5 Attach the stand to the LCD panel and fasten the thumb screw x1 6 Connect the mini display cable to FeDP port on the systems IO panel Make sure the system is powered off Please note the cable cover and the stand front cover refer to Chapter 3 2 and 3 3 have to be remove...

Страница 19: ...ssignment 6 1 Pin Signal 1 Cash drawer 2 In 2 Cash drawer 1 Out 3 Cash drawer 1 In 4 12V 19V 5 Cash drawer 2 Out 6 GND Cash Drawer Controller Register The Cash Drawer Controller use one I O addresses to control the Cash Drawer Register Location 0x482h Attribute Read Write Size 8bit BIT Attribute BIT7 BIT6 BIT5 Reserved BIT4 BIT3 CD1 Out CD1 In BIT2 BIT1 BIT0 Reserved ...

Страница 20: ...losed or no Cash Drawer 0 the Cash Drawer opened Bit 2 Reserved Bit 1 Reserved Bit 0 Reserved Note Please follow the Cash Drawer control signal design to control the Cash Drawer Command O 482 10 O 482 00 Cash Drawer Opening Allow to close Set the I O address 482h bit4 1 for opening Cash Drawer by DOUT bit0 pin control Set the I O address 482h bit4 0 for allow close Cash Drawer Command I 482 Cash D...

Страница 21: ...2GB Max Intel Graphic Gen 9 DX12 define on CPU 15 6 LED eDP 220 nits 1920 x 1080 True flat P CAP 0 90o M 2 SATA SSD or NVMe SSD 1x for WLAN m 2 m Key Slot 1x M key 2280 for storage 2x M key 2280 for storage I O Ports USB Type A 4 2x USB3 0 2x USB 2 0 USB Type C 1x USB2 0 USB3 0 data only w o MUX CC controller 5V only 1x USB2 0 data only CC controller 5V only or PD source 5V 19V PD option for POS 1...

Страница 22: ...torage temperature Humidity Dimension W x D x H Weight OS supported Flush mount LCM display 2 x 20 characters USB 1 x 3W 1 1 Blue on the touch screen FCC Class A CE LVD 4 KV contact discharge 8 KV air discharge IP54 front side 0 C 35 C 32 F 95 F 20 C 60 C 4 F 140 F 20 85 RH non condensing 369 x 201 x 262mm 4 3kg Windows 10 64 bit Windows IOT 10 64 bit Linux UbuntuAfter15 10 Fedora After 23 OpenSUS...

Страница 23: ...Page 23 of 34 CN3 SW2 CN3 USB1 CN1 CN2 CN20 JP3 JP6 CN8 CN8 CN9 CN12 BAT1 FEDP2 RJ45 1 PWR1 PWR2 USB4 USB5 CN15 CN13 CN19 USB6 USB7 USB2 USB3 CN14 COM1 CN17 CN16 JP4 COM2 CN18 JP5 RJ11 1 FEDP1 CN10 CN23 JP2 JP1 CN4 FAN1 DIMM_A1 ...

Страница 24: ...onnector Internal USB connector M 2 M KEY PCIE SATA connector Internal eDP connector M 2 E KEY WIFI connector Wide range Power connector Storage LED connector Mic out connector DC jack 2pin 4pin Cash drawer connector LAN connector Power button DDR4 SO DIMM CPU FAN connector FeDP main display connector FeDP 2nd display connector USB2 0 connector USB3 0 connector USB C data only connector USB3 0 2 0...

Страница 25: ...anual Page 25 of 34 Function JP2 L 0 58m L 2 0m M B 1 3 2 4 1 3 2 4 1 3 2 4 Function Stereo Reserved line out Function JP3 1 2 1 2 JP5 19V 12V 1 3 2 4 1 3 2 4 Manufacturer Default Setting 1 2 Jumper open 1 2 Jumper short ...

Страница 26: ...10 JP1 JP2 CN2 2 800 x 600 3 1024 x 768 4 1024 x 768 5 1366 x 768 1 3 5 7 9 CN3 2 4 6 8 10 1 3 5 7 9 2 4 6 8 10 CN4 1 3 5 7 9 2 4 6 8 10 CN6 CN5 1 3 5 7 9 2 4 6 8 10 6 1366 x 768 7 1024 x 600 8 1280 x 1024 9 1440 x 900 15 1920 x 1080 CN7 1 3 5 7 9 2 4 6 8 10 1 3 5 7 9 CN10 2 4 6 8 10 CN8 1 3 5 7 9 2 4 6 8 10 CN11 1 3 5 7 9 2 4 6 8 10 CN12 1 3 5 7 9 2 4 6 8 10 JP4 1 2 Jumper open 1 DP1 2 Jumper sho...

Страница 27: ...0mA 280mA 320mA 360mA 400mA 420mA 460mA 1 3 5 7 2 4 6 8 1 3 5 7 2 4 6 8 1 3 5 7 2 4 6 8 1 3 5 7 2 4 6 8 1 3 5 7 2 4 6 8 1 3 5 7 2 4 6 8 1 3 5 7 2 4 6 8 1 3 5 7 2 4 6 8 CN1 CN2 CN3 CN4 CN5 CN6 CN7 CN10 CN8 CN11 500mA 1 1 3 5 7 2 4 6 8 1 CN12 2 Jumper open 2 Jumper short JP4 DP1 ...

Страница 28: ...er on the system and press the DEL key when the system is booting up to enter the BIOS Setup utility 2 Select the Advanced tab 3 Select VGA COM Power Configuration Ports and press Enter to go to display the available options 4 To enable the power select COM1 COM2 Power setting and press Enter Select Power and press Enter Save the change by pressing F10 ...

Страница 29: ...Element 455W User Manual Page 29 of 34 USB6 USB7 USB2 COM2 CN5 CN19 ...

Страница 30: ...ttery connector Earphone connector Internal USB connector M 2 M KEY PCIE SATA connector Internal eDP connector M 2 E KEY WIFI connector Wide range power connector Storage LED connector Mic out connector DC jack 2pin 4pin Cash drawer connector LAN connector Power button DDR4 SO DIMM CPU FAN connector FeDP main display connector FeDP 2nd display connector USB2 0 connector USB3 0 connector USB C full...

Страница 31: ...JP2 L 0 46m 2m 2W M B 2W L 0 46m 2m 3W M B 3W 1 3 2 4 1 3 2 4 1 3 2 4 1 3 2 4 Audio Line out Setting Function Stereo Reserved line out Cash Drawer Power Setting Function JP3 1 2 1 2 JP5 19V 1 3 2 4 12V 1 3 2 4 Manufacturer Default Setting 1 2 Jumper open 1 2 Jumper short ...

Страница 32: ...10 JP1 JP2 CN2 2 800 x 600 3 1024 x 768 4 1024 x 768 5 1366 x 768 1 3 5 7 9 CN3 2 4 6 8 10 1 3 5 7 9 2 4 6 8 10 CN4 1 3 5 7 9 2 4 6 8 10 CN6 CN5 1 3 5 7 9 2 4 6 8 10 6 1366 x 768 7 1024 x 600 8 1280 x 1024 9 1440 x 900 15 1920 x 1080 CN7 1 3 5 7 9 2 4 6 8 10 1 3 5 7 9 CN10 2 4 6 8 10 CN8 1 3 5 7 9 2 4 6 8 10 CN11 1 3 5 7 9 2 4 6 8 10 CN12 1 3 5 7 9 2 4 6 8 10 JP4 1 2 Jumper open 1 DP1 2 Jumper sho...

Страница 33: ...0mA 280mA 320mA 360mA 400mA 420mA 460mA 1 3 5 7 2 4 6 8 1 3 5 7 2 4 6 8 1 3 5 7 2 4 6 8 1 3 5 7 2 4 6 8 1 3 5 7 2 4 6 8 1 3 5 7 2 4 6 8 1 3 5 7 2 4 6 8 1 3 5 7 2 4 6 8 CN1 CN2 CN3 CN4 CN5 CN6 CN7 CN10 CN8 CN11 500mA 1 1 3 5 7 2 4 6 8 1 CN12 2 Jumper open 2 Jumper short JP4 DP1 ...

Страница 34: ...er on the system and press the DEL key when the system is booting up to enter the BIOS Setup utility 2 Select the Advanced tab 3 Select VGA COM Power Configuration Ports and press Enter to go to display the available options 4 To enable the power select COM1 COM2 Power setting and press Enter Select Power and press Enter Save the change by pressing F10 ...

Отзывы: