background image

- 4 -

Care and cleaning

1

2

3

4

5

6

Important

Make sure that the machine is unplugged and the water
turned off before undertaking any kind of maintenance.

General cleaning

Inspect the filters and spray arm nozzle before re-loading
the machine and remove any food scraps. Wipe round
the rubber gasket at the bottom of the door to remove
grease which tends to collect there.

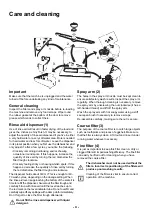
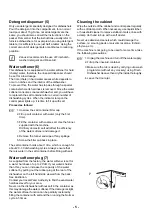
Rinse aid dispenser (1)

Use of rinse aid will result in faster drying of the load and
gives the  dishes a shiny finish. It may be necessary to
adjust the quantity of rinse aid dispensed if you live in either
a very hard water or a very soft water area. More is needed
for hard water and less for soft water. Leave the dispenser
in its preset position when you first use the dishwasher and
only adjust if, after a few cycles, you notice the following:

• Crockery remaining dull looking and/or showing

occasional round spots. If this happens, increase the
quantity of rinse aid by turning the red dial below the
filler trough clockwise. 

• Crockery feeling sticky or showing whitish spots. If this

happens, decrease the quantity of rinse aid by turning
the red dial below the filler trough anti-clockwise.

The dispenser holds about 140 ml. This is enough for 40-
70 wash cycles, depending on the dosage setting. When
the rinse aid level is approaching the bottom of the scale it is
time to refill the dispenser. Swivel out the filler trough and
carefully fill up with rinse aid until the level reaches up to
the red mark on the level indicator tube. Do not overfill, and
carefully wipe off any spillage with a damp cloth immediately.
Don’t forget to close the filler trough afterwards. 

Do not fill the rinse aid dispenser with liquid
detergent.

Spray arm (2)

The holes in the spray arm nozzle must be kept clean to
ensure satisfactory wash results. Inspect the spray arm
regularly. When thorough cleaning is necessary, remove
the spray arm by unscrewing the nut clockwise (it has a
left-handed thread) and lift off the spray arm.

Wash the spray arm with hot soapy water using a stiff
saucepan brush if necessary to remove scraps.

Re-assemble carefully, making sure the nut is secure.

Coarse filter (3)

The purpose of the coarse filter is to catch large objects
such as toothpicks and pieces of eggshell. Make sure
that the filter is always clean. Lift it out and rinse it under
running water whenever necessary.

Fine filter (4)

It is just as important to keep this filter clean. A dirty or
clogged filter will  impair washing efficiency. The fine filter
can easily be lifted out for cleaning when you have
removed the coarse filter.

The dishwasher must not be used without the
filters. Incorrect repositioning of the filters will
produce poor washing results.

Cleaning of the filters is vital to ensure correct
operation of the machine.

Содержание ZANUSSI DCS12W

Страница 1: ...I N S T R U C T I O N B O O K L E T 822 90 11 12 D I S H WA S H E R D C S 1 2 W ...

Страница 2: ...ething Not Working 9 Service 10 Service and Spare Parts Customer Care Department Guarantee Conditions 11 For the installer Technical specifications 12 Unpacking the machine 13 If the machine is damaged Use Protecting the machine against freezing Installation 14 15 Water inlet Water drainage Power supply Guide to use the instruction book The following symbols will be found in the text to guide you ...

Страница 3: ... of it Keep all packaging well away from children Keep all detergents in safe place out of children s reach Prevent children from sitting swinging or standing on the open door During Use This dishwasher is designed solely for washing house hold utensils suitable for machine washing Using it for other purposes could lead to physical injury or damage to property and invalidate the guarantee Avoid op...

Страница 4: ...level is approaching the bottom of the scale it is time to refill the dispenser Swivel out the filler trough and carefully fill up with rinse aid until the level reaches up to the red mark on the level indicator tube Do not overfill and carefully wipe off any spillage with a damp cloth immediately Don t forget to close the filler trough afterwards Do not fill the rinse aid dispenser with liquid de...

Страница 5: ...age it 4 Remove the funnel and wipe off any spillage 5 Screw the filler cap back in place The salt container holds about 1 litre which is enough for about 20 30 dishwashing cycles Always ensure that there is water in the salt container before filling with salt Water softener plug 7 As supplied from the factory the water softener is set for a water hardness of up to 20 dH If your water is harder th...

Страница 6: ... While the programme is in progress the indicator lamp is lit and it goes out when the programme has finished 4 Salt indicator lamp The operating lamp indicates when the salt needs to be replenished The lamp may remain lit for one or more programmes after refilling the salt container this is normal Wash phase Rinse phase Door lock Press the handle down and open the door Avoid opening the door whil...

Страница 7: ...ours may fade and lose their lustre The same applies to cutlery with wooden or plastic handles Make sure you always buy articles that are dishwasher proof Not all plastic articles are machine washable If you are in doubt as to whether your plasticware can be machine washed we suggest you check by washing a single item or else wash them by hand Aluminium becomes dull and tarnished when machine wash...

Страница 8: ... the door 4 Select the required temperature 5 Start the dishwasher by turning the programme knob to the start position 6 Check the filters to see whether they need cleaning when the dishwasher has finished the wash 1 2 3 4 5 6 Detergent recommendations For best results we recommend the use of Finish detergents rinse aid and salt A complimentary sample pack is included in your new dishwasher ...

Страница 9: ...re the filters clogged Are the filters in position Did you use enough detergent Is the detergent old or has gone hard Is the salt container cap properly closed Is the washing programme selected too gentle Is the rinse aid dispenser empty Is the salt container empty or is the water softener not correctly adjusted Is the rinse aid dispenser adjusted to too low dosage Are the dishes rattling against ...

Страница 10: ...you will need to give the following details 1 Your name address and post code 2 Your telephone number 3 Clear and concise details of the fault 4 The model and serial number of the appliance found on the rating plate 5 The purchase date Please note that a valid purchase receipt or guarantee documentation is required for in guarantee service calls Customer Care Department For general enquiries conce...

Страница 11: ... of glass or plastic Costs incurred for calls to put right an appliance which is improperly installed or calls to appliances outside the United Kingdom Appliances found to be in use within a commercial environment plus those which are the subject to rental agreements Products of Zanussi Electrolux manufacture which are not marketed by Zanussi Electrolux European Guarantee If you should move to ano...

Страница 12: ...ns Dimensions Height 460 mm Width 450 mm Depth 480 mm Weight Net 17 kg Gross 20 kg Capacity 5 settings Water pressures Minimum 50 kPa 0 5 bar Maximum 1000 kPa 10 bar Water Temperature Maximum 25 C Electrical data Power supply 230 V 50 Hz Fuse 13 A Heating element 1200 W Power rating 1280 W This appliance complies with the following E E C directives 73 23 EEC dated 19 02 1973 low voltage directive ...

Страница 13: ...gned solely for washing household utensils suitable for washing in a dishwasher Using it for other purposes may damage it and invalidate the guarantee Protecting the machine against freezing If the dishwasher is placed in an environment where the temperature sometimes falls below 0 C there is a risk that the small amount of water which remains inside the parts of the dishwasher will freeze and dam...

Страница 14: ... pipe close to the dish washer and accessible for easy use This should be turned off when the appliance is not in use Connect the inlet hose to a tap with a 3 4 pipe thread The inlet hose must not be joined onto any form of extension hose If it is too short the entire hose must be replaced with a longer high pressure hose specially designed for the purpose The end of the hose which is connected to...

Страница 15: ...case it should be plugged into a 13 amp socket in another part of your home Important The wires in the mains lead are coloured in accordance with the following code Green and Yellow Earth Blue Neutral Brown Live If you fit your own plug the colours of the wires in the mains lead of your appliance may not correspond with the markings identifying the terminals in your plug proceed as follows Connect...

Страница 16: ... Electrolux plc 2003 ...

Страница 17: ...board monitors software tv dvd and othes Manual users user manuals user guide manual owners manual instruction manual manual owner manual owner s manual guide manual operation operating manual user s manual operating instructions manual operators manual operator manual product documentation manual user maintenance brochure user reference pdf manual ...

Отзывы: