background image

74

MAINTENANCE

Cleaning of the cooker
Splashes of juice, fruit juice, etc. must be removed as
quickly as possible with a damp cloth as they could, in
time, cause the enamel to loose its shine.
To remove light scratches from the enamel, use slightly
abrasive cleaning products in powder form.  Do not use
steel wool or knives to remove deposits of dirt.
For daily cleaning use soap and water or one of the
numerous products available commerically.
Wash the enamelled grills with water and a cleaning
product.
Clean the oven door with hot water only, avoid using
rough clothes or abrasive substances.
Only clean the electric plates once they have become
cold.
Both the plates themselves and their edges can be
cleaned with a fine emergy-cloth.  They can be oiled
occasionally with a little vegetable oil or vaseline whilst
they are still hot.

Cleaning of the oven
Carefully clean the oven after use and whilst still
slightly warm. In fact this is when deposits of fat or
similar, fruit juices, particles of sugar or grease can be
most easily removed as they will not have had time to
become hard.
Use hot water and a cleaning product or a product in
spray form which can be obtained commercially.
When using, follow with manufacturer’s instructions.
Do not direct sprays onto parts in burnished steel, as
you could damage them.
Clean oven accessories (grill, dripping pan, etc.) with
hot water and a cleaning product.
Remove any deposits by means of a slightly abrasive
powder.

Never cover the sides or the bottom of the oven
with aluminium foil to collect splashes of fat.
The resultant accumulation of heat would affect
cooking results and could damage the enamel.

Replacement of the oven lamp (Fig. 15)
Disconnect the appliance
Unscrew the lamp and replace with another, capable
of tolerating  high temperatures (300˚C) having the
following characteristics:

Tension:  230 V (50 Hz)
Power:    15W
Cap:      E14

Fig. 15

Fig. 16

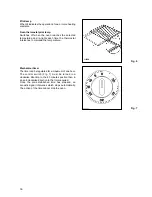
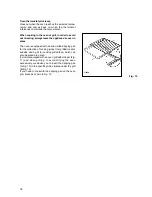
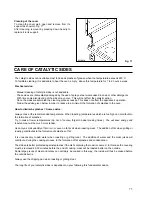
Cleaning of the oven door
To clean the oven door completely it is advisable to
dismount it by following these instructions (Fig. 16):
-

open the door completely;

-

turn the two staples positioned on the hinges’ arm
180˚;

-

partially open the door to an angle of -30˚, lift the
door and remove from the front.

Replace the door by carrying out the operations
described in reverse.

FO 0424

FO 0967

Содержание Oven

Страница 1: ...ides assistance to the most important makes of electrical domestic appliances In case of necessity contact the nearest Centre by consulting the telephone directory under the name ZANUSSI or of course the yellow pages under the section Electrical Domestic Appliances Repairs GUARANTEE Your new appliance is under guarantee You will find the guarantee certificate attached If it is missing request it f...

Страница 2: ...d see instructions Only heat resistent dishes should be placed in the drawer situated under the oven Do not place inflammable items in it If the appliance requires repair this should be carried out by qualified personnel as you could cause damage Contact the nearest Assistance Centre and only use original spareparts This appliance has been designed for use by adults Take care therefore of children...

Страница 3: ...ONS To offer better protection to children who could be burnt by the oven door when in use a shield can be applied to the door itself This shield can be purchased in our after sales service shops The fitting instructions are supplied with the kit When cooking in the oven or the grill the appliance is subject to considerable heat particularly around the door and nearby area Take care therefore that...

Страница 4: ...open the oven door INSTRUCTIONS FOR USER INSTALLATION It is important that all operations relating to instalation and regulation be carried out by qualified personnel according to the rules and regulations in force Specific instructions are described in the chapter intended for the installer BEFORE using the appliance take care to remove the special film which protects parts in inox or stainless s...

Страница 5: ...bs to operate the four hot plates There are two different types of plates Normal This is a 7 position control knob 0 off and 1 6 indica te the levels of power uo to the mawimum Rapid hot Plate This type is indicated by a red circle in the middle of the plate The red circle is painted on and so will deteriorate and may come off completely over a period of time A rapid plate will heat up much more q...

Страница 6: ...erature will never exceed 220 C for and 180 C fo r and will not be regulated by the thermostat When grilling it is sufficient to turn the switch so that the sign is in front of the symbol When the grill is in use the oven door must be left ajar and the switch protection shield inserted Fig 4 and 5 When cooking in the oven or grill in order to avoid over heating always leave the appliance s cover o...

Страница 7: ... to maintain the temperature Mechanical timer The timer can be regulated for a maximum of one hour The control switch Fig 7 must be turned in a clockwise direction to the 60 minutes postion then in an anti clockwise direction to the time required Once the pre established time has elapsed an acoustic signal intervenes which stops automatically The action of the time cannot stop the oven Fig 6 Fig 7...

Страница 8: ...position and regulate the thermostat to the required tempera ture Fig 9 FO 1114 FO 1135 Fig 8 Fig 10 Fig 11 Upper heating only Turn the selector switch to bring the sign to position and regulate the thermostat to the required tempera ture Fanned air convection Turn the selector switch to bring the sign to position and regulate the thermostat to the required tempera ture De freezing Turn the select...

Страница 9: ...s equipped with an enamelled dripping pan for the collection of cooking juices from grilled meat or kebabs and a grill for cooking grilled food which can also be placed in a dish In models equipped with an oven grill with stopper Fig 11 and when grilling to avoid dirtying the oven excessively we advise you to insert the dripping pan A Fig 12 in the specific grids situated under the grill B Fig 12 ...

Страница 10: ...te The increase and decrease control buttons operate slowly at first and then more rapidly They should be pressed separately 2 THE MINUTE MINDER IMPORTANT The minute minder can be used to time a set cooking period At the end of the cook time the minute minder will automatically switch off the oven if in use The minute minder gives an audible reminder at the end of any period of cooking up to 23 ho...

Страница 11: ...et the time of day press button 1 and 2 together See Fig 13 9 4 THINGS TO NOTE 1 If at first you do not set the time of day correctly reset the clock by pressing and holding button 1 The display will count back to 00 00 Release the button After a few seconds the display will reset to show 12 00 To reset the time of day follow the procedure laid down in point 1 on page 69 2 The time of day must be ...

Страница 12: ...method through the elimination of humidity in the air and a drier environment smells and tastes are not given off and do not mix with those of other dishes Thanks to this possibility of cooking on several levels you can cook up to three different dishes at the same time to be consumed immediately or frozen You can also cook on only one level In this case it is advisable to place the dish on the lo...

Страница 13: ...at at a high temperature reducing the temperature to finish cooking the inside The cooking temperature for white meat can be mode rate throughout The degree of cooking can be checked by pressing the meat with a fork if it does not give the meat is cooked At the end of cooking it is advisable to wait at least 15 minutes before cutting the meat in order that the juices are not lost Before serving pl...

Страница 14: ... slow cooking 175 2 12 15 Roasts brief cooking 200 2 10 12 Italian meatballs 200 2 30 40 Poultry Duck 1 1 2 2 kg 200 2 120 180 Goose 3 kg 200 2 150 210 Roast chicken 200 2 60 90 Turkey 5 kg 175 2 240 Game Hare 200 2 60 90 Leg of venison 200 2 90 150 Leg of deer 175 2 90 180 Vegetables Gemüsetopf 200 2 40 45 Fish Mullet 200 2 40 50 Pizza 240 1 20 25 Grill Pork chops 3 15 20 Sausages 3 20 25 Grilled...

Страница 15: ...emoved as they will not have had time to become hard Use hot water and a cleaning product or a product in spray form which can be obtained commercially When using follow with manufacturer s instructions Do not direct sprays onto parts in burnished steel as you could damage them Clean oven accessories grill dripping pan etc with hot water and a cleaning product Remove any deposits by means of a sli...

Страница 16: ...dapt cooking times You will save energy and roasted meat will be much more tender Use only a small quantity of fat or oil or even no fat at all when roasting meat The addition of fat when grilling or roasting contributes to the formation of splashes of fat It is unnecessary to add water when roasting or grilling meat The addition of water and the meat juices will contribute during the cooking proc...

Страница 17: ...ible in case of accidents or incidents caused by inexisting or defective earthing PLACEMENT The appliance is of type X It has been designed to be placed between two other units whose sides can tolerate temperatures exceeding that of the room by 75 C WHEN THE COOKER IS FIRST INSTALLED Once the cooker has been installed it is important to remove the protective materials which were put on in the fact...

Страница 18: ...w ground wire must not be interrupted by the switch The supply cable must in all cases be laid out in such a way as to ensure that it does not reach at any given point a temperature 50 C higher than the ambient tem perature The manufacturer disclaims any liability in case these accident preventing rules are not observed Suitable power supply cables are the following types considering the respectiv...

Страница 19: ... after each use when cooking meat splashes of fat are formed if they are not cleaned they can cause smoke and smells during successive cooking see paragraph concerning cleaning The oven light does not work the lamp has certainly burnt to replace follow the instructions provided in the paragraph on this subject If after all the controls indicated above the appliance still does not work contact your...

Отзывы: