background image

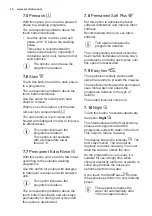
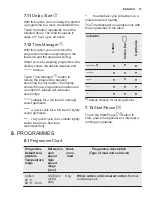
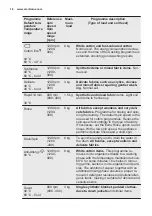
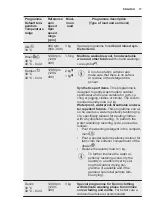
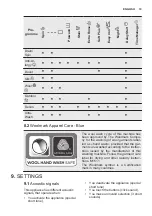
Pro‐

gramme

Spin


Prewash 

Stain 

Extra Rinse 

Soft Plus


Easy Iron

Night

Delay Start


Time Manager 

Drain/
Spin 


Anti-Al‐
lergy 


Duvet 


Silk 


Wool 


Outdoor


Denim 


Ultra‐
Wash 


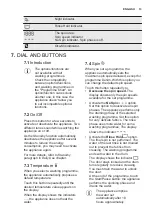
8.2 Woolmark Apparel Care - Blue

The  wool  wash  cycle  of  this  machine  has

been approved by The Woolmark Compa‐

ny for the washing of wool garments label‐

led as «hand wash» provided that the gar‐

ments are washed according to the instruc‐

tions  issued  by  the  manufacturer  of  this

washing machine. Follow the garment care

label  for  drying  and  other  laundry  instruc‐

tions. M1511

The  Woolmark  symbol  is  a  Certification

mark in many countries.

9. SETTINGS

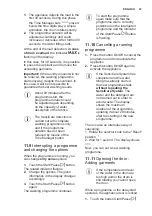
9.1 Acoustic signals

This appliance has different acoustic

signals, that operate when:
• You activate the appliance (special

short tune).

• You deactivate the appliance (special

short tune).

• You touch the buttons (click sound).

• You make an invalid selection (3 short

sounds).

ENGLISH

19

Содержание EW8F228S

Страница 1: ...EW8F228S EN Washing Machine User Manual ...

Страница 2: ...genious and stylish it has been designed with you in mind So whenever you use it you can be safe in the knowledge that you ll get great results every time Welcome to Electrolux Visit our website for Get usage advice brochures trouble shooter service information www electrolux com webselfservice Register your product for better service www registerelectrolux com Buy Accessories Consumables and Orig...

Страница 3: ...appliance in a safe way and understand the hazards involved Children between 3 and 8 years of age and persons with very extensive and complex disabilities shall be kept away unless continuously supervised Children of less than 3 years of age should be kept away unless continuously supervised Do not let children play with the appliance Keep all packaging away from children and dispose of it appropr...

Страница 4: ...amaged it must be replaced by the manufacturer its Authorised Service Centre or similarly qualified persons to avoid an electrical hazard Before any maintenance operation deactivate the appliance and disconnect the mains plug from the socket Do not use high pressure water sprays and or steam to clean the appliance Clean the appliance with a moist cloth Use only neutral detergents Do not use abrasi...

Страница 5: ...horised Service Centre Connect the mains plug to the mains socket only at the end of the installation Make sure that there is access to the mains plug after the installation Do not touch the mains cable or the mains plug with wet hands Do not pull the mains cable to disconnect the appliance Always pull the mains plug This appliance complies with the E E C Directives 2 3 Water connection Do not cau...

Страница 6: ...r catch to prevent children or pets from becoming trapped in the drum Dispose of the appliance in accordance with local requirements for the disposal of Waste Electrical and Electronic Equipment WEEE 3 INSTALLATION WARNING Refer to Safety chapters 3 1 Unpacking 1 Remove the external film If necessary use a cutter 2 Remove the cardboard top and the polystyrene packaging materials 3 Put the front po...

Страница 7: ... movement of the appliance when it operates x4 1 Install the appliance on a flat hard floor The appliance must be levelled and stable Make sure that the appliance does not touch the wall or other units and there is air circulation below the appliance 2 Loosen or tighten the feet to adjust the level All feet must rest firmly on the floor WARNING Do not put cardboard wood or equivalent materials bel...

Страница 8: ...ice centre for the other drain hose and the extension It is possible to connect the drain hose in different ways 1 Make a U shape with the drain hose and put it around the plastic hose guide 2 On the edge of a sink Fasten the guide to the water tap or to the wall Make sure that the plastic guide cannot move when the appliance drains and the drain hose end is not immersed in the water There may be ...

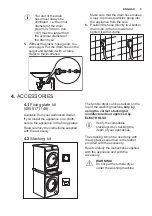
Страница 9: ...SORIES 4 1 Fixing plate kit 4055171146 Available from your authorised dealer If you install the appliance on a plinth secure the appliance in the fixing plates Read carefully the instructions supplied with the accessory 4 2 Stacking kit The tumble dryer can be stacked on the top of the washing machine only by using the correct stacking kit manufactured and approved by ELECTROLUX Verify the compati...

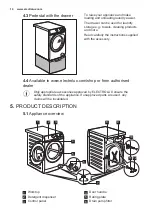
Страница 10: ...the accessory 4 4 Available in www electrolux com shop or from authorised dealer Only appropriate accessories approved by ELECTROLUX ensure the safety standards of the appliance If unapproved parts are used any claims will be invalidated 5 PRODUCT DESCRIPTION 5 1 Appliance overview 1 2 3 9 5 6 7 4 10 8 11 12 1 Worktop 2 Detergent dispenser 3 Control panel 4 Door handle 5 Rating plate 6 Drain pump ...

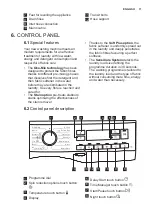
Страница 11: ...ptimizing the effectiveness of the stain remover Thanks to the Soft Plus option the fabric softener is uniformly spread out in the laundry and deeply penetrates the fabric fibres favouring a perfect softness The SensiCare System detects the laundry load size defining the programme duration in 30 seconds The washing programme is tailored to the laundry load and the type of fabric without consuming ...

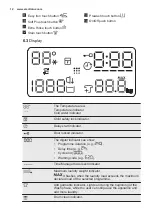
Страница 12: ...indicator Door locked indicator The digital indicator can show Programme duration e g Delay time e g Cycle end Warning code e g Time Manager bars level indicator Maximum laundry weight indicator It flashes when the laundry load exceeds the maximum declared load of the selected programme Add garments indicator Lights on during the beginning of the Wash phase while the user can still pause the appli...

Страница 13: ...display When the display shows the indicators the appliance does not heat the water 7 4 Spin When you set a programme the appliance automatically sets the maximum spin speed allowed except for programme Denim With this option you can change the default spin speed Touch this button repeatedly to Decrease the spin speed The display shows only the spin speeds available for the set programme Activate ...

Страница 14: ...ays permanently on during next cycles until this option is deactivated 7 8 Permanent Soft Plus Set this option to optimise the fabric softener distribution and improve fabric softness Recommended when you use fabric softener This option increases the programme duration The corresponding indicator above the touch button illuminates and also stays permanently on during next cycles until this option ...

Страница 15: ...table for a full load of normally soiled garments a quick cycle for a full load of lightly soiled garments very quick cycle for a smaller lightly soiled load max half load recommended the shortest cycle to freshen up a small amount of laundry The Time Manager is available only with the programmes in the table indicator Cotton Cotton Eco Synthetics 1 1 Default duration for all programmes 7 13 Start...

Страница 16: ... for rinsing and spin ning the laundry The default spin speed is the one used for cotton programmes Reduce the spin speed accordingly to the type of laundry If necessary set the Extra Rinse option to add rinses With a low spin speed the appliance performs delicate rinses and a short spin Drain Spin 1200 rpm 1200 400 8 kg To spin the laundry and to drain the water in the drum All fabrics except woo...

Страница 17: ... The recom mended laundry load is 2 kg Waterproof waterproof breathable and wa ter repellent fabrics This programme can al so be used as a water repellency restoring cy cle specifically tailored for treating clothes with a hydrophobic coating To perform the water repellency restoring cycle proceed as follows Pour the washing detergent in the compart ment Pour a special water repellency restorer fo...

Страница 18: ...gramme They are the most efficient pro grammes in terms of combined energy and water consumption for washing normally soiled cotton laundry The water temperature of the washing phase may differ from the temperature declared for the selected programme 2 During this cycle the drum rotates slowly to ensure a gentle wash It can seem that the drum doesn t rotate or doesn t rotate properly but this is n...

Страница 19: ...d that the gar ments are washed according to the instruc tions issued by the manufacturer of this washing machine Follow the garment care label for drying and other laundry instruc tions M1511 The Woolmark symbol is a Certification mark in many countries 9 SETTINGS 9 1 Acoustic signals This appliance has different acoustic signals that operate when You activate the appliance special short tune You...

Страница 20: ... the electrical power is available and the water tap is open 2 Pour 2 litres of water into the detergent compartment marked by This action activates the drain system 3 Pour a small quantity of detergent into the compartment marked by 4 Set and start a programme for cotton at the highest temperature without any laundry in the drum This removes all possible dirt from the drum and the tub 11 DAILY US...

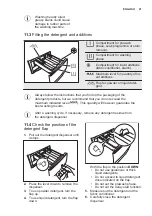
Страница 21: ...icated level This quantity will however guarantee the best washing results After a washing cycle if necessary remove any detergent residue from the detergent dispenser 11 4 Check the position of the detergent flap 1 Pull out the detergent dispenser until it stops 2 Press the lever down to remove the dispenser 3 To use powder detergent turn the flap up 4 To use liquid detergent turn the flap down W...

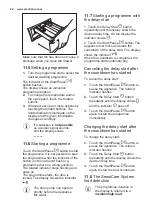
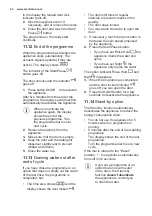
Страница 22: ...iance fills water 11 7 Starting a programme with the delay start 1 Touch the Delay Start button repeatedly until the display shows the desired delay time On the display the indicator shows 2 Touch the Start Pause button The appliance door locks and starts the countdown of the delay start The display shows the indicator When the countdown is completed the programme starts automatically Cancelling t...

Страница 23: ...tart Pause button The related indicator flashes 2 Change the options The given information in the display changes accordingly 3 Touch the Start Pause button again The washing programme continues To start the programme again make sure that the programme dial is correctly positioned on the interrupted programme and the indicator of the Start Pause button is flashing 11 10 Cancelling a running progra...

Страница 24: ...ramme is completed but The time area shows and the display shows the door locked The drum still turns at regular intervals to prevent creases in the laundry The door stays locked You must drain the water to open the door 1 If necessary touch the Spin button to decrease the spin speed proposed by the appliance 2 Press the Start Pause button If you have set Rinse Hold the appliance drains the water ...

Страница 25: ...e stains water and detergent is not sufficient We recommend that you pre treat these stains before you put the items in the appliance Special stain removers are available Use the special stain remover that is applicable to the type of stain and fabric 12 3 Detergents and other treatments Only use detergents and other treatments specially made for washing machines powder detergents for all types of...

Страница 26: ... empty drum and a descaling product occasionally Always follow the instructions that you find on the packaging of the product 13 3 Maintenance wash The repeated and prolonged use of low temperature programmes can cause detergent deposits fluff residues bacterial growth inside the drum and the tub This could generate bad odours and mildew To eliminate these deposits and clean the inner part of the ...

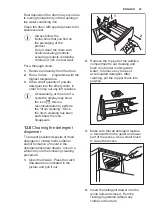
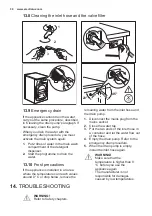
Страница 27: ...he drum cleaning Once the drum cleaning has been performed the icon disappears 13 6 Cleaning the detergent dispenser To prevent possible deposits of dried detergent or clotted fabric softener and or formation of mould in the detergent dispenser drawer once in a while carry out the following cleaning procedure 1 Open the drawer Press the catch downwards as indicated in the picture and pull it out 2...

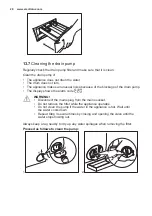
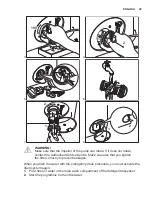
Страница 28: ...isplay shows the alarm code WARNING Disconnect the mains plug from the mains socket Do not remove the filter while the appliance operates Do not clean the pump if the water in the appliance is hot Wait until the water cools down Repeat Step 3 several times by closing and opening the valve until the water stops flowing out Always keep a rag nearby to dry up any water spillages when removing the fil...

Страница 29: ...horised Service Centre Make sure also that you tighten the filter correctly to prevent leakages When you drain the water with the emergency drain procedure you must activate the drain system again 1 Put 2 litres of water in the main wash compartment of the detergent dispenser 2 Start the programme to drain the water ENGLISH 29 ...

Страница 30: ...iance is installed in an area where the temperature can reach values around 0 C or drop below remove the remaining water from the inlet hose and the drain pump 1 Disconnect the mains plug from the mains socket 2 Close the water tap 3 Put the two ends of the inlet hose in a container and let the water flow out of the hose 4 Empty the drain pump Refer to the emergency drain procedure 5 When the drai...

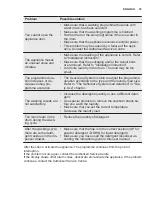
Страница 31: ...e appliance Switch it off and switch on again The programme was not finished properly or the appliance stopped too early If the alarm code appears again contact the Authorised Service Centre The appliance does not fill with water properly After the proper check start the appliance again by pressing Start Pause button the appliance tries to resume the cycle If the error persists the alarm code will...

Страница 32: ...he correct position The hose may be positioned too low Refer to Installa tion instruction The appliance does not drain the water Make sure that the sink spigot is not clogged Make sure that the drain hose has no kinks or bends Make sure that the drain filter is not clogged Clean the filter if necessary Refer to Care and cleaning Make sure that the connection of the drain hose is cor rect Set the d...

Страница 33: ...ng to the type and the laundry load size Refer to The SensiCare System load detection in Dai ly Use chapter The washing results are not satisfactory Increase the detergent quantity or use a different deter gent Use special products to remove the stubborn stains be fore you wash the laundry Make sure that you set the correct temperature Decrease the laundry load Too much foam in the drum during the...

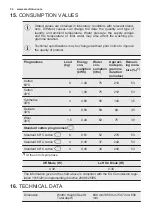
Страница 34: ...n litre Approxi mate pro gramme duration minutes Remain ing mois ture 1 Cotton 60 C 8 1 40 75 210 53 Cotton 40 C 8 1 00 75 210 53 Synthetics 40 C 3 0 60 56 140 35 Delicate 40 C 3 0 50 59 90 35 Wool 30 C 1 5 0 40 62 75 30 Standard cotton programmes Standard 60 C cotton 8 0 61 52 270 53 Standard 60 C cotton 4 0 45 37 240 53 Standard 40 C cotton 4 0 45 38 240 53 1 At the end of spin phase Off Mode W ...

Страница 35: ...8 bar 0 8 MPa Water supply 1 Cold water Maximum Load Cotton 8 kg Energy Efficiency Class A 40 Spin Speed Maximum spin speed 1151 rpm 1 Connect the water inlet hose to a water tap with a 3 4 thread 17 QUICK GUIDE 17 1 Daily use 1 2 3 5 4 Connect the mains plug to the mains socket Open the water tap Load the laundry Pour the detergent and other treatment in the proper compartment of the detergent di...

Страница 36: ... Standard programmes for the Energy Label con sumption values Synthetics 3 kg Synthetic items or mixed fabric items Delicate 3 kg Delicate fabrics such as acrylics viscose polyester items Rapid 14 min 1 5 kg Synthetic and mixed fabric Lightly soiled items and garments to freshen up Rinse 8 kg All fabrics except woollens and very deli cate fabrics Programme for rinsing and spinning Drain Spin 8 kg ...

Страница 37: ... full and partial load and the con sumption of the low power modes Actual energy con sumption will depend on how the appliance is used 117 Energy consumption of the standard 60 C cotton pro gramme at full load in kWh 0 61 Energy consumption of the standard 60 C cotton pro gramme at partial load in kWh 0 45 Energy consumption of the standard 40 C cotton pro gramme at partial load kWh 0 45 Power con...

Страница 38: ...otton pro gramme at partial load in minutes 240 Duration of the left on mode in minutes 5 Airborne acoustical noise emission in db A washing 50 Airborne acoustical noise emission in db A spinning 73 Built in appliance Y N No The information given in the chart above is compliant with the EU Commission regulation 1015 2010 implementing directive 2009 125 EC 19 ENVIRONMENTAL CONCERNS Recycle material...

Страница 39: ...ENGLISH 39 ...

Страница 40: ...www electrolux com shop 192936291 A 382018 ...

Отзывы: