background image

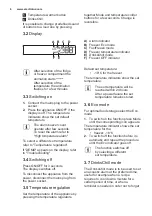
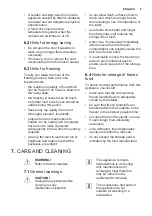
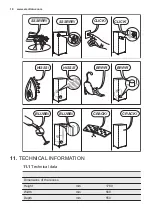
• A sudden cracking noise from inside

appliance caused by thermic dilatation

(a natural and not dangerous physical

phenomenon).

• A faint click noise from the

temperature regulator when the

compressor switches on or off.

6.2 Hints for energy saving

• Do not open the door frequently or

leave it open longer than absolutely

necessary.

• If foreseen, do not remove the cold

accumulators from the freezer basket.

6.3 Hints for freezing

To help you make the most of the

freezing process, here are some

important hints:
• the maximum quantity of food which

can be frozen in 24 hours is shown on

the rating plate;

• the freezing process takes 24 hours

no further food to be frozen should be

added during this period;

• freeze only top quality, fresh and

thoroughly cleaned, foodstuffs;

• prepare food in small portions to

enable it to be rapidly and completely

frozen and to make it possible

subsequently to thaw only the quantity

required;

• wrap up the food in aluminium foil or

polythene and make sure that the

packages are airtight;

• do not allow fresh, unfrozen food to

touch food which is already frozen,

thus avoiding a rise in temperature of

the latter;

• lean foods store better and longer

than fatty ones; salt reduces the

storage life of food;

• water ices, if consumed immediately

after removal from the freezer

compartment, can possibly cause the

skin to be freeze burnt;

• it is advisable to show the freezing in

date on each individual pack to

enable you to keep tab of the storage

time.

6.4 Hints for storage of frozen

food

To obtain the best performance from this

appliance, you should:
• make sure that the commercially

frozen foodstuffs were adequately

stored by the retailer;

• be sure that frozen foodstuffs are

transferred from the foodstore to the

freezer in the shortest possible time;

• not open the door frequently or leave

it open longer than absolutely

necessary;

• once defrosted, food deteriorates

rapidly and cannot be refrozen;

• do not exceed the storage period

indicated by the food manufacturer.

7. CARE AND CLEANING

WARNING!

Refer to Safety chapters.

7.1 General warnings

CAUTION!

Unplug the appliance before

carrying out any

maintenance operation.

This appliance contains

hydrocarbons in its cooling

unit; maintenance and

recharging must therefore

only be carried out by

authorized technicians.

The accessories and parts of

the appliance are not

suitable for washing in a

dishwasher.

ENGLISH

9

Содержание EUN2244AOW

Страница 1: ...EUN2244AOW EN Freezer User Manual 2 FR Congélateur Notice d utilisation 20 DE Gefriergerät Benutzerinformation 39 ...

Страница 2: ...that you ll get great results every time Welcome to Electrolux Visit our website for Get usage advice brochures trouble shooter service information www electrolux com Register your product for better service www registerelectrolux com Buy Accessories Consumables and Original spare parts for your appliance www electrolux com shop CUSTOMER CARE AND SERVICE Always use original spare parts When contac...

Страница 3: ...en play with the appliance Cleaning and user maintenance shall not be made by children without supervision Keep all packaging away from children 1 2 General Safety This appliance is intended to be used in household and similar applications such as Farm houses staff kitchen areas in shops offices and other working environments By clients in hotels motels bed and breakfast and other residential type...

Страница 4: ...oven or hobs The rear of the appliance must stand against the wall Do not install the appliance where there is direct sunlight Do not install this appliance in areas that are too humid or too colds such as the construction appendices garages or wine cellars When you move the appliance lift it by the front edge to avoid scratching the floor 2 2 Electrical connection WARNING Risk of fire and electri...

Страница 5: ...od that has been thawed Obey the storage instructions on the packaging of frozen food 2 4 Care and cleaning WARNING Risk of injury or damage to the appliance Before maintenance deactivate the appliance and disconnect the mains plug from the mains socket This appliance contains hydrocarbons in the cooling unit Only a qualified person must do the maintenance and the recharging of the unit Regularly ...

Страница 6: ...itching off Press ON OFF for 3 seconds The display switches off To disconnect the appliance from the power disconnect the mains plug from the power socket 3 5 Temperature regulation Set the temperature of the appliance by pressing the temperature regulators Default set temperature 18 C for the freezer The temperature indicators show the set temperature The set temperature will be reached within 24...

Страница 7: ...itches off by selecting a different freezer set temperature 3 9 High temperature alarm An increase in the temperature in the freezer compartment for example due to an earlier power failure or opening of the door is indicated by flashing the alarm and freezer temperature indicators sounding of buzzer To reset the alarm press any button The buzzer switches off The freezer temperature indicator shows...

Страница 8: ... the value shown in the technical characteristics chart under rising time the defrosted food must be consumed quickly or cooked immediately and then re frozen after cooling 5 3 Thawing Deep frozen or frozen food prior to being used can be thawed in the refrigerator compartment or at room temperature depending on the time available for this operation Small pieces may even be cooked still frozen dir...

Страница 9: ...avoiding a rise in temperature of the latter lean foods store better and longer than fatty ones salt reduces the storage life of food water ices if consumed immediately after removal from the freezer compartment can possibly cause the skin to be freeze burnt it is advisable to show the freezing in date on each individual pack to enable you to keep tab of the storage time 6 4 Hints for storage of f...

Страница 10: ...s nor on the foods The absence of frost is due to the continuous circulation of cold air inside the compartment driven by an automatically controlled fan 7 4 Periods of non operation When the appliance is not in use for long periods take the following precautions 1 Disconnect the appliance from electricity supply 2 Remove all food 3 Clean the appliance and all accessories 4 Leave the door doors op...

Страница 11: ... system will continue to keep food products cold but temperature adjustment will not be possible The compressor operates continually Temperature is set incor rectly Refer to Operation Many food products were put in at the same time Wait some hours and then check the temperature again The room temperature is too high Refer to climate class chart on the rating plate Food products placed in the appli...

Страница 12: ...t a higher lower tempera ture The food products tem perature is too high Let the food products tem perature decrease to room temperature before storage The door has been opened often Open the door only if neces sary There is no cold air circu lation in the appliance Make sure that there is cold air circulation in the appli ance If the advice does not lead to the desired result contact the nearest ...

Страница 13: ...thed The power supply cable plug is provided with a contact for this purpose If the domestic power supply socket is not earthed connect the appliance to a separate earth in compliance with current regulations consulting a qualified electrician The manufacturer declines all responsibility if the above safety precautions are not observed This appliance complies with the E E C Directives 9 3 Ventilat...

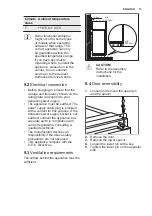
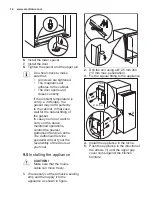
Страница 14: ...erations contact the nearest Authorised Service Centre The Authorised Service specialist will carry out the reversibility of the doors at your cost 9 5 Installing the appliance CAUTION Make sure that the mains cable can move freely 1 If necessary cut the adhesive sealing strip and then apply it to the appliance as shown in figure x x 2 Drill the unit using a Ø 2 5 mm drill 10 mm max penetration 3 ...

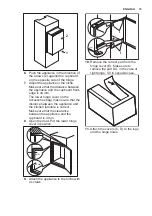
Страница 15: ...ag makes sure that the distance between the appliance and the kitchen furniture is correct Make sure that the clearance between the appliance and the cupboard is 4 mm 8 Open the door Put the lower hinge cover in position 44mm 4mm 9 Attach the appliance to the niche with 4 screws I I 10 Remove the correct part from the hinge cover E Make sure to remove the part DX in the case of right hinge SX in o...

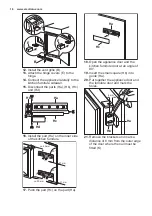
Страница 16: ...f the kitchen furniture ca 50 mm ca 50 mm 21 mm 90 90 21 mm 17 Push the part Hc on the part Ha Ha Hc 18 Open the appliance door and the kitchen furniture door at an angle of 90 19 Insert the small square Hb into guide Ha 20 Put together the appliance door and the furniture door and mark the holes Ha Hb 8 mm 21 Remove the brackets and mark a distance of 8 mm from the outer edge of the door where th...

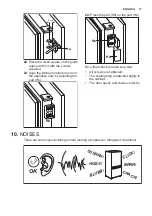
Страница 17: ...adjusting the part Hb Hb 24 Press the part Hd on the part Hb Hb Hd Do a final check to make sure that All screws are tightened The sealing strip is attached tightly to the cabinet The door opens and closes correctly 10 NOISES There are some sounds during normal running compressor refrigerant circulation BRRR HISSS CLICK BLUBB CRACK SSSRRR OK ENGLISH 17 ...

Страница 18: ...LICK CLICK SSSRRR SSSRRR BRRR BRRR HISSS HISSS BLUBB BLUBB CRACK CRACK 11 TECHNICAL INFORMATION 11 1 Technical data Dimensions of the recess Height mm 1780 Width mm 560 Depth mm 550 www electrolux com 18 ...

Страница 19: ...2 ENVIRONMENT CONCERNS Recycle the materials with the symbol Put the packaging in applicable containers to recycle it Help protect the environment and human health and to recycle waste of electrical and electronic appliances Do not dispose appliances marked with the symbol with the household waste Return the product to your local recycling facility or contact your municipal office ENGLISH 19 ...

Страница 20: ...atisfaction Bienvenue chez Electrolux Visitez notre site Internet pour Obtenir des conseils d utilisation des brochures de l aide des informations www electrolux com Enregistrer votre produit pour obtenir un meilleur service www registerelectrolux com Acheter des accessoires consommables et pièces de rechange d origine pour votre appareil www electrolux com shop SERVICE APRÈS VENTE N utilisez que ...

Страница 21: ...es instructions relatives à l utilisation de l appareil en toute sécurité leur ont été données et si les risques encourus ont été appréhendées Les enfants ne doivent pas jouer avec l appareil Le nettoyage et l entretien par l usager ne doivent pas être effectués par des enfants sans surveillance Ne laissez pas les emballages à la portée des enfants 1 2 Consignes générales de sécurité Cet appareil ...

Страница 22: ...STRUCTIONS DE SÉCURITÉ 2 1 Installation AVERTISSEMENT L appareil doit être installé uniquement par un professionnel qualifié Retirez l intégralité de l emballage N installez pas et ne branchez pas un appareil endommagé Suivez scrupuleusement les instructions d installation fournies avec l appareil L appareil est lourd prenez toujours des précautions lorsque vous le déplacez Portez toujours des gan...

Страница 23: ... isobutane R600a un gaz naturel ayant un niveau élevé de compatibilité environnementale Ce gaz est inflammable Si le circuit frigorifique est endommagé assurez vous de l absence de flammes et de sources d ignition dans la pièce Aérez la pièce Évitez tout contact d éléments chauds avec les parties en plastique de l appareil Ne placez jamais de boissons gazeuses dans le congélateur Cela engendrerait...

Страница 24: ...e 4 Touche de diminution de la température 5 Touche d augmentation de la température 6 DrinksChill Pour augmenter le volume de la tonalité des touches appuyez simultanément sur la touche Mode et la touche de diminution de la température pendant quelques secondes Ce changement est réversible 3 2 Affichage A B C D E F A Voyant d alarme B Mode Eco du congélateur C Mode FastFreeze D Indicateur de temp...

Страница 25: ...ête automatiquement répétez la procédure jusqu à ce que le voyant Eco s éteigne La fonction se désactive lorsque vous sélectionnez une température différente 3 7 Mode DrinksChill Le mode DrinksChill doit être utilisé pour le réglage d une alarme sonore à une heure souhaitée ce qui est utile par exemple pour refroidir une préparation pendant un certain temps dans le cadre d une recette de cuisine o...

Страница 26: ...rte Une alarme sonore se déclenche si la porte reste ouverte pendant quelques minutes Les conditions d alarme de porte ouverte sont indiquées par le clignotement du voyant de l alarme une alarme sonore Au rétablissement des conditions normales porte fermée l alarme s arrête Pendant la phase d alarme l alarme sonore peut être désactivée en appuyant sur le bouton Alarme 4 PREMIÈRE UTILISATION 4 1 Ne...

Страница 27: ...lus longue 5 4 Production de glaçons Cet appareil est équipé d un ou plusieurs bacs à glaçons N utilisez pas d instruments métalliques pour décoller les bacs du congélateur 1 Remplissez les bacs avec de l eau 2 Placez les bacs dans le compartiment congélateur 5 5 Accumulateurs de froid Le congélateur est équipé d au moins un accumulateur de froid qui permet d augmenter l autonomie de conservation ...

Страница 28: ...partiment congélateur peut provoquer des brûlures l identification des emballages est importante indiquez la date de congélation du produit et respectez la durée de conservation indiquée par le fabricant 6 4 Conseils pour le stockage des aliments surgelés Pour obtenir les meilleures performances possibles assurez vous que les denrées surgelées achetées dans le commerce ont été correctement entrepo...

Страница 29: ...e du congélateur Le compartiment congélateur est sans givre Cela signifie que le givre ne se forme pas pendant que l appareil est en fonctionnement que ce soit sur les parois internes ou sur les aliments L absence de givre est due à la circulation d air froid en continu à l intérieur du compartiment grâce à un ventilateur automatique 7 4 En cas de non utilisation prolongée Si l appareil n est pas ...

Страница 30: ...ntér ieur de l appareil est trop élevée Consultez le paragraphe Alarme porte ouverte ou Alarme haute tempéra ture La porte est laissée ou verte Fermez la porte La température à l intér ieur de l appareil est trop élevée Contactez un électricien qualifié ou le service après vente agréé le plus proche Un symbole rectangulaire apparaît à la place des chiffres sur l écran de tem pérature Problème de c...

Страница 31: ... de l eau de dégivrage n est pas raccordé au bac d évaporation situé au dessus du compresseur Fixez le tuyau d évacuation de l eau au bac d évapora tion de l eau de dégivrage Il est impossible de régler la température Le mode FastFreeze ou Shopping est activé Désactivez manuellement la fonction FastFreeze ou Shopping ou attendez que la fonction se réinitialise au tomatiquement avant de ré gler la ...

Страница 32: ...ent se produire sur certains types de modèles fonctionnant hors de cette plage de températures Seul le respect de la plage de températures spécifiée peut garantir un bon fonctionnement de l appareil En cas de doute concernant l emplacement d installation de l appareil veuillez contacter le vendeur notre service après vente agréé le plus proche 9 2 Branchement électrique Avant de brancher l apparei...

Страница 33: ...serrées Le joint magnétique adhère bien à l appareil La porte s ouvre et se ferme correctement Si la température ambiante est basse par exemple en hiver il se peut que le joint n adhère pas parfaitement Dans ce cas attendez que le joint reprenne sa taille naturelle Si vous ne voulez pas effectuer personnellement les opérations décrites ci dessus contactez le service après vente agréé le plus proch...

Страница 34: ...quée par les flèches 2 contre le meuble du côté opposé à la charnière 7 Ajustez la position de l appareil dans le meuble d encastrement Assurez vous que la distance entre l appareil et le bord avant du meuble est de 44 mm Le cache de la charnière inférieure dans le sachet d accessoires vous permet de vérifier que la distance entre l appareil et le meuble de cuisine est correcte Assurez vous que l ...

Страница 35: ...rgots et dans les trous des charnières E E B D C 12 Mettez en place la grille d aération B 13 Fixez les cache charnières E sur la charnière 14 Placez l appareil contre la paroi latérale du meuble de cuisine 15 Détachez les pièces Ha Hb Hc et Hd Hb Ha Hc Hd 16 Installez la pièce Ha sur la face intérieure du meuble de cuisine ca 50 mm ca 50 mm 21 mm 90 90 21 mm 17 Poussez la pièce Hc sur la pièce Ha...

Страница 36: ... l arête extérieure de la porte où le clou doit être posé K Ha K 8 mm 22 Placez de nouveau le petit carré sur le guide et fixez le à l aide des vis fournies 23 Alignez la porte du meuble de cuisine et celle de l appareil en réglant la pièce Hb Hb 24 Appuyez la pièce Hd sur la pièce Hb Hb Hd Faites une dernière vérification pour vous assurer que Toutes les vis sont bien serrées Le joint d étanchéit...

Страница 37: ...10 BRUITS L appareil émet certains bruits pendant son fonctionnement compresseur circuit frigorifique BRRR HISSS CLICK BLUBB CRACK SSSRRR OK CLICK CLICK SSSRRR SSSRRR BRRR BRRR HISSS HISSS FRANÇAIS 37 ...

Страница 38: ...e côté intérieur ou extérieur de l appareil et sur l étiquette énergétique 12 EN MATIÈRE DE PROTECTION DE L ENVIRONNEMENT Recyclez les matériaux portant le symbole Déposez les emballages dans les conteneurs prévus à cet effet Contribuez à la protection de l environnement et à votre sécurité recyclez vos produits électriques et électroniques Ne jetez pas les appareils portant le symbole avec les or...

Страница 39: ...e Ergebnisse erzielen werden Willkommen bei Electrolux Besuchen Sie uns auf unserer Website um Anwendungshinweise Prospekte Fehlerbehebungs und Service Informationen zu erhalten www electrolux com Ihr erworbenes Produkt zu registrieren um den besten Service dafür zu gewährleisten www registerelectrolux com Zubehör Verbrauchsmaterial und Original Ersatzteile für Ihr Gerät zu erwerben www electrolux...

Страница 40: ...here Verwendung des Geräts eingewiesen wurden und die mit dem Gerät verbundenen Gefahren verstanden haben Kinder dürfen nicht mit dem Gerät spielen Wartung oder Reinigung des Geräts dürfen nicht von Kindern ohne Aufsicht erfolgen Alle Verpackungsmaterialien von Kindern fernhalten 1 2 Allgemeine Sicherheit Dieses Gerät ist für die Verwendung im Haushalt und ähnliche Zwecke vorgesehen wie z B Bauern...

Страница 41: ...rnen Sie das gesamte Verpackungsmaterial Stellen Sie ein beschädigtes Gerät nicht auf und benutzen Sie es nicht Halten Sie sich an die mitgelieferte Montageanleitung Seien Sie beim Umsetzen des Geräts vorsichtig denn es ist schwer Tragen Sie stets Sicherheitshandschuhe Stellen Sie sicher dass die Luft um das Gerät zirkulieren kann Warten Sie mindestens 4 Stunden bevor Sie das Gerät an das Stromnet...

Страница 42: ...räglichkeit Dieses Gas ist brennbar Wird der Kältekreislauf beschädigt stellen Sie bitte sicher dass es keine Flammen und Zündquellen im Raum gibt Belüften Sie den Raum Stellen Sie keine heißen Gegenstände auf die Kunststoffteile des Geräts Legen Sie Erfrischungsgetränke nicht in das Gefrierfach Dadurch entsteht Druck auf den Getränkebehälter Bewahren Sie keine entzündbaren Gase und Flüssigkeiten ...

Страница 43: ...oreingestellte Tastenton lässt sich lauter einstellen Halten Sie dazu Mode und die Taste zum Senken der Temperatur einige Sekunden gleichzeitig gedrückt Die Änderung lässt sich rückgängig machen 3 2 Display A B C D E F A Alarmanzeige B Gefriergerätmodus Eco C FastFreeze Modus D Gefriergerät Temperaturanzeige E DrinksChill Modus F Gefriergerätanzeige OFF Nach der Auswahl des Kühl oder Gefrierraums ...

Страница 44: ...anderen Temperatur ausgeschaltet 3 7 DrinksChill Modus Mit dem Modus DrinksChill lässt sich ein Alarmton einstellen der zu der gewünschten Zeit ertönt Dies ist zum Beispiel praktisch wenn ein Gericht eine gewisse Zeit abkühlen muss oder Sie die Flaschen die Sie für eine schnellere Kühlung in den Gefrierraum gelegt haben nicht vergessen möchten 1 Drücken Sie zum Einschalten der Funktion DrinksChill...

Страница 45: ...ür geschlossen wird der Alarm ausgeschaltet Während des Alarms kann der Summer durch Drücken der Alarmtaste ausgeschaltet werden 4 ERSTE INBETRIEBNAHME 4 1 Reinigen des Innenraums Bevor Sie das Gerät in Betrieb nehmen beseitigen Sie den typischen Neugeruch am besten durch Auswaschen der Innenteile mit lauwarmem Wasser und einer neutralen Seife Sorgfältig nachtrocknen ACHTUNG Verwenden Sie keine Re...

Страница 46: ...ine Gegenstände aus Metall 1 Füllen Sie die Schalen mit Wasser 2 Stellen Sie die Eisschalen in das Gefrierfach 5 5 Kälteakkus Das Gefriergerät enthält mindestens einen Kälteakku der die Lagerzeit im Falle eines Stromausfalls oder einer Störung verlängert 6 TIPPS UND HINWEISE 6 1 Normale Betriebsgeräusche Folgende Geräusche sind während des normalen Gerätebetriebs normal Ein leichtes Gurgeln und Bl...

Страница 47: ...lnen Packung zu notieren um einen genauen Überblick über die Lagerzeit zu haben 6 4 Hinweise zur Lagerung gefrorener Lebensmittel So erzielen Sie die besten Ergebnisse mit Ihrem Gerät Vergewissern Sie sich dass die gefrorenen Lebensmittel vom Händler angemessen gelagert wurden Achten Sie unbedingt darauf die eingekauften gefrorenen Lebensmittel in der kürzest möglichen Zeit zum Gefriergerät zu bri...

Страница 48: ...trom 7 3 Abtauen des Gefriergeräts Das Gefrierfach ist ein NoFrost Fach Das bedeutet dass sich während des Betriebs weder an den Innenwänden noch an Lebensmitteln Reif bilden kann Die Reifbildung wird durch die kontinuierliche von einem automatisch geregelten Ventilator gesteuerte Luftzirkulation im Inneren des Gefrierraums verhindert 7 4 Stillstandszeiten Bei längerem Stillstand des Geräts müssen...

Страница 49: ...ch Wenden Sie sich an einen qualifizierten Elektriker oder die nächste autorisierte Kun dendienststelle In der Temperaturanzeige ist ein rechteckiges Sym bol anstatt der Zahlen zu sehen Problem mit dem Tem peraturfühler Bitte wenden Sie sich an die nächste autorisierte Kunden dienststelle das Kühlsystem hält zwar die eingelagerten Lebensmittel weiterhin kühl doch eine Temperaturein stellung ist ni...

Страница 50: ... Fast Freeze oder Shopping Das Display zeigt DEMO an Das Gerät befindet sich im Demo Modus Halten Sie Mode etwa 10 Sekunden gedrückt bis ein langer Signalton ertönt und das Display für kurze Zeit ausgeschaltet wird Die Temperatur im Gerät ist zu hoch niedrig Der Temperaturregler ist nicht richtig eingestellt Stellen sie eine höhere niedrigere Temperatur ein Die Temperatur der zu kühlenden Lebensmi...

Страница 51: ... Kontrollieren Sie vor der ersten Benutzung des Geräts ob die Netzspannung und frequenz Ihres Hausanschlusses mit den auf dem Typenschild angegebenen Anschlusswerten übereinstimmen Das Gerät muss geerdet sein Zu diesem Zweck ist der Netzstecker mit einem Schutzkontakt ausgestattet Falls die Steckdose Ihres Hausanschlusses nicht geerdet sein sollte lassen Sie das Gerät gemäß den geltenden Vorschrif...

Страница 52: ... öffnet und schließt Bei niedrigen Umgebungstemperaturen z B im Winter kann es vorkommen dass die Türdichtung nicht richtig am Gerät anliegt Warten Sie in diesem Fall ab bis sich die Dichtung allmählich anpasst Wenden Sie sich bitte an den nächsten autorisierten Kundendienst falls Sie die oben beschriebenen Tätigkeiten nicht selber durchführen möchten Ein autorisierter Kundendiensttechniker wird d...

Страница 53: ...ng 2 so weit wie möglich gegen die Seitenwand des Küchenmöbels 7 Richten Sie das Gerät in der Einbaunische aus Vergewissern Sie sich dass der Abstand zwischen dem Gerät und der Schrankvorderkante 44 mm beträgt Mit der unteren Scharnierabdeckung im Beipack können Sie sicherstellen dass der Abstand zwischen dem Gerät und dem Küchenmöbel richtig ist Achten Sie darauf dass der Abstand zwischen dem Ger...

Страница 54: ... C D in die Befestigungs und Scharnierlöcher ein E E B D C 12 Bauen Sie das Belüftungsgitter B ein 13 Stecken Sie die Scharnierabdeckungen E auf das Scharnier auf 14 Schließen Sie das Gerät seitlich wie folgt an das Küchenmöbel an 15 Trennen Sie die Teile Ha Hb Hc und Hd ab Hb Ha Hc Hd 16 Montieren Sie Teil Ha an der Innenseite der Küchenmöbeltür ca 50 mm ca 50 mm 21 mm 90 90 21 mm 17 Drücken Sie ...

Страница 55: ...außenkante die Stelle an der der Nagel K eingesetzt werden muss Ha K 8 mm 22 Setzen Sie das Führungsstück erneut auf die Führungsschiene und schrauben Sie es mit den mitgelieferten Schrauben fest 23 Richten Sie die Tür des Einbaumöbels und die Gerätetür mit Teil Hb aus Hb 24 Drücken Sie Teil Hd auf Teil Hb Hb Hd Führen Sie eine Endkontrolle durch um sicherzustellen dass Alle Schrauben fest angezog...

Страница 56: ...ÄUSCHE Während das Gerät in Betrieb ist entstehen bestimmte Geräusche Kompressor und Kühlkreislauf BRRR HISSS CLICK BLUBB CRACK SSSRRR OK CLICK CLICK SSSRRR SSSRRR BRRR BRRR HISSS HISSS www electrolux com 56 ...

Страница 57: ...enschild auf der Außen oder Innenseite des Geräts sowie auf der Energieplakette 12 UMWELTTIPPS Recyceln Sie Materialien mit dem Symbol Entsorgen Sie die Verpackung in den entsprechenden Recyclingbehältern Recyceln Sie zum Umwelt und Gesundheitsschutz elektrische und elektronische Geräte Entsorgen Sie Geräte mit diesem Symbol nicht mit dem Hausmüll Bringen Sie das Gerät zu Ihrer örtlichen Sammelste...

Страница 58: ...www electrolux com 58 ...

Страница 59: ...DEUTSCH 59 ...

Страница 60: ...www electrolux com shop 222372024 A 212015 ...

Отзывы: