background image

33

Electrolux 818 21 34-04/2

Door Reversal

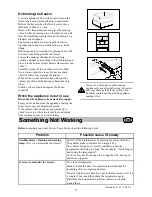
1. Close the cabinet and remove the plug from the
electrical socket.

2. Remove the ventilation grille. There is a part on
the grille that can be removed. Remove and
reposition it on the other side.

3. Put the cabinet on a wooden board when it is laid
down. Later, when raising the cabinet, it will be
easier to grip under the cabinet thanks to the board.

4. On the upper part of the cabinet. Put the hinge pin
on the other side.

5. On the lower part of the cabinet.
a. Unscrew the hinge.
b. Remove the door-closing fittings from the hinge
and put the hinge pin on the other side. Then attach
the supplied door-closing fitting.

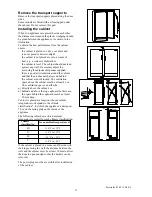
6. a. Remove the door-closing fitting from the
bottom of the door.
b. Then secure the supplied door-closing fitting on
the other side.
c. Secure the lower hinge.

7. Raise the cabinet and replace the ventilation grille.

8. To transfer the handle.
Unscrew the screws. Fit the handle onto the opposite
side by turning it one half circle. Press the supplied
plastic plugs into the holes to which the handle was
previously fitted.

9. Put the cabinet in position. Check that the
appliance is level. See the section "Positioning the
cabinet".

Electrical connection

Connect the cabinet to a grounded electrical outlet.
Voltage: 230 V.
Fuse: 10 A.
Refer to the rating plate on the left inside the
cabinet.

1

2

3

4

5 a

5 b

a

b

c

6

8

Содержание EUC2603

Страница 1: ... e l a d o r c o n g e l a d o r f r e e z e r p a k a s t i n f r y s s k å p INSTRUCCIONES DE USO INSTRUÇÕES DE USO INSTRUCTION BOOKLET KÄYTTÖOHJE BRUKSANVISNING 818 21 34 04 2 GB EUC2603 EUC3003 PO ES SE FI ...

Страница 2: ...ls or the inside of the cabinet Scrapping old cabinets The symbol on the product or on its packaging indicates that this product may not be treated as household waste Instead it shall be handed over to the applicable collection point for the recycling of electrical and electronic equipment By ensuring this product is disposed of correctly you will help prevent potential negativ consequences for th...

Страница 3: ...anel A B C D E F G A Thermometer Displays the warmest temperature inside the freezer B Red warning lamp Flashes when one of the alarms in the cabinet has been triggered C Alarm shut off button Used to turn the audible alarm off D Yellow indicator lamp Lights when Fast Freeze is operating E FAST FREEZE button Used to switch the Fast Freeze feature on and off F Green indicator lamp Lights when the f...

Страница 4: ... temperature inside the fridge reaches 1 C or below Temperature inside the freezer To ensure that foodstuff will keep for a long time be sure that the temperature inside the freezer is 18 C or below Please note however that the energy consumption increases as the temperature decreases The built in temperature display shows the warmest temperature inside the freezer If the temperature is measured u...

Страница 5: ...o much food at the same time The freezing capacity of the unit is indicated in the specifications section Suitable storage periods Food purchased in frozen condition Follow the advice on the maximum storage period indicated on the packaging Fresh food frozen at home Fatty and salty food should not be kept frozen for more than three months Cooked food and low fat food may be kept up to about six mo...

Страница 6: ...the door from closing properly Thaw frozen food in the fridge This will ensure safer defrosting of foods and reduce the work of the refrigeration unit It is advisable to periodically clean the refrigeration system at the back of the appliance with a duster or vacuum cleaner Food which is to be frozen when cool should be placed in the fridge before being transfered to the freezer Avoid unnecessary ...

Страница 7: ...gents abrasive powders high perfumed cleaning products wax polishes or cleaning products containing bleach or alcohol when cleaning the product Disconnect the appliance from electricity supply Clean the inside and accessories with warm water and bicarbonate of soda 5ml to 0 5 litre water Rinse and dry thoroughly Regularly check the door seals and wipe clean to ensure they are clean and free from d...

Страница 8: ...from electricity supply Empty all foods and clean the appliance leaving the doors ajar to prevent unpleasant smells If the cabinet will be kept on ask somebody to check it once in a while to prevent the food inside from spoiling in case of a power failure Never use a hair drier or other heating appliances to speed up defrosting Excessive heat may damage the plastic interior and humidity could ente...

Страница 9: ...ould be moved to another cabinet that works If the frozen products are still hard following the power cut they may be immediately refrozen If the food products have thawed but are still fresh they may be used however they should be prepared before re freezing or eating them Sound level in cabinet is too high The refrigerating system will always produce some sounds A pulsing sound is heard when coo...

Страница 10: ...epth 623 mm 623 mm Energy consumption 281 kWh y 306 kWh y Energy class A A Rated power 100W 100W Freezing capacity 24 kg 24 hours 24 kg 24 hours Installation GB Mains Cable Do not remove the power cord by pulling on its lead particulary when the product is being pulled out of its niche Damage to the cord may cause a short circuit fire and or electric shock In the event of damage to the appliance s...

Страница 11: ...the air channels below and behind the cabinet are not blocked The ventilation space above the cabinet must be at least 4 cm The ventilation space can either be a directly above the cabinet or b behind and above the top cupboard In this case the space behind the cupboard must be at least 50 mm deep Cabinet is placed at a location whose ambient temperature corresponds to the climate classification f...

Страница 12: ...he hinge pin on the other side Then attach the supplied door closing fitting 6 a Remove the door closing fitting from the bottom of the door b Then secure the supplied door closing fitting on the other side c Secure the lower hinge 7 Raise the cabinet and replace the ventilation grille 8 To transfer the handle Unscrew the screws Fit the handle onto the opposite side by turning it one half circle P...

Страница 13: ...çåÉáí I é äóåáãìêÉáí I ãççííçêáë Üçà ëÉâ êìçÜçåäÉáââìêÉáí F åK NQ ãáäà êÇáå Ççää êáå êîçëí K qÜÉ bäÉÅíêçäìñ dêçìé áë íÜÉ ïçêäÇDë ä êÖÉëí éêçÇìÅÉê çÑ éçïÉêÉÇ ééäá åÅÉë Ñçê âáíÅÜÉåI ÅäÉ åáåÖ åÇ çìíÇççê ìëÉK jçêÉ íÜ å RR ãáääáçå bäÉÅíêçäìñ dêçìé éêçÇìÅíë EëìÅÜ ë êÉÑêáÖÉê íçêëI ÅççâÉêëI ï ëÜáåÖ ã ÅÜáåÉëI î Åììã ÅäÉ åÉêëI ÅÜ áå ë ïë åÇ ä ïå ãçïÉêëF êÉ ëçäÇ É ÅÜ óÉ ê íç î äìÉ çÑ ééêçñK rpa NQ Äáääáçå áå...

Отзывы: