background image

1.2 

Children and vulnerable people safety

This appliance can be used by children aged from 8

years and above and persons with reduced physical,

sensory or mental capabilities or lack of experience and

knowledge if they have been given supervision or

instruction concerning use of the appliance in a safe

way and understand the hazards involved.

Do not let children play with the appliance.

Keep all detergents away from children.

Keep children and pets away from the appliance door

when it is open.

Cleaning and user maintenance shall not be made by

children without supervision.

2. 

SAFETY INSTRUCTIONS

2.1 

Installation

• Remove all the packaging.

• Do not install or use a damaged

appliance.

• Do not install or use the appliance

where the temperature is less than 0

°C.

• Obey the installation instruction

supplied with the appliance.

• Make sure that the appliance is

installed below and adjacent to safe

structures.

2.2 

Electrical connection

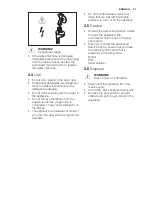
WARNING!

Risk of fire and electrical

shock.

• The appliance must be earthed.

• Make sure that the electrical

information on the rating plate agrees

with the power supply. If not, contact

an electrician.

• Always use a correctly installed

shockproof socket.

• Do not use multi-plug adapters and

extension cables.

• Make sure not to cause damage to the

mains plug and to the mains cable.

Should the mains cable need to be

replaced, this must be carried out by

our Authorised Service Centre.

• Connect the mains plug to the mains

socket only at the end of the

installation. Make sure that there is

access to the mains plug after the

installation.

• Do not pull the mains cable to

disconnect the appliance. Always pull

the mains plug.

• This appliance complies with the E.E.C.

Directives.

• Only for UK and Ireland. The appliance

has a 13 amp mains plug. If it is

necessary to change the fuse in the

mains plug, use fuse: 13 amp ASTA

(BS 1362).

2.3 

Water connection

• Make sure not to cause damage to the

water hoses.

• Before you connect the appliance to

new pipes or pipes not used for a long

time, let the water flow until it is clean.

• The first time you use the appliance,

make sure that there is no leakage.

• The water inlet hose has a safety valve

and a sheath with an inner mains

cable.

www.electrolux.com

20

Содержание ESI5201LOX

Страница 1: ...ESI5201LOX NL AFWASAUTOMAAT GEBRUIKSAANWIJZING 2 EN DISHWASHER USER MANUAL 18 FR LAVE VAISSELLE NOTICE D UTILISATION 33 ...

Страница 2: ...t kunt u er op vertrouwen dat u keer op keer fantastische resultaten zult krijgen Welkom bij Electrolux Ga naar onze website voor Advies over gebruik brochures het oplossen van problemen en onderhoudsinformatie www electrolux com Registreer uw product voor een betere service www registerelectrolux com Koop accessoires verbruiksartikelen en originele reserveonderdelen voor uw apparaat www electrolu...

Страница 3: ... 05 8 0 8 bar Mpa Houd rekening met het maximale aantal 13 plaatsen Als de voedingskabel beschadigd is moet de fabrikant een erkende serviceverlener of een gekwalificeerd persoon deze vervangen teneinde gevaarlijke situaties te voorkomen Doe messen en bestek met scherpe punten in het bestekmandje met de punten omlaag in horizontale positie Laat de deur van het apparaat niet open staan zonder toezi...

Страница 4: ...WAARSCHUWING Gevaar voor brand en elektrische schokken Dit apparaat moet worden aangesloten op een geaard stopcontact Controleer of de elektrische informatie op het typeplaatje overeenkomt met de stroomvoorziening Zo niet neem dan contact op met een elektromonteur Gebruik altijd een correct ge stalleerd schokbestendig stopcontact Gebruik geen meerwegstekkers en verlengsnoeren Zorg dat u de hoofdst...

Страница 5: ...aatwasmiddel op de borden zitten Het apparaat kan hete stoom laten ontsnappen als u de deur opent terwijl er een programma wordt uitgevoerd Plaats geen ontvlambare producten of items die vochtig zijn door ontvlambare producten in bij of op het apparaat 2 5 Servicedienst Contact opnemen met de klantenservice voor reparatie van het apparaat Wij raden uitsluitend het gebruik van originele onderdelen ...

Страница 6: ... 6 11 1 2 1 Bovenste sproeiarm 2 Onderste sproeiarm 3 Filters 4 Typeplaatje 5 Zoutreservoir 6 Luchtopening 7 Glansmiddeldoseerbakje 8 Afwasmiddeldoseerbakje 9 Bestekkorf 10 Onderkorf 11 Bovenkorf 4 BEDIENINGSPANEEL 1 2 4 5 6 3 www electrolux com 6 ...

Страница 7: ...ielampje is altijd uit als het pro gramma in werking is 5 PROGRAMMA S Programma Mate van ver vuiling Type belading Programmafa sen Verbruiksgegevens 1 Pro gramma duur min Energie kWh Water l 2 Normaal bev uild Serviesgoed en bestek Voorspoelen Wassen 50 C Spoelgangen Drogen 195 1 039 11 3 Sterk bevuild Serviesgoed bestek en pan nen Voorspoelen Wassen 70 C Spoelgangen Drogen 140 160 1 3 1 5 13 15 N...

Страница 8: ...over testprestaties een e mail naar info test dishwasher production com Schrijf het productnummer PNC op dat u op het typeplaatje vindt 6 INSTELLINGEN 6 1 Programmakeuzemodus en gebruikersmodus Als het apparaat in de programmakeuzemodus staat kan een programma worden ingesteld en de gebruikersmodus worden ingevoerd In de gebruikersmodus kunnen de volgende instellingen worden gewijzigd Het niveau v...

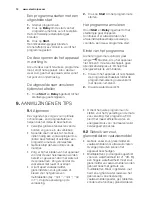
Страница 9: ...zer op de knop op één lijn staat met het lampje aan uit 2 Houd om naar de gebruikersmodus te gaan Delay ingedrukt Draai tegelijkertijd de programmaschakelaar linksom totdat de programma aanwijzer overeenkomt met het eerste programma Laat Delay los als de indicatielampjes Start en aan uit gaan knipperen 3 Druk op Delay Het indicatielampje knippert De indicatielampjes Start en aan uit blijven knippe...

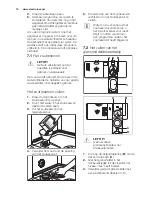
Страница 10: ...Het zoutreservoir vullen 1 Draai de dop linksom om het zoutreservoir te openen 2 Doe 1 liter water in het zoutreservoir alleen de eerste keer 3 Vul het zoutreservoir met regenereerzout 4 Verwijder het zout rond de opening van het zoutreservoir 5 Draai de dop van het zoutreservoir rechtsom om het zoutreservoir te sluiten Water en zout kunnen uit het zoutreservoir stromen als u het bijvult Gevaar vo...

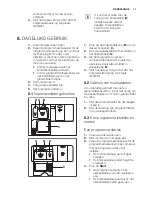
Страница 11: ...l te openen C 2 Doe de vaatwastablet of het poeder in het doseerbakje A 3 Als het programma over een voorspoelfase beschikt plaats dan een kleine dosis afwasmiddel in doseerbakje D 4 Sluit het deksel Zorg ervoor dat het ontgrendelknopje op zijn plaats dichtklikt 8 2 Gebruik van multitabletten Als u tabletten gebruikt die zout en glansmiddel bevatten is het niet nodig om de doseerbakjes voor zout e...

Страница 12: ... volgende tips zorgen voor optimale schoonmaak en droogresultaten en helpen ook het milieu te beschermen Verwijder grotere etensresten van de borden en gooi ze in de vuilnisbak Spoel de vaat niet eerst af Gebruik indien nodig een voorwasprogramma indien beschikbaar of selecteer een programma met een voorwasfase Gebruik altijd de hele ruimte van de mandjes Zorg er bij het inladen van het apparaat v...

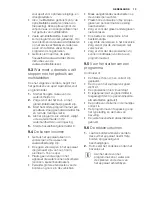
Страница 13: ...in het apparaat die gemaakt zijn van hout hoorn aluminium tin en koper Plaats geen voorwerpen in het apparaat die water kunnen absorberen sponzen keukenhanddoeken Verwijder grotere etensresten van de borden en gooi ze in de vuilnisbak Maak aangebrande voedselresten op de voorwerpen zachter Plaats holle voorwerpen bijv kopjes glazen en pannen met de opening naar beneden Zorg er voor dat glazen ande...

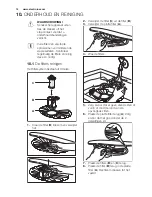
Страница 14: ...gen Het filtersystem bestaat uit 3 delen C B A 1 Draai de filter B linksom en verwijder het 2 Verwijder de filter C uit de filter B 3 Verwijder de platte filter A 4 Was de filters 5 Zorg ervoor dat er geen etensresten of vuil in of rond de rand van de opvangbak zitten 6 Plaats de platte filter terug A Zorg ervoor dat het goed onder de 2 geleidingen zit 7 Plaats de filters B en C terug 8 Plaats de ...

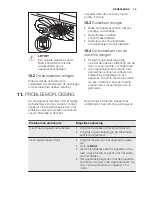
Страница 15: ...n het apparaat Om dit te voorkomen raden we aan minstens 2 keer per maand progamma s met een lange duur te gebruiken 11 PROBLEEMOPLOSSING Als het apparaat niet start of stopt tijdens de bediening kijk dan voordat u contact opneemt met de klantenservice of u het probleem zelf kunt oplossen met behulp van de informatie in de tabel Bij sommige problemen knippert het eindlampje om een storing aan te g...

Страница 16: ...t Draai de waterkraan dicht en neem contact op met de klantenservice Druk als u het apparaat gecontroleerd heeft op Start Als het probleem opnieuw optreedt neemt u contact op met onze klantenservice Voor alarmcodes die niet in de tabel vermeld zijn neemt u contact op met de klantenservice 11 1 De was en droogresultaten zijn niet naar tevredenheid Probleem Mogelijke oplossing Witte strepen of een b...

Страница 17: ...rnatieve milieuvriendelijkere energiebron geproduceerd wordt bijv zonnepanelen en windenergie gebruik dan een heetwatervoorziening om het en ergieverbruik te verminderen 13 MILIEUBESCHERMING Recycle de materialen met het symbool Gooi de verpakking in een geschikte verzamelcontainer om het te recyclen Help om het milieu en de volksgezondheid te beschermen en recycle het afval van elektrische en ele...

Страница 18: ...safe in the knowledge that you ll get great results every time Welcome to Electrolux Visit our website for Get usage advice brochures trouble shooter service information www electrolux com Register your product for better service www registerelectrolux com Buy Accessories Consumables and Original spare parts for your appliance www electrolux com shop CUSTOMER CARE AND SERVICE Always use original s...

Страница 19: ...re minimum and maximum must be between 0 5 0 05 8 0 8 bar Mpa Obey the maximum number of 13 place settings If the supply cord is damaged it must be replaced by the manufacturer its Authorised Service Centre or similarly qualified persons in order to avoid a hazard Put knives and cutlery with sharp points in the cutlery basket with the points down or in a horizontal position Do not keep the applian...

Страница 20: ...thed Make sure that the electrical information on the rating plate agrees with the power supply If not contact an electrician Always use a correctly installed shockproof socket Do not use multi plug adapters and extension cables Make sure not to cause damage to the mains plug and to the mains cable Should the mains cable need to be replaced this must be carried out by our Authorised Service Centre...

Страница 21: ...The appliance can release hot steam if you open the door while a programme operates Do not put flammable products or items that are wet with flammable products in near or on the appliance 2 5 Service Contact the Authorised Service Centre to repair the appliance We recommend only the use of original spare parts When you contact the Authorised Service Centre ensure that you have the following inform...

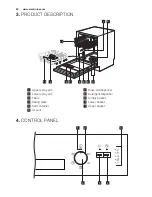
Страница 22: ... 11 1 2 1 Upper spray arm 2 Lower spray arm 3 Filters 4 Rating plate 5 Salt container 6 Air vent 7 Rinse aid dispenser 8 Detergent dispenser 9 Cutlery basket 10 Lower basket 11 Upper basket 4 CONTROL PANEL 1 2 4 5 6 3 www electrolux com 22 ...

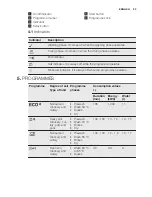
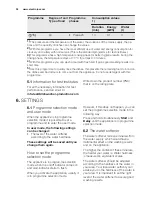
Страница 23: ...s Rinse aid indicator It is always off while the programme operates 5 PROGRAMMES Programme Degree of soil Type of load Programme phases Consumption values 1 Duration min Energy kWh Water l 2 Normal soil Crockery and cutlery Prewash Wash 50 C Rinses Dry 195 1 039 11 3 Heavy soil Crockery cut lery pots and pans Prewash Wash 70 C Rinses Dry 140 160 1 3 1 5 13 15 Normal soil Crockery and cutlery Prewa...

Страница 24: ...ETTINGS 6 1 Programme selection mode and user mode When the appliance is in programme selection mode it is possible to set a programme and to enter the user mode In user mode the following settings can be changed The level of the water softener according to the water hardness These settings will be saved until you change them again How to set the programme selection mode The appliance is in progra...

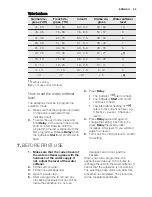
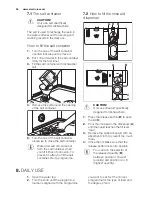
Страница 25: ...or starts to flash The indicators Start and on off continues to flash The intermittent flashing of refers to the current set level e g 5 flashes pause 5 flashes level 5 4 Press Delay again and again to change the setting Each time you press Delay the level number increases After level 10 you will start again from level 1 5 Turn knob to on off position to confirm the setting 7 BEFORE FIRST USE 1 Ma...

Страница 26: ...rrosion To prevent it after you fill the salt container start a programme 7 2 How to fill the rinse aid dispenser A B D C MAX 1 2 3 4 A B D C CAUTION Only use rinse aid specifically designed for dishwashers 1 Press the release button D to open the lid C 2 Pour the rinse aid in the dispenser A until the liquid reaches the fill level max 3 Remove the spilled rinse aid with an absorbent cloth to prev...

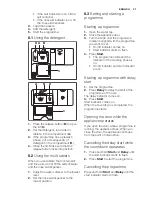
Страница 27: ...er tap 2 Close the appliance door 3 Turn the knob until the programme marker is aligned with the programme you want to set On off indicator comes on Start indicator starts to flash 4 Press Start The programme starts and the indicator of the washing phase is on On off indicator and start indicator are on Starting a programme with delay start 1 Set the programme 2 Press Delay to delay the start of t...

Страница 28: ...soil 9 2 Using salt rinse aid and detergent Only use salt rinse aid and detergent for dishwasher Other products can cause damage to the appliance Multi tablets are usually suitable in areas with a water hardness up to 21 dH In areas exceeding this limit rinse aid and salt must be used in addition to the multi tablets However in areas with hard and very hard water we recommend to use solo detergent...

Страница 29: ...ay arms are not clogged There is dishwasher salt and rinse aid unless you use multi tablets The position of the items in the baskets is correct The programme is applicable for the type of load and for the degree of soil The correct quantity of detergent is used 9 6 Unloading the baskets 1 Let the tableware cool down before you remove it from the appliance Hot items can be easily damaged 2 First re...

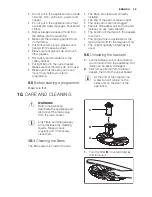
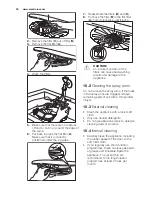
Страница 30: ...he appliance 10 2 Cleaning the spray arms Do not remove the spray arms If the holes in the spray arms are clogged remove remaining parts of soil with a thin pointed object 10 3 External cleaning Clean the appliance with a moist soft cloth Only use neutral detergents Do not use abrasive products abrasive cleaning pads or solvents 10 4 Internal cleaning Carefully clean the appliance including the ru...

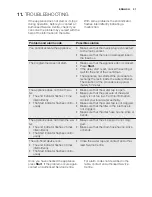
Страница 31: ...ot fill with wa ter The end indicator flashes 1 time intermittently The Start indicator flashes contin uously Make sure that the water tap is open Make sure that the pressure of the water supply is not too low For this information contact your local water authority Make sure that the water tap is not clogged Make sure that the filter in the inlet hose is not clogged Make sure that the inlet hose h...

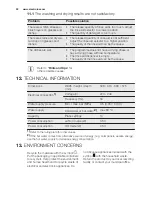
Страница 32: ...2 TECHNICAL INFORMATION Dimensions Width height depth mm 596 818 898 575 Electrical connection 1 Voltage V 220 240 Frequency Hz 50 Water supply pressure Min max bar MPa 0 5 0 05 8 0 8 Water supply Cold water or hot water 2 max 60 C Capacity Place settings 13 Power consumption Left on mode W 0 50 Power consumption Off mode W 0 50 1 Refer to the rating plate for other values 2 If the hot water comes...

Страница 33: ...ous apportera satisfaction Bienvenue chez Electrolux Visitez notre site Internet pour Obtenir des conseils d utilisation des brochures de l aide des informations www electrolux com Enregistrer votre produit pour obtenir un meilleur service www registerelectrolux com Acheter des accessoires consommables et pièces de rechange d origine pour votre appareil www electrolux com shop SERVICE APRÈS VENTE ...

Страница 34: ...nement minimale et maximale doit se situer entre 0 5 0 05 8 0 8 bar Mpa Respectez le nombre maximum de 13 couverts Si le câble d alimentation est endommagé il doit être remplacé par le fabricant son service après vente ou des personnes de qualification similaire afin d éviter un danger Placez les couteaux et les couverts avec des bouts pointus dans le panier à couverts avec les pointes tournées ve...

Страница 35: ... dans un endroit où la température ambiante est inférieure à 0 C Suivez scrupuleusement les instructions d installation fournies avec l appareil Vérifiez que l appareil est installé sous et à proximité de structures sûres 2 2 Connexion électrique AVERTISSEMENT Risque d incendie ou d électrocution L appareil doit être relié à la terre Vérifiez que les données électriques figurant sur la plaque sign...

Страница 36: ...ux Suivez les consignes de sécurité figurant sur l emballage du produit de lavage Ne buvez pas l eau de l appareil ne jouez pas avec N enlevez pas la vaisselle de l appareil avant la fin du programme Il peut rester du produit de lavage sur la vaisselle De la vapeur chaude peut s échapper de l appareil si vous ouvrez la porte pendant le déroulement d un programme Ne placez pas de produits inflammab...

Страница 37: ... 2 Bras d aspersion inférieur 3 Filtres 4 Plaque de calibrage 5 Réservoir de sel régénérant 6 Fente d aération 7 Distributeur de liquide de rinçage 8 Distributeur de produit de lavage 9 Panier à couverts 10 Panier du bas 11 Panier du haut 4 BANDEAU DE COMMANDES 1 2 4 5 6 3 FRANÇAIS 37 ...

Страница 38: ... voyant est toujours éteint pendant le déroulement du programme 5 PROGRAMMES Programme Degré de sal issure Type de vais selle Phases du pro gramme Valeurs de consommation 1 Durée min Consom mation électri que kWh Eau l 2 Normalement sale Vaisselle et couverts Prélavage Lavage 50 C Rinçages Séchage 195 1 039 11 3 Très sale Vaisselle cou verts plats et casseroles Prélavage Lavage 70 C Rinçages Sécha...

Страница 39: ... mauvaises odeurs N utilisez pas de produit de lavage avec ce programme 5 1 Informations pour les instituts de test Pour toute information relative aux performances de test envoyez un courrier électronique à l adresse info test dishwasher production com Notez le numéro du produit PNC indiqué sur la plaque signalétique 6 RÉGLAGES 6 1 Mode Sélection de programme et mode utilisateur Lorsque l apparei...

Страница 40: ...7 18 0 7 1 8 5 12 2 4 7 0 7 5 1 2 1 Réglages d usine 2 N utilisez pas de sel à ce niveau Réglage du niveau de l adoucisseur d eau L appareil doit être en mode Programmation 1 Assurez vous que l indicateur de programme du sélecteur est aligné sur le voyant Marche Arrêt 2 Pour entrer en mode utilisateur appuyez sur la touche Delay en la maintenant enfoncée Simultanément tournez le sélecteur vers la ...

Страница 41: ...lièrement 7 1 Réservoir de sel régénérant ATTENTION Utilisez uniquement du sel régénérant conçu pour les lave vaisselle Le sel permet de recharger la résine dans l adoucisseur d eau et de garantir de bons résultats de lavage en utilisation quotidienne Remplissage du réservoir de sel régénérant 1 Tournez le couvercle du réservoir de sel régénérant vers la gauche et retirez le 2 Versez 1 litre d eau...

Страница 42: ...souhaité Réglez le programme adapté au type de vaisselle et au degré de salissure Si le voyant du réservoir de sel régénérant est allumé remplissez le réservoir Si le voyant du liquide de rinçage est allumé remplissez le distributeur de liquide de rinçage 3 Chargez les paniers 4 Ajoutez le produit de lavage 5 Lancez le programme 8 1 Utilisation du produit de lavage 30 20 A B D C 20 30 B A D C 1 Ap...

Страница 43: ...qu un programme est en cours l appareil s arrête Lorsque vous refermez la porte l appareil reprend là où il a été interrompu Annulation du départ différé au cours du décompte 1 Appuyez sur les touches Start et Delay en les maintenant enfoncées jusqu à ce que le voyant Départ clignote 2 Appuyez sur la touche Start pour lancer le programme Annulation du programme Appuyez sur les touches Start et Del...

Страница 44: ...liquide de rinçage et de sel régénérant pour des résultats de lavage et de séchage optimaux Si vous utilisez des pastille tout en 1 vous pouvez sélectionner l option Multitab si disponible Cette option améliore les résultats de lavage et de séchage avec l utilisation de pastilles tout en 1 Les tablettes de détergent ne se dissolvent pas complètement durant les programmes courts Pour éviter que des...

Страница 45: ... si vous utilisez des pastilles tout en 1 La vaisselle est bien positionnée dans les paniers Le programme est adapté au type de vaisselle et au degré de salissure Vous utilisez la bonne quantité de produit de lavage 9 6 Déchargement des paniers 1 Attendez que la vaisselle refroidisse avant de la retirer du lave vaisselle La vaisselle encore chaude est sensible aux chocs 2 Déchargez d abord le pani...

Страница 46: ...es bras d aspersion Ne retirez pas les bras d aspersion Si des résidus ont bouché les orifices des bras d aspersion éliminez ceux ci à l aide d un objet fin et pointu 10 3 Nettoyage extérieur Nettoyez l appareil avec un chiffon doux humide Utilisez uniquement des produits de lavage neutres N utilisez pas de produits abrasifs de tampons à récurer ni de solvants 10 4 Nettoyage intérieur Nettoyez soi...

Страница 47: ...e façon intermittente Le voyant Start clignote de façon continue Assurez vous que le robinet d eau est ouvert Assurez vous que la pression de l eau n est pas trop faible Pour connaître cette informa tion contactez votre compagnie locale de distribution des eaux Assurez vous que le robinet d arrivée d eau n est pas obstrué Assurez vous que le filtre du tuyau d arrivée d eau n est pas obstrué Assure...

Страница 48: ... age ou inclut une phase de séchage à basse tem pérature Le distributeur de liquide de rinçage est vide Il se peut que la qualité du liquide de rinçage soit en cause Pour trouver d autres causes possibles reportez vous au chapitre Conseils 12 CARACTÉRISTIQUES TECHNIQUES Dimensions Largeur hauteur profon deur mm 596 818 898 575 Branchement électrique1 Tension V 220 240 Fréquence Hz 50 Pression de l...

Страница 49: ...teneurs prévus à cet effet Contribuez à la protection de l environnement et à votre sécurité recyclez vos produits électriques et électroniques Ne jetez pas les appareils portant le symbole avec les ordures ménagères Emmenez un tel produit dans votre centre local de recyclage ou contactez vos services municipaux FRANÇAIS 49 ...

Страница 50: ...www electrolux com 50 ...

Страница 51: ...FRANÇAIS 51 ...

Страница 52: ...www electrolux com shop 100002720 A 372014 ...

Отзывы: