


• The electrical cable for the safety valve is
in the double-walled water inlet hose. Do
not immerse the water inlet hose or the
safety valve in water.
• If water inlet hose or the safety valve is
damaged, remove the mains plug imme-
diately.
• A water inlet hose with safety valve must
only be replaced by the Service Force
Centre.
Warning!
Dangerous voltage
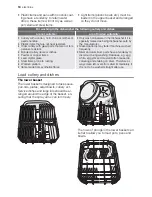
Water drain connection
The end of the drain hose can be connected
in the following ways:
1. To the sink outlet spigot, securing it to the
underside of the work surface. This will
prevent waste water from the sink run-
ning into the machine.
2. To a stand pipe provided with venthole,
minimum internal diameter 4 cm.
max 85 cm
min 40 cm
max 400 cm
The drain hose can face either to the right or
left of the dishwasher
Ensure the drain hose is not bent or squash-
ed as this could prevent or slow down the
discharge of water.
The sink plug must not be in place when the
machine is draining as this could cause the
water to syphon back into the machine.
If you use a drain hose extension, its internal
diameter must be no smaller than the diam-
eter of the hose provided.
Likewise the internal diameter of the cou-
plings used for connections to the waste out-
let must be no smaller than the diameter of
the hose provided.
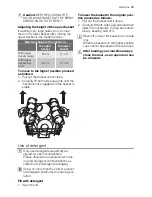
When connecting the drain hose to an under
sink trap spigot,
the entire plastic mem-
brane (A) must be removed.
Failure to re-
move all the membrane will result in food
particles building up over time eventually
blocking the dishwasher drain hose spigot
Our appliances are supplied with a se-
curity device to protect against the re-
turn of dirty water back into the machine.
If the spigot of your sink has a "no return
valve" incorporated this can prevent the
correct draining of your dishwasher. We
therefore advise you to remove it.
To avoid water leakage after installation
make sure that the water couplings are
tight.
Electrical connection
Warning!
Safety standards require
the appliance to be earthed.
Prior to using the appliance for the
first time, ensure that the rated volt-
age and type of supply on the rating
plate match that of the supply where
the appliance is to be installed. The
fuse rating is also to be found on the
rating plate.
Always plug the mains plug into a
correctly installed shockproof sock-
et.
Multi-way plugs, connectors and ex-
tension cables must not be used.
This could constitute a fire hazard
through overheating.
If necessary, have the domestic wir-
ing system socket replaced. In case
that the electrical cable has to be
24
electrolux
Содержание ESI 47020
Страница 1: ...user manual Dishwasher ESI 47020 ...
Страница 26: ...26 electrolux ...
Страница 27: ...electrolux 27 ...
Страница 28: ...117957710 00 112008 www electrolux com ...