background image

15

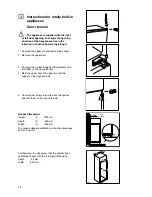
Electrical connections

Any electrical work required to install this appliance
should be carried out by a qualified electrician or
competent person.

WARNING: THIS APPLIANCE MUST BE
EARTHED.

The manufacturer declines any liability should
this safety measure not be observed.

If the plug that is fitted to your appliance is not
suitable for your socket outlet, it must be cut off and
the appropriate plug fitted.

Remove the fuse from the cut off plug.

The cut off plug should then be disposed of to
prevent the hazard of shocks in case it should be
plugged into a 13amp socket in another part of your
home.

Important

The wires in the mains lead are coloured in
accordance with the following code:

Green and Yellow        - Earth

Blue                              - Neutral

Brown                           - Live

If you fit your own plug, the colours of the wires in
the mains lead of your appliance may not correspond
with the markings identifying the terminals in your
plug, proceed as follows:

Connect the Green and Yellow (earth) wire to the
terminal in the plug which is marked with the letter

«E» or the earth symbol 

or coloured green and

yellow.

Connect the blue (neutral) wire to the terminal in the
plug which is marked with the letter «N» or coloured
black.

Connect the brown (live) wire to the terminal in the
plug which is marked with the letter «L» or coloured
red.

The plug moulded onto the lead incorporates a fuse.
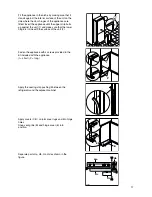
D207

GREEN & YELLOW

13 AMP. FUSE

BROWN

CORD CLAMP

BLUE

13 

AMP

For replacement, use a 13amp BSI362 fuse. Only
ASTA or BSI approved fuses should be used.

The plug must not be used if the fuse cover/carrier is
lost. The cover/carrier is indicated by the coloured
insert at the base of the plug.

A replacement cover/carrier must be obtained from
your local Electrolux Service Force Centre.

This appliance complies with the E.E.C. Directive
No. 87/308 of 2.6.87 relative to radio interference
suppression.

This appliance complies with the following

E.E.C. Directives:

73/23 EEC of 19.2.73

(Low Voltage Directive)

and subsequent modifications;

89/336 EEC of 3.5.89 

(Electromagnetic

Compatibility Directive) and subsequent
modifications.

Please ensure that when the appliance is
installed it is easily accessible for the engineer in
the event of a breakdown.

Содержание ERN 28600

Страница 1: ...f r i d g e f r e e z e r USER MANUAL 2223 010 41 ERN 28600 ...

Страница 2: ...ose to radiators or boilers Avoid prolonged exposure of the appliance to direct sunlight Do not use other electrical appliances such as ice cream makers inside of refrigerating appliances unless they are approved for this purpose by the manufacturer During Use This appliance is designed for domestic use only specifically for the storage of edible foodstuffs only Frozen food must NOT be re frozen o...

Страница 3: ... Installer Technical Specification 13 Installation 14 Positioning 14 Shelf holders 14 Electrical Connection 15 Door Reversal 16 Disposal of old Appliances The symbol on the product or on its packaging indicates that this product may not be treated as household waste Instead it shall be handed over to the applicable collection point for the recycling of electrical and electronic equipment By ensuri...

Страница 4: ... room temperature drops below 16 C the switch mounted next to the thermostat control should be switched on No damage can be caused by leaving the switch in this position for any period of time see page 10 Low room temperature operation However should the temperature rise above 16 C remember to turn the switch off again The freezer compartment The four star freezer compartment is suitable for stora...

Страница 5: ... these should have a cap and should be stored in the bottle rack on the door Thawing Frozen food prior to being used can be thawed in the fridge or at room temperature depending on the time available Small food items may even be cooked from frozen in this case cooking will take longer Any frozen food which is allowed to thaw accidentally should either be eaten as soon as possible or thrown away Al...

Страница 6: ...pace the front half shelves can lie over the rear ones Positioning the door shelves To permit storage of food packages of various sizes the door shelves can be adjusted in height To make these adjustments proceed as follows Gradually pull the shelf in the direction of the arrows until it comes off then reposition as required D338 ...

Страница 7: ...void unnecessary frosting in the cabinet by packing all foodstuffs into airtight packages before placing them in the freezer Always leave warm food to cool down to room temperature before placing in the fridge or freezer Food which is to be frozen when cool should be placed in the fridge before being transferred to the freezer Thaw frozen food in the fridge This will ensure safer defrosting of foo...

Страница 8: ...rs ajar to prevent unpleasant smells Changing the light bulb Should the interior light fail to work first switch off the appliance and disconnect from the electricity supply then replace the bulb as follows Unscrew the light cover and then pull it outward by pressing as shown in the figure Unscrew the bulb and replace it with one of the same power the maximum power is shown on the light diffuser a...

Страница 9: ...of the V shaped drip collector at the back of the refrigerator compartment behind the fruit and vegetable drawer Use the defrost cleaner provided which you will find already inserted into the discharge hole Remember to wash the defrost cleaner in hot soapy water at regular intervals Dry throughly before replacing Freezer When the frost has reached a thickness of up to 4mm it can be removed using t...

Страница 10: ...djust the thermostat control knob to give correct temperature control See Setting the temperature Check that the doors are closed Large quantities of food have recently been placed in the cabinet and or door is frequently opened Check that air ventilation is not obstructed Ensure the doors are not left open Check that nothing is preventing the doors from closing Is the door gasket intact and clean...

Страница 11: ...urchase receipt or guarantee documentation is required for in guarantee service calls For general enquiries concerning your Electrolux appliance or for further information on Electrolux products please contact our Customer Care Department by letter or telephone at the address below or visit our website at www electrolux co uk Customer Care Department Electrolux Major Appliances Addington Way Luton...

Страница 12: ... calls to put right an appliance which is improperly installed or calls to appliances outside the European Community EC or European Free Trade Area Appliances found to be in use within a commercial environment plus those which are subject to rental agreements Products of Electrolux manufacture which are not marketed by Electrolux European Guarantee If you should move to another country within Euro...

Страница 13: ...AVERAGE DAILY UNITS ELECTRICITY 0 879 kWh GROSS CAPACITY Fridge 173 l Freezer 110 l NET CAPACITY Fridge 170 l Freezer 92 l STAR RATING This figure is based on standard test results in accordance with European Standard EN 153 Actual consumption will depend on how the appliance is used and where it is located ...

Страница 14: ...orrectly For building in and door reversal instructions please refer to the relevant instructions on the following pages Warning IF YOU ARE DISCARDING AN OLD APPLIANCE THAT HAS A LOCK OR CATCH ON THE DOOR YOU MUST ENSURE THAT IT IS MADE UNUSABLE TO PREVENT YOUNG CHILDREN BEING TRAPPED INSIDE Depending upon the position which you choose for your appliance you may wish to reverse the way in which th...

Страница 15: ...ug which is marked with the letter E or the earth symbol or coloured green and yellow Connect the blue neutral wire to the terminal in the plug which is marked with the letter N or coloured black Connect the brown live wire to the terminal in the plug which is marked with the letter L or coloured red The plug moulded onto the lead incorporates a fuse D207 GREEN YELLOW 13 AMP FUSE BROWN CORD CLAMP ...

Страница 16: ...n of the door proceed as in the following instructions before installing it 1 Unscrew the upper pin and remove the spacer 2 Remove the upper door 3 Unscrew the middle hinge and the brackets and refit them on the opposite side 4 Refit the upper door the upper pin and the spacer on the opposite side 5 Unscrew the lower pin and remove the spacer and refit them on the opposite side Furthermore it is n...

Страница 17: ...re that the lower hinge is in line with the surface of the unit 2 D023 1 2 D724 Apply the sealing strip pushing it between the refrigerator and the adjacent cabinet I P Fasten the appliance with 4 screws provided in the kit included with the appliance I short P long Apply covers C D on joint cover lugs and into hinge holes Snap vent grille B and hinge cover E into position PR266 Ha Hb Hc Hd Separa...

Страница 18: ...furniture door at 90 Insert the small square Hb into guide Ha Put together the appliance door and the furniture door and mark the holes as indicated in the figure PR168 Hb Place the small square on the guide again and fix it with the screws supplied Should the lining up of the furniture door be necessary use the clearance of slots At the end of operations it is necessary to check if the door of th...

Страница 19: ...ompletion of the door reversing operation check that the door gasket adheres to the cabinet If the ambient temperature is cold i e in Winter the gasket may not fit perfectly to the cabinet In that case wait for the natural fitting of the gasket or accelerate this process by heating up the part involved with a normal hairdryer on a low setting PR167 1 Hd Hb Fix cover Hd on guide Hb until it clips i...

Страница 20: ... Electrolux plc 2007 w ww ww w e elle ec ct tr ro ollu ux x c co om m www electrolux co uk ...

Отзывы: