background image

INSTALLATION

Read the "Safety Information" carefully
for your safety and correct operation of
the appliance before installing the
appliance.

Positioning

Install this appliance at a location where the
ambient temperature corresponds to the
climate class indicated on the rating plate of
the appliance:

Climate

class

Ambient temperature

SN

+10°C to + 32°C

N

+16°C to + 32°C

ST

+16°C to + 38°C

T

+16°C to + 43°C

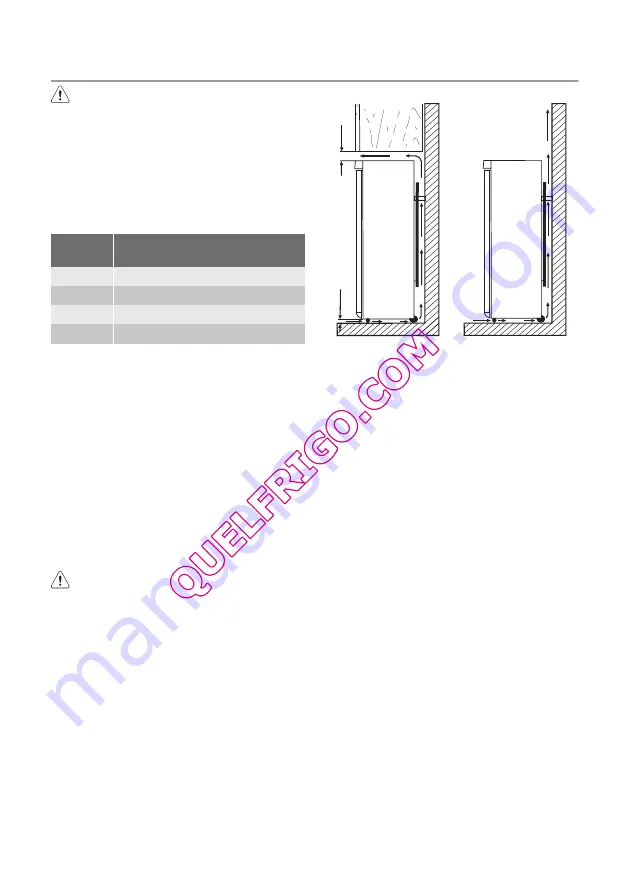
Location

The appliance should be installed well away
from sources of heat such as radiators,
boilers, direct sunlight etc. Ensure that air
can circulate freely around the back of the
cabinet. To ensure best performance, if the
appliance is positioned below an overhang-
ing wall unit, the minimum distance be-
tween the top of the cabinet and the wall
unit must be at least 100 mm . Ideally, how-
ever, the appliance should not be posi-
tioned below overhanging wall units. Accu-
rate levelling is ensured by one or more ad-
justable feet at the base of the cabinet.

Warning!

 It must be possible to

disconnect the appliance from the
mains power supply; the plug must
therefore be easily accessible after
installation.

A

B

100 mm min

20 mm

Electrical connection

Before plugging in, ensure that the voltage
and frequency shown on the rating plate
correspond to your domestic power supply.
The appliance must be earthed. The power
supply cable plug is provided with a contact
for this purpose. If the domestic power sup-
ply socket is not earthed, connect the appli-
ance to a separate earth in compliance with
current regulations, consulting a qualified
electrician.
The manufacturer declines all responsibility
if the above safety precautions are not ob-
served.
This appliance complies with the E.E.C. Di-
rectives.

Rear spacers

You can find the two spacers in the bag
with documentation.
Do these steps to install the spacers:
1. Release the screw.
2. Engage the spacer below the screw.
3. Turn the spacer to the right position.
4. Tighten again the screws.

20 

electrolux

Содержание ERC33230W

Страница 1: ...gebruiksaanwijzing user manual notice d utilisation benutzerinformation Koelkast Refrigerator Réfrigérateur Kühlschrank ERC33230W ...

Страница 2: ... begrepen kin deren met verminderde fysieke zintuiglij ke vermogens of een gebrek aan ervaring en kennis tenzij dit onder toezicht ge beurt van een voor hun veiligheid verant woordelijke persoon of tenzij zij van een dergelijke persoon instructie hebben ont vangen over het gebruik van het appa raat Houd kinderen uit de buurt om te voorko men dat ze met het apparaat gaan spe len Houd alle verpakkin...

Страница 3: ...it kan uw huid beschadigen of vrieswonden veroorzaken Stel het apparaat niet langdurig bloot aan direct zonlicht Gloeilampjes2 gebruikt voor dit apparaat is een speciaal lampje voor huishoudelijke apparaten De lampjes zijn niet geschikt voor de verlichting van ruimtes Dagelijks gebruik Zet geen hete potten op de kunststof on derdelen in het apparaat Bewaar geen brandbare gassen of vloei stoffen in...

Страница 4: ...n van het sym bool zijn recyclebaar BEDIENING Inschakelen Steek de stekker in het stopcontact Draai de thermostaatknop op een gemid delde stand Uitschakelen Draai de thermostaatknop op de stand O om het apparaat uit te schakelen Temperatuurregeling De temperatuur wordt automatisch gere geld Ga als volgt te werk om het apparaat in werking te stellen draai de thermostaatknop op een lagere stand om d...

Страница 5: ... gezet kunnen worden Sommige schappen moeten aan de achter kant worden opgetild om ze te kunnen ver wijderen Belangrijk Verwijder de glasplaat boven de groentelade niet om een goede luchtcirculatie te garanderen Flessenrek Plaats de flessen met de openingen naar voren gericht in het voorgeplaatste schap Belangrijk Plaats alleen dichte flessen Het plaatsen van de deurschappen Om het bewaren van voe...

Страница 6: ...ten ont dooien en zo elektriciteitsverbruik te be sparen Tips voor het koelen van vers voedsel Om de beste prestatie te verkrijgen Zet geen warm voedsel of verdampende vloeistoffen in de koelkast dek het voedsel af of verpak het in het bijzonder als het een sterke geur heeft plaats het voedsel zodanig dat de lucht er vrijelijk omheen kan circuleren Nuttige tips voor het koelen Nuttige tips Vlees a...

Страница 7: ...elangrijk Zorg ervoor dat u het koelsysteem niet beschadigt Veel normaal verkrijgbare keukenreinigers bevatten chemicaliën die de kunststoffen die in dit apparaat gebruikt zijn kunnen aan tasten beschadigen Daarom wordt het aanbevolen de buitenkant van dit apparaat alleen schoon te maken met warm water met een beetje afwasmiddel Steek na het schoonmaken van het appa raat de stekker weer in het sto...

Страница 8: ...ntdooit de rijp te gen de achterwand Dit is normaal Er loopt water in de koel kast De waterafvoer is verstopt Reinig de waterafvoer Producten verhinderen dat water in de wateropvangbak kan stro men Zorg ervoor dat de producten de achterwand niet raken Er loopt water over de vloer De dooiwaterafvoer loopt niet in de verdamperbak boven de compressor Maak de dooiwaterafvoer vast op de verdamperbak De...

Страница 9: ... plaatje aan de linker binnenkant in het ap paraat en op het energielabel MONTAGE Lees voor uw eigen veiligheid en correcte werking van het apparaat eerst de veiligheidsinformatie aandachtig door alvorens het apparaat te installeren Opstelling Installeer dit apparaat op een plaats waar de omgevingstemperatuur overeenkomt met de klimaatklasse die vermeld is op het typeplaatje van het apparaat Klima...

Страница 10: ...rvoor een gekwalificeerd elektricien De fabrikant neemt geen verantwoordelijk heid op zich als de bovenstaande veilig heidsmaatregelen niet worden nageleefd Dit apparaat voldoet aan de EU richtlijnen Afstandsstukken achterkant U vindt de twee afstandhouders in de zak van de gebruikershandleiding Volg deze stappen om de afstandhouders te installeren 1 Draai de schroef los 2 Plaats de afstandhouder ...

Страница 11: ...dcontrole uit en verzeker u er van dat alle schroeven zijn aangedraaid de randen van de deuren parallel lopen met de zijkant van het apparaat De magnetische afdichtstrip vast zit aan de kast De deur goed open en dicht gaat Wij adviseren u om vier uur te wachten voordat u het apparaat aansluit dan kan de olie terugvloeien in de compressor Als de omgevingstemperatuur laag is bijv in de winter kan he...

Страница 12: ...negatieve gevolgen voor mens en milieu die zich zouden kunnen voordoen in geval van verkeerde afvalverwerking Voor gedetailleerdere informatie over het recyclen van dit product kunt u contact opnemen met de gemeente de gemeentereiniging of de winkel waar u het product hebt gekocht 12 electrolux ...

Страница 13: ...ervised to ensure that they do not play with the appliance Keep all packaging well away from chil dren There is risk of suffocation If you are discarding the appliance pull the plug out of the socket cut the con nection cable as close to the appliance as you can and remove the door to pre vent playing children to suffer electric shock or to close themselves into it If this appliance featuring magn...

Страница 14: ... plode Appliance s manufacturers storage rec ommendations should be strictly adhered to Refer to relevant instructions Care and cleaning Before maintenance switch off the appli ance and disconnect the mains plug from the mains socket Do not clean the appliance with metal objects Regularly examine the drain in the refrig erator for defrosted water If necessary clean the drain If the drain is blocke...

Страница 15: ... turn the Temperature regulator toward higher settings to obtain the maximum coldness A medium setting is generally the most suitable However the exact setting should be chos en keeping in mind that the temperature in side the appliance depends on room temperature how often the door is opened the quantity of food stored the location of the appliance Important If the ambient temperature is high or ...

Страница 16: ...opening facing front in the pre positioned shelf Important Place only closed bottles Positioning the door shelves To permit storage of food packages of vari ous sizes the door shelves can be placed at different heights To make these adjustments proceed as fol lows gradually pull the shelf in the direction of the arrows until it comes free then reposition as required HELPFUL HINTS AND TIPS Normal O...

Страница 17: ...ecial drawer s provided Butter and cheese these should be placed in special airtight containers or wrapped in aluminium foil or polythene bags to exclude as much air as possible Milk bottles these should have a cap and should be stored in the bottle rack on the door Bananas potatoes onions and garlic if not packed must not be kept in the refrigera tor CARE AND CLEANING Caution Unplug the appliance...

Страница 18: ...ible cause Solution The appliance does not operate The lamp does not operate The appliance is switched off Switch on the appliance The mains plug is not connected to the mains socket correctly Connect the mains plug to the mains socket correctly The appliance has no power There is no voltage in the mains socket Connect a different electrical ap pliance to the mains socket Contact a qualified elect...

Страница 19: ... room temperature be fore storage Many products are stored at the same time Store less products at the same time There is no cold air circulation in the appliance Make sure that there is cold air circulation in the appliance Replacing the lamp 1 Disconnect the appliance 2 Push the movable part to unhook the lamp cover 1 3 Remove the lamp cover 2 4 Replace the lamp with one of the same power and sp...

Страница 20: ...te levelling is ensured by one or more ad justable feet at the base of the cabinet Warning It must be possible to disconnect the appliance from the mains power supply the plug must therefore be easily accessible after installation A B 100 mm min 20 mm Electrical connection Before plugging in ensure that the voltage and frequency shown on the rating plate correspond to your domestic power supply Th...

Страница 21: ...he power socket Tilt back the appliance carefully so that the compressor cannot touch the floor Remove the plinth B1 Unscrew and remove the lower hinges B2 Remove the door Unscrew the upper pin and screw it on the opposite side Refit the door Make sure that the edge of the door is parallel with the edge of the top Unscrew the pin B3 and the spacer B4 and screw it on the opposite side Remove the co...

Страница 22: ...ter Sales Service Force The After Sales Service specialist will carry out the re versibility of the doors at your cost ENVIRONMENTAL CONCERNS The symbol on the product or on its packaging indicates that this product may not be treated as household waste Instead it should be taken to the appropriate collection point for the recycling of electrical and electronic equipment By ensuring this product i...

Страница 23: ...et ou décrets pour une utilisation sur le territoire français Pour la sécurité des biens et des per sonnes ainsi que pour le respect de l environnement vous devez d abord li re attentivement les préconisations sui vantes avant toute utilisation de votre appareil Attention Pour éviter tout risque de détérioration de l appareil transportez le dans sa position d utilisation muni de ses cales de trans...

Страница 24: ...ous vous conseillons de rendre celle ci inutilisable avant de vous en débarrasser Ceci afin d éviter aux enfants de s enfermer dans l appareil et de mettre ainsi leur vie en danger Consignes générales de sécurité Avertissement Veillez à ce que les orifices de ventilation situés dans l enceinte de l appareil ou la structure intégrée ne soient pas obstrués Les appareils sont destinés uniquement à la...

Страница 25: ...de bouteilles ni de boîtes de boissons gazeuses dans le comparti ment congélateur car la pression se for mant à l intérieur du contenant pourrait le faire éclater et endommager ainsi l appa reil Ne consommez pas certains produits tels que les bâtonnets glacés dès leur sortie de l appareil car ils peuvent provoquer des brûlures Entretien et nettoyage Avant toute opération d entretien mettez l appar...

Страница 26: ...ppareil sur une prise murale Tournez le bouton du thermostat dans le sens des aiguilles d une montre sur une po sition moyenne Mise à l arrêt Pour mettre à l arrêt l appareil tournez le bouton du thermostat sur la position O Réglage de la température La température est réglée automatique ment Pour faire fonctionner l appareil procédez comme suit tournez le bouton du thermostat vers le bas pour obt...

Страница 27: ...de température sur une position inférieure L indication OK apparaissant en noir celui ci est difficile ment visible si l indicateur de température est mal éclairé La bonne lecture de celui ci est facilitée s il est correctement éclairé A chaque modification du dispositif de ré glage de température attendez la stabilisa tion de la température à l intérieur de l ap pareil avant de procéder si nécess...

Страница 28: ...égumes afin de garantir une circulation d air optimale Porte bouteilles Placez les bouteilles ouverture vers l avant sur la clayette prévue à cet effet Important Placez uniquement les bouteilles fermées Positionnement des balconnets de la porte En fonction de la taille des emballages des aliments conservés les balconnets de la porte peuvent être positionnés à différentes hauteurs Pour les ajuster ...

Страница 29: ... le réfrigérateur Couvrez ou enveloppez soigneusement les aliments surtout s ils sont aromati ques Placez les aliments pour que l air puisse circuler librement autour Conseils pour la réfrigération Conseils utiles Viande tous les types enveloppez la dans des sachets en plastique et placez la sur la tablette en verre au dessus du bac à légu mes La période de conservation est de 1 à 2 jours au maxim...

Страница 30: ...u dessus du com presseur d où elle s évapore Il est important de nettoyer régulièrement l orifice d écoulement de la gouttière d éva cuation de l eau de dégivrage située au mi lieu du compartiment réfrigérateur pour em pêcher l eau de déborder et de couler sur les aliments qui se trouvent à l intérieur Nettoyez l orifice d écoulement de l eau de dégivrage avec le bâtonnet spécial se trou vant déjà...

Страница 31: ...ol L eau de dégivrage ne s écoule pas dans le bac d évaporation de l eau de dégivrage situé au dessus du compresseur Fixez le tuyau de sortie de l eau au bac d évaporation de l eau de dégivrage La température à l inté rieur de l appareil est trop basse Le thermostat n est pas correc tement réglé Réglez une température plus éle vée La température à l inté rieur de l appareil est trop élevée Le ther...

Страница 32: ...ante correspond à la classe climatique indiquée sur la plaque signaléti que de l appareil Classe climati que Température ambiante SN 10 à 32 C N 16 à 32 C ST 16 à 38 C T 16 à 43 C Emplacement L appareil ne doit pas être installé près d une source de chaleur comme un radia teur une chaudière la lumière directe du soleil etc Assurez vous que l air circule li brement à l arrière de l appareil Pour ga...

Страница 33: ...doit être remplacé par un câble d alimentation certi fié Cette opération ne peut être effectuée que par une personne habilitée par votre vendeur ou par le fabricant L appareil ne doit pas être raccordée à l aide d un pro longateur d une prise multiple ou d un rac cordement multiple risque d incendie Véri fiez que la prise de terre est conforme aux règlements en vigueur Notre responsabilité ne saur...

Страница 34: ...é opposé Vissez les charnières inférieures B2 Retirez la plinthe B1 Retirez les caches h1 Retirez les goupil les du cache h2 Dévissez la poignée h3 et remontez les sur le côté opposé Réinsérez les goupilles du cache h2 sur le côté opposé Faites une dernière vérification pour vous assurer que Toutes les vis sont bien serrées Les bords des portes sont parallèles au côté de l appareil Le joint magnét...

Страница 35: ...recyclage du matériel électrique et électronique En procédant à la mise au rebut de l appareil dans les règles de l art nous préservons l environnement et notre sécurité s assurant ainsi que les déchets seront traités dans des conditions optimum Pour obtenir plus de détails sur le recyclage de ce produit veuillez prendre contact avec les services de votre commune ou le magasin où vous avez effectu...

Страница 36: ...ntnissen einen siche ren Gebrauch des Gerätes ausschließen nur unter Aufsicht oder nach ausreichen der Einweisung durch eine verantwor tungsbewusste Person benutzt werden die sicherstellt dass sie sich der Gefah ren des Gebrauchs bewusst sind Kinder müssen beaufsichtigt werden da mit sie nicht am Gerät herumspielen kön nen Halten Sie das Verpackungsmaterial un bedingt von Kindern fern Erstickungsg...

Страница 37: ...er Kältever brennungen führen kann Das Gerät nicht über eine längere Zeit di rekter Sonneneinstrahlung aussetzen Die Leuchtmittel12 für dieses Gerät sind Speziallampen die ausschließlich für Haushaltsgeräte geeignet sind Sie eig nen sich nicht zur Raumbeleuchtung Täglicher Gebrauch Stellen Sie keine heißen Töpfe auf die Kunststoffteile des Gerätes Lagern Sie keine feuergefährlichen Gase oder Flüss...

Страница 38: ... den Stecker in die Wandsteck dose Drehen Sie den Temperaturregler im Uhr zeigersinn auf eine mittlere Einstellung Ausschalten des Geräts Drehen Sie den Temperaturregler zum Aus schalten des Geräts in die Position O Temperaturregelung Die Temperatur wird automatisch geregelt Bedienen Sie das Gerät wie folgt drehen Sie den Temperaturregler auf eine niedrigere Einstellung um die minimal mögliche Küh...

Страница 39: ...s Kühlraums anzeigt Verstellbare Ablagen Die Wände des Kühlschranks sind mit einer Anzahl von Führungsschienen ausgestattet die verschiedene Möglichkeiten für das Ein setzen der Ablagen bieten Einige Ablagen müssen zum Herausneh men an der hinteren Kante angehoben wer den Wichtig Die Glasablage über der Gemüseschublade sollte jedoch nicht verstellt werden um eine korrekte Luftzirkulation zu gewähr...

Страница 40: ...ellt und das Gerät voll beladen ist kann es zu andau erndem Betrieb des Kompressors und damit zu Reif oder Eisbildung am Ver dampfer kommen Stellen Sie in diesem Fall den Temperaturregler auf eine höhere Einstellung ein die ein automatisches Ab tauen und damit auch einen niedrigeren Energieverbrauch ermöglicht Hinweise für die Kühlung frischer Lebensmittel So erzielen Sie beste Ergebnisse Legen Si...

Страница 41: ... stark parfümierte Reinigungsmittel oder Wachspolituren da diese die Oberfläche des Innenraums beschädigen und einen starken Eigengeruch hinterlassen können Reinigen Sie den Kondensator schwarzes Gitter und den Kompressor auf der Geräte rückseite mit einer Bürste Dadurch verbes sert sich die Leistung des Geräts und es verbraucht weniger Strom Wichtig Bitte achten Sie darauf das Kühlsystem nicht zu...

Страница 42: ...estellt Stellen Sie eine höhere Tempera tur ein Die Tür ist nicht richtig geschlos sen Siehe hierzu Schließen der Tür Die Tür wurde zu häufig geöff net Lassen Sie die Tür nicht länger als unbedingt erforderlich offen Die Temperatur der Lebensmittel ist zu hoch Lassen Sie die Lebensmittel auf Raumtemperatur abkühlen bevor Sie sie in das Gerät legen Die Raumtemperatur ist zu hoch Senken Sie die Raum...

Страница 43: ...ingen Sie die Lampenabdeckung an 6 Schalten Sie das Gerät wieder ein 7 Tür öffnen Prüfen Sie ob die Lampe brennt 1 2 Schließen der Tür 1 Reinigen Sie die Türdichtungen 2 Stellen Sie die Tür nach Bedarf ein Sie he hierzu Montage 3 Ersetzen Sie die defekten Türdichtun gen falls erforderlich Kontaktieren Sie den Kundendienst TECHNISCHE DATEN Abmessungen Höhe 1540 mm Breite 595 mm Tiefe 658 mm Spannun...

Страница 44: ...b die Netzspannung und frequenz Ihres Hausanschlusses mit den auf dem Typenschild angegebenen An schlusswerten übereinstimmen Das Gerät muss geerdet sein Zu diesem Zweck ist die Netzkabelsteckdose mit ei nem Schutzkontakt ausgestattet Falls die Steckdose Ihres Hausanschlusses nicht ge erdet sein sollte lassen Sie das Gerät bitte gemäß den geltenden Vorschriften erden und fragen Sie dafür einen qua...

Страница 45: ...an B1 B2 B3 B4 B5 Bringen Sie die Tür wieder an Stellen Sie sicher dass die Türkante ge nau parallel zur Kante der Deckplatte ist Schrauben Sie den Bolzen B3 und das Distanzstück B4 ab und montieren Sie sie auf der gegenüberliegenden Seite Nehmen Sie die Abdeckung B5 ab und montieren Sie sie auf der gegenüberlie genden Seite Schrauben Sie die unteren Scharniere B2 an Montieren Sie die Sockelblende...

Страница 46: ...n Tätigkeiten nicht selbst durchführen möchten Ein Kundendiensttechniker wird die Türen dann auf Ihre Kosten umbauen HINWEISE ZUM UMWELTSCHUTZ Das Symbol auf dem Produkt oder seiner Verpackung weist darauf hin dass dieses Produkt nicht als normaler Haushaltsabfall zu behandeln ist sondern an einem Sammelpunkt für das Recycling von elektrischen und elektronischen Geräten abgegeben werden muss Durch...

Страница 47: ...electrolux 47 ...

Страница 48: ...210621822 B 172011 www electrolux com shop ...

Отзывы: