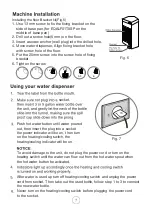
Electrolux EQACF01TXWP Скачать руководство пользователя страница 8

socket,

Fig. 6

Push hot water button until water poured 
out, then insert the plug into a socket 
the power indicator will be on, then turn 
on the heating/cooling switch, the 
heating/cooling indicator will be on.

To avoid damage to the unit, do not plug the power cord or turn on the 
heating switch until the water can flow out from the hot water spout when 
the hot water button be activated.

After water is used up turn off heating/cooling switch and unplug the power 
cord from socket. Then take out the used bottle, follow step 1 to 3 to connect 
the new water bottle.

Never turn on the heating/cooling switch before plugging the power cord 
to the socket.

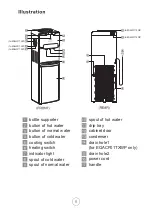
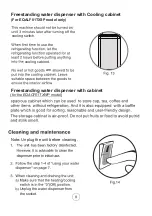
Installing the floor Bracket kit(Fig.6)

1. Use 13 mm screw to fix the fixing bracket on the 

side of base pan.(for EQALF01TXSP on the 
middle of base pan)

2. Drill out a screw hole(6 mm) on the floor. 
3. Insert a screw anchor (wall plug) into the drilled hole. 
4. Move water dispenser, Align fixing bracket hole 

with screw hole of the floor. 

5. Put the 25mm screw into the screw hole of fixing 

bracket. 

6. Tighten the screw.

1

1

1

2-3

4-5

6

Содержание EQACF01TXWP

Страница 1: ...EQALF01TXSP EQACF01TXWP USER MANUAL 1 EN ...

Страница 2: ...event that your water dispenser needs service The packaging material used is recyclable We recommend that you separate plastic paper and cardboard and give them to recycling agents To help preserve the environment the refrigerant used in this product is R134a Hydrofluorocarbon HFC which does not affect the ozone layer and has little impact on the greenhouse effect According to WEEE Waste of Electr...

Страница 3: ...d properties incident To avoid danger of suffocation keep plastic bag away from babies and children power Troubleshooting ...

Страница 4: ... with cooling cabinet model not higher than 75 This dispenser can provide hot cold and room temperature water The heating method of machine can only be used within 1500m elevation ...

Страница 5: ...socket The unit requires proper 5 Choose a place that is near a grounded electrical socket Keep the dispenser at least 20cm away from walls and other appliances and furnitures on all 4 sides ...

Страница 6: ...olishing chemical to clean the machine 15 The thermostat to control temperature has been set up by There is no manufacturer need to adjust it yourself Fig 5 until the water can flow out from the hot water spout when the hot water button be activated cooling On Off Located at the at the left side back of water dispenser page 6 ...

Страница 7: ...01TXWP for EQACF01TXWP button of hot water button of normal water button of cold water cooling switch heating switch indicator light spout of cold water spout of normal water condenser drain hole1 for EQACF01TXWP only spout of hot water drip tray cabinet door drain hole2 power cord handle for EQALF01TXSP ...

Страница 8: ...switch and unplug the power cord from socket Then take out the used bottle follow step 1 to 3 to connect the new water bottle Never turn on the heating cooling switch before plugging the power cord to the socket Installing the floor Bracket kit Fig 6 1 Use 13 mm screw to fix the fixing bracket on the side of base pan for EQALF01TXSP on the middle of base pan 2 Drill out a screw hole 6 mm on the fl...

Страница 9: ...y then the hot water can be out Fig 9 Fig 10 Push the middle button in vertical Push the right button in vertical Plug the water dispenser into the socket the power indicator will light up then turn on the heating cooling switch heating cooling indicator will light up accordingly Fig 8 ...

Страница 10: ...he EQACF01TXWP model Note Unplug the unit before cleaning Unplug the water dispenser from the socket cooling switch use the cooling cabinet are Freestanding water dispenser with Cooling cabinet Freestanding water dispenser with cabinet ...

Страница 11: ... finished draining close the drain caps Fig 16 Follow the using your water dispenser on page 7 Dispense water from each spout till no water flow out from spout Scald Hazard Scald Hazard when tapping hot water and drain water from drain hole Please make sure it is tight enough before long term use ...

Страница 12: ... the hot water spout when the hot water button be activated Turn on the heating switch to heat water 30 minutes later drain off the liquid and clean it with water two or three times It is recommend that this should be done every six months damage 6 4 ...

Страница 13: ...Wait until the COOLING indicator turns off it takes up to approximate 1 hour to cool the water in general Make sure the back of the water dispenser is at least 20 cm away from a wall and there is free airflow on all sides of the water dispenser Hot water is not hot Make sure the water dispenser is properly connected to a working socket Make sure the red heating switch is set ON Wait until the HEAT...

Страница 14: ...stat 2 HEATER L POWER CORD Cool SW Hot SW Cool Thermostat N LED1 LED2 LED3 DISPLAY BOARD EARTH1 L_COOL L_HEAT L_COMP L_COMP1 N_COMP N_HEATER1 N_HEATER2 L_HEATER2 L_HEATER1 N_LED L_LED EARTH2 75 COMP EARTH KEY1 Hot Thermostat 1 KEY2 Hot Thermostat 2 HEATER EARTH L POWER CORD Cool Thermostat 2 Cool SW Hot SW Cool Thermostat 1 N LED1 LED2 LED3 DISPLAY BOARD EARTH1 L_HEAT L_COOL L_COMP1 L_COMP2 L_COMP...

Страница 15: ......

Страница 16: ......

Отзывы: