background image

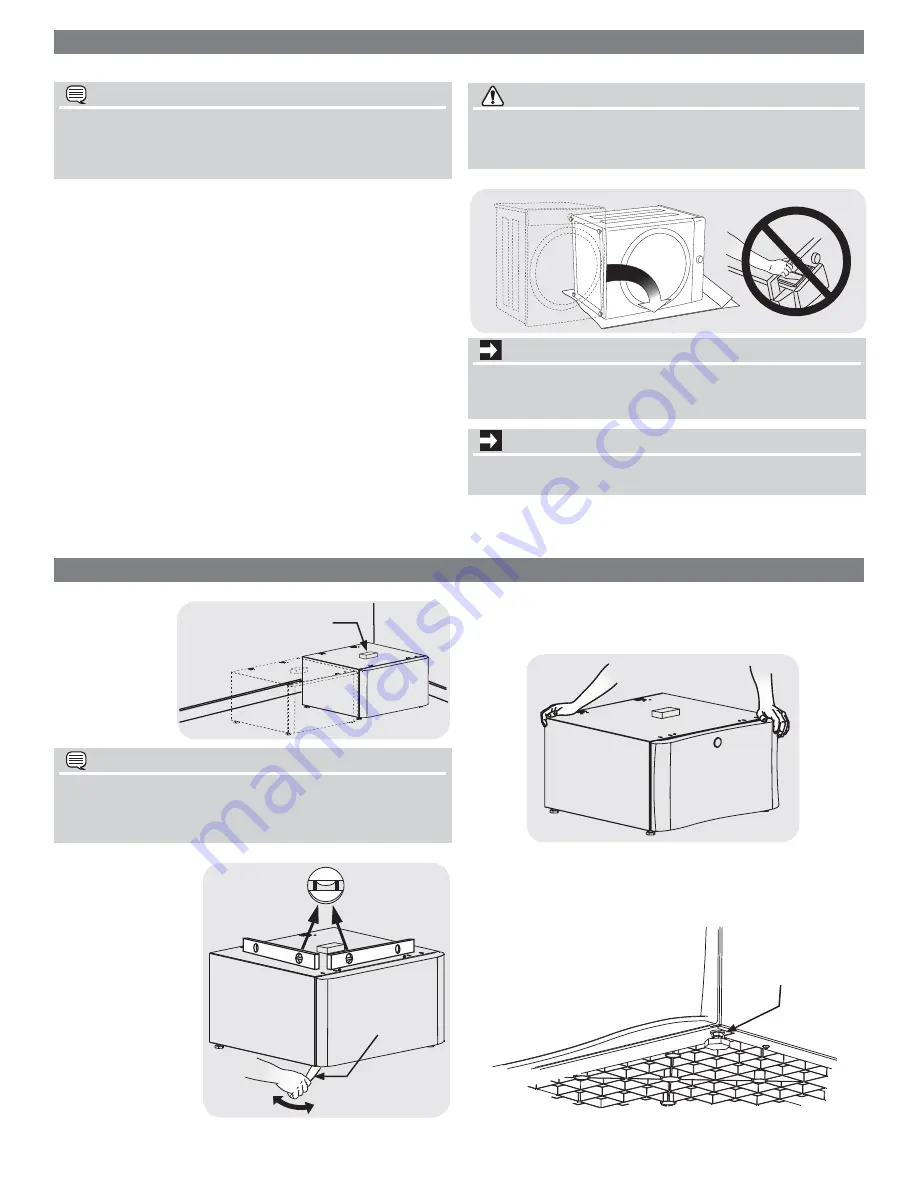
       CAUTION

EXCESSIVE WEIGHT HAZARD

To avoid back or other injury, have more than one person move 
or lift the appliance.

If washer or dryer is new and has not been installed yet, skip 

1. 

to step 4. 

If dryer is already installed, disconnect dryer from electrical 

2. 

and gas connections and exhaust venting. On models with 
Steam Option, turn off cold water supply and disconnect wa-
ter supply hose to dryer.

If washer is already installed, disconnect washer from electri-

3. 

cal connection. Turn off hot and cold water supply and dis-
connect hot and cold water supply hoses from water supply 
outlets. Disconnect drain hose from drain pipe.

Protect fl oor and unit with cardboard or rug and carefully lay 

4. 

the appliance on its side and screw each leg completely into 
the base.


NOTE

Allow for approximately 5 in. (12.5 cm) behind the pedestal 
for clearance of back of washer or dryer to the wall. Allow an 
additional 3/4 in. (2 cm) for water inlet on Steam Model Dryers 
and additional space if venting dryer upward or downward.


NOTE

Due to higher center of gravity of appliance on pedestals, some 
side-to-side rocking is normal during operation. Vibration can be 
minimized by assuring appliance is installed properly, including being 
level and solid on all four (4) legs by following these directions.

lock nut

2

Prepare appliance for mounting

Prepare pedestal before mounting

Locate pedestal 

1. 

to within a few 
inches of its 
fi nal location.

Level the pedestal 

2. 

front-to-back and 
side-to-side by ad-
justing each leveling 
leg. Keep leg exten-
sion to a minimum.

Rock the pedestal from corner-to-corner to check for stability. 

3. 

Repeat leveling and rocking until all four (4) feet are sturdy on 
the fl oor and pedestal is level.

Without turning the rubber foot, lock each pedestal leg in 

4. 

place by tightening its lock nut tight against the pedestal 
base.

DO NOT remove foam!

raise

lower

adjustable 
pliers

       IMPORTANT

DO NOT use open dispenser drawer of washer or dispenser 
cavity as hand-hold location when tipping washer on its side. 
Serious damage could occur to your washer.

       IMPORTANT

If feet are not completely screwed in, mounting holes in 
appliance will not align to mounting holes in brackets.

Содержание EPWD15T

Страница 1: ...vantar o mover la lavadora o secadora con la ayuda de más de una persona No apile la secadora sobre la lavadora si ya está instalada sobre un pedestal Adjustable wrench Llave ajustable Clé à molette Carpenter s level Nivel de carpintero Niveau de charpentier Universal wrench supplied with washer Llave universal propor cionada con la lavadora Clé iniverselle fournie avec la laveuse Phillips screwdr...

Страница 2: ...dryer upward or downward NOTE Due to higher center of gravity of appliance on pedestals some side to side rocking is normal during operation Vibration can be minimized by assuring appliance is installed properly including being level and solid on all four 4 legs by following these directions lock nut 2 Prepare appliance for mounting Prepare pedestal before mounting Locate pedestal 1 to within a fe...

Страница 3: ...el 2 Attach each bracket with 2 screws through the holes that line up on 3 pedestal Front brackets from kit 1 Appliance 2 Rear bracket orientation DRYER Tab A into Slot 1 Arrow pointing to back WASHER Tab A into Slot 1 Arrow pointing to front TAB A TAB B Each rear bracket has tabs marked A and B Each pedestal has slots in the rear marked 1 2 and 3 Each rear bracket also has 2 arrows indicating bra...

Страница 4: ...iance to settle in the brackets and retighten each mounting screw Slide washer pedestal into place 1 Check for levelness and rock all four 4 legs again Repeat 2 until level and solid Refer to Wa 3 sher Installation Instructions for complete details on installing water drain or electrical Slide dryer pedestal into place 1 Check for levelness and rock all four 4 legs again Repeat 2 until level and s...

Страница 5: ...sés solidement sur le plancher et que le socle soit de niveau Sans tourner le pied en caoutchouc verrouillez chaque pied 4 du socle en serrant bien son contre écrou contre la base du socle N ENLEVEZ PAS la mousse IMPORTANT N UTILISEZ PAS le tiroir distributeur de détergent ouvert ou sa cavité comme point d appui de levage pour incliner la laveuse sur le côté Cela pourrait endommager sérieusement v...

Страница 6: ... laveuse ou sécheuse en 1 vous reportant aux colonne 1 du tableau ci dessous Disposez les supports arrière en fonction de votre modèle reportez 2 vous à la colonne 2 Fixez chaque support à l aide de 2 vis en les faisant passer dans les 3 trous alignés sur le socle Chaque support arrière est doté de languettes marquées A et B Chaque socle est doté de fentes à l arrière marquées 1 2 et 3 Chaque supp...

Страница 7: ... et de gauche à droite Répétez cette vérification jusqu à ce que l appareil soit de niveau et stable Reportez vous à la section 3 Instructions d installation de la laveuse pour obtenir des instructions d installations détaillées sur l alimentation en eau le système de vidange et l alimenta tion en électricité Glissez l électroménager le socle en place 1 Vérifiez le niveau en faisant bouger l appar...

Страница 8: ...edestal esté nivelado Sin girar la pata de goma fije cada pata del pedestal en su 4 lugar apretando bien la tuerca de bloqueo contra la base del pedestal IMPORTANTE NO utilice el cajón distribuidor abierto de la lavadora o la cavidad del distribuidor para apoyar las manos cuando incline la lavadora sobre su costado Podría causar serios daños a la lavadora IMPORTANTE Si no se enroscan completamente...

Страница 9: ...lantero al 1 juego más externo de agujeros usando 2 tornillos Soportes delanteros del kit 1 Electrodoméstico 2 Orientación de los soportes traseros SECADORA Lengüeta A en Ranura 1 Flecha orientada hacia atrás LAVADORA Lengüeta A en Ranura 1 Flecha orientada hacia adelante FLECHAS INDICADORAS DE DIREC CIÓN RANURA 1 RANURA 2 RANURA 3 Cada soporte trasero tiene lengüetas marcadas A y B Cada pedestal ...

Страница 10: ...jación Deslice el electrodoméstico y pedestal a su ubicación final 1 Verifique que esté nivelado y agite las cuatro 4 patas nueva 2 mente Repita este paso hasta que la unidad quede firme y nivelada Consulte las 3 Instrucciones de instalación de la lavadora para obtener detalles completos sobre la conexión del agua del drenaje o del suministro eléctrico Deslice el electrodoméstico y pedestal a su u...

Страница 11: ......

Страница 12: ...las instrucciones proporcionadas Cualquier costo de mano de obra o de servicio en el hogar Daños al acabado del electrodoméstico o al hogar que hayan ocurrido durante el transporte o la instalación incluyendo sin limitarse los armarios paredes etc Daños causados por servicio técnico realizado por compañías de servicio técnico no autorizadas el uso de piezas que no sean piezas genuinas Electrolux o...

Отзывы: