background image

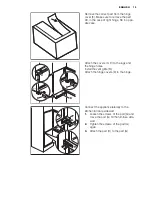
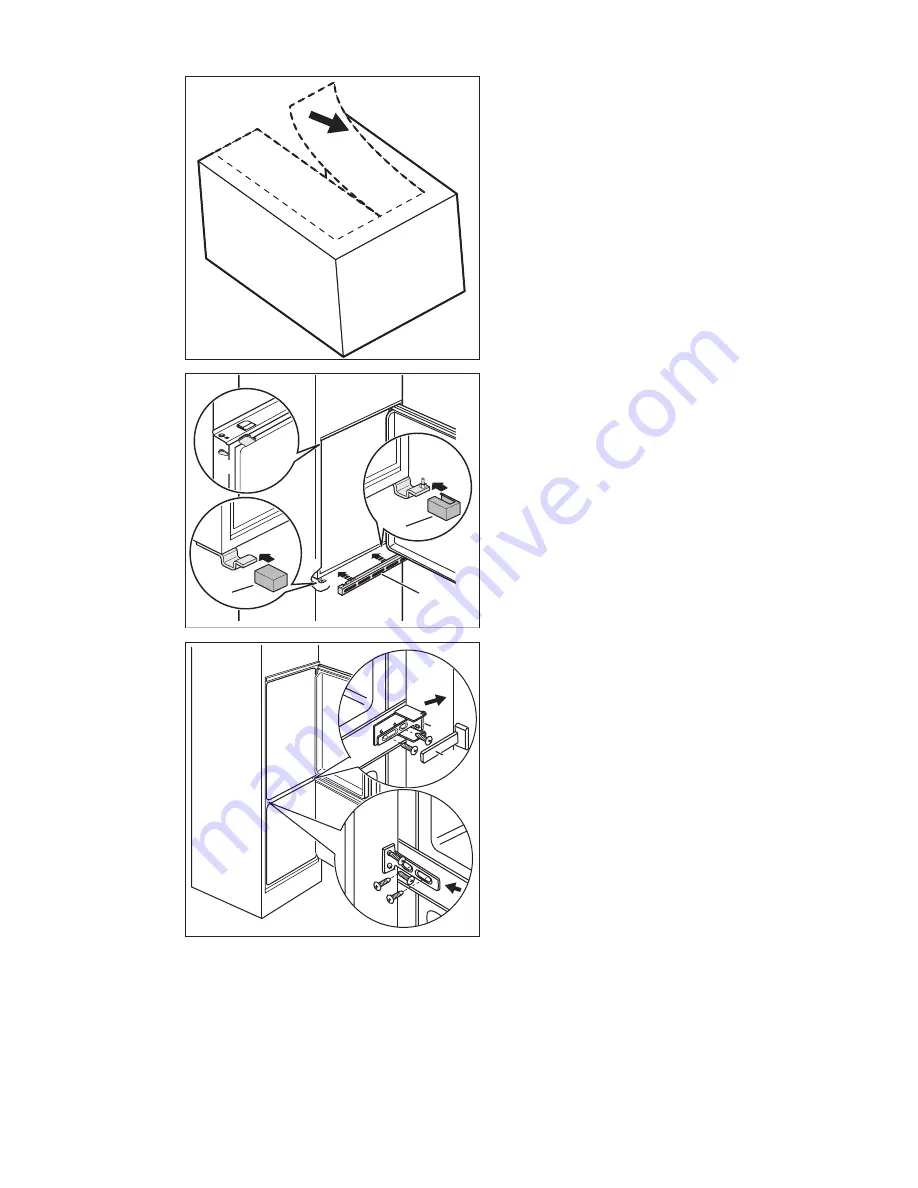
Remove the correct part from the hinge
cover (E). Make sure to remove the part
DX, in the case of right hinge, SX in oppo-
site case.

B

E

E

D

C

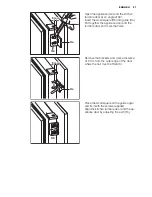
Attach the covers (C, D) to the lugs and
the hinge holes.
Install the vent grille (B).
Attach the hinge covers (E) to the hinge.

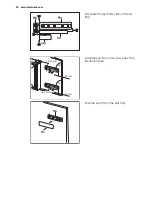
G

H

Connect the appliance laterally to the
kitchen furniture sidewall:

1.

Loosen the screws of the part (G) and
move the part (G) till the furniture side-
wall.

2.

Tighten the screws of the part (G)
again.

3.

Attach the part (H) to the part (G).

ENGLISH

19

Содержание ENN2801AOW

Страница 1: ...ENN2801AOW EN FRIDGE FREEZER USER MANUAL ...

Страница 2: ...eat results every time Welcome to Electrolux Visit our website for Get usage advice brochures trouble shooter service information www electrolux com Register your product for better service www electrolux com productregistration Buy Accessories Consumables and Original spare parts for your appliance www electrolux com shop CUSTOMER CARE AND SERVICE We recommend the use of original spare parts When...

Страница 3: ...sure to make that spring lock unusable before you discard the old ap pliance This will prevent it from becom ing a death trap for a child GENERAL SAFETY WARNING Keep ventilation openings in the appliance enclosure or in the built in structure clear of obstruction The appliance is intended for keeping foodstuff and or beverages in a normal household as explained in this instruction booklet Do not u...

Страница 4: ...aintenance switch off the appli ance and disconnect the mains plug from the mains socket Do not clean the appliance with metal objects Do not use sharp objects to remove frost from the appliance Use a plastic scra per Regularly examine the drain in the refrig erator for defrosted water If necessary clean the drain If the drain is blocked water will collect in the bottom of the ap pliance INSTALLAT...

Страница 5: ...t be discarded together with the urban refuse and rubbish The insulation foam con tains flammable gases the appli ance shall be disposed according to the applicable regulations to ob tain from your local authorities Avoid damaging the cooling unit especially at the rear near the heat exchanger The materials used on this appliance marked by the sym bol are recyclable ENGLISH 5 ...

Страница 6: ... the most suitable However the exact setting should be chosen keeping in mind that the tempera ture inside the appliance depends on room temperature how often the door is opened the quantity of food stored the location of the appliance If the ambient temperature is high or the appliance is fully loaded and the appliance is set to the lowest temperatures it may run continu ously causing frost to fo...

Страница 7: ...e appli ance STORAGE OF FROZEN FOOD When first starting up or after a period out of use before putting the products in the compartment let the appliance run at least 2 hours on the higher settings If large quantities of food are to be stored remove all drawers and baskets from appli ance and place food on cooling shelves to obtain the best performance WARNING Make sure that foods do not ex ceed th...

Страница 8: ...ction of the arrows until it comes free then repo sition as required HUMIDITY CONTROL The glass shelf incorporates a device with slits adjustable by means of a sliding lever which makes it possible to regulate the temperature in the vegetable drawer s When the ventilation slots are closed the natural moisture content of the food in the fruit and vegetable compartments is preserved for longer When ...

Страница 9: ...t not be kept in the refrigera tor HINTS FOR FREEZING To help you make the most of the freezing process here are some important hints the maximum quantity of food which can be frozen in 24 hrs is shown on the rat ing plate the freezing process takes 24 hours No further food to be frozen should be add ed during this period only freeze top quality fresh and thor oughly cleaned foodstuffs prepare foo...

Страница 10: ...at can attack damage the plastics used in this appliance For this reason it is recommended that the outer casing of this appliance is only cleaned with warm water with a little washing up liquid added After cleaning reconnect the equipment to the mains supply DEFROSTING OF THE REFRIGERATOR Frost is automatically eliminated from the evaporator of the refrigerator compartment every time the motor co...

Страница 11: ...5 Switch on the appliance 6 After two or three hours reload the previously removed food into the com partment Never use sharp metal tools to scrape off frost from the evaporator as you could damage it Do not use a mechanical device or any arti ficial means to speed up the thawing proc ess other than those recommended by the manufacturer A temperature rise of the frozen food packs during defrosting...

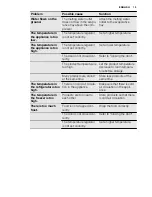
Страница 12: ...he lamp does not work The lamp is in stand by Close and open the door The lamp is defective Refer to Replacing the lamp The compressor op erates continually The temperature is not set correctly Set a higher temperature The door is not closed cor rectly Refer to Closing the door The door has been opened too frequently Do not keep the door open longer than necessary The product temperature is too hi...

Страница 13: ...roduct temperature is too high Let the product temperature decrease to room tempera ture before storage Many products are stored at the same time Store less products at the same time The temperature in the refrigerator is too high There is no cold air circula tion in the appliance Make sure that there is cold air circulation in the appli ance The temperature in the freezer is too high Products are...

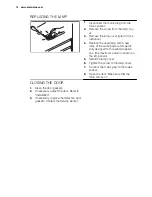
Страница 14: ...lly designed for household applian ces the maximum power is shown on the lamp cover 5 Install the lamp cover 6 Tighten the screw to the lamp cover 7 Connect the mains plug to the mains socket 8 Open the door Make sure that the lamp comes on CLOSING THE DOOR 1 Clean the door gaskets 2 If necessary adjust the door Refer to Installation 3 If necessary replace the defective door gaskets Contact the Se...

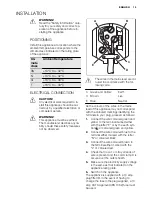
Страница 15: ...ode A Green and Yellow Earth C Brown Live E Blue Neutral As the colours of the wires in the mains lead of this appliance may not correspond with the coloured markings identifying the terminals in your plug proceed as follows 1 Connect the wire coloured green and yellow to the terminal marked either with the letter E or by the earth sym bol or coloured green and yellow 2 Connect the wire coloured b...

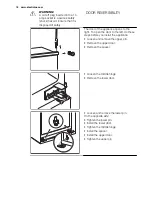
Страница 16: ... the door to the left do these steps before you install the appliance Loosen and remove the upper pin Remove the upper door Remove the spacer Loosen the middle hinge Remove the lower door Loosen and remove the lower pin On the opposite side Tighten the lower pin Install the lower door Tighten the middle hinge Install the spacer Install the upper door Tighten the upper pin 16 www electrolux com ...

Страница 17: ...e airflow behind the appliance must be sufficient INSTALLING THE APPLIANCE CAUTION Make sure that the mains cable can move freely Do these steps x x If necessary cut the adhesive sealing strip and then apply it to the appliance as shown in figure ENGLISH 17 ...

Страница 18: ... 44 mm Adjust the appliance in the niche Make sure that the distance between the appliance and the cupboard front edge is 44 mm The lower hinge cover in the accessories bag makes sure that the distance be tween the appliance and the kitchen furni ture is correct Make sure that the clearance between the appliance and the cupboard is 4 mm Open the door Put the lower hinge cover in position I I Attac...

Страница 19: ...e covers C D to the lugs and the hinge holes Install the vent grille B Attach the hinge covers E to the hinge G H Connect the appliance laterally to the kitchen furniture sidewall 1 Loosen the screws of the part G and move the part G till the furniture side wall 2 Tighten the screws of the part G again 3 Attach the part H to the part G ENGLISH 19 ...

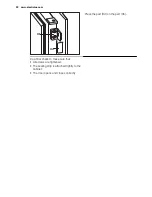
Страница 20: ...Disconnect the parts Ha Hb Hc and Hd ca 50 mm ca 50 mm 21 mm 90 90 21 mm Install the part Ha on the inner side of the kitchen furniture Ha Hc Push the part Hc on the part Ha 20 www electrolux com ...

Страница 21: ...iance door and the furniture door and mark the holes Ha K 8 mm Remove the brackets and mark a distance of 8 mm from the outer edge of the door where the nail must be fitted K Hb Place the small square on the guide again and fix it with the screws supplied Align the kitchen furniture door and the ap pliance door by adjusting the part Hb ENGLISH 21 ...

Страница 22: ...d Press the part Hd on the part Hb Do a final check to make sure that All screws are tightened The sealing strip is attached tightly to the cabinet The door opens and closes correctly 22 www electrolux com ...

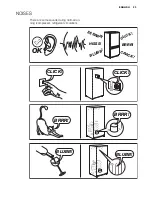
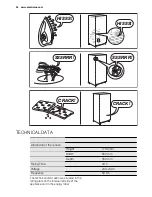
Страница 23: ...NOISES There are some sounds during normal run ning compressor refrigerant circulation BRRR HISSS CLICK BLUBB CRACK SSSRRR OK CLICK CLICK BRRR BRRR BLUBB BLUBB ENGLISH 23 ...

Страница 24: ...nsion of the recess Height 1780 mm Width 560 mm Depth 550 mm Rising Time 24 h Voltage 230 240 V Frequency 50 Hz The technical information are situated in the rating plate on the internal left side of the appliance and in the energy label 24 www electrolux com ...

Страница 25: ...ainers to recycle it Help protect the environment and human health and to recycle waste of electrical and electronic appliances Do not dispose appliances marked with the symbol with the household waste Return the product to your local recycling facility or contact your municipal office ENGLISH 25 ...

Страница 26: ...26 www electrolux com ...

Страница 27: ...ENGLISH 27 ...

Страница 28: ...www electrolux com shop 222301057 A 462011 ...

Отзывы: