background image

1. 

  SAFETY INFORMATION

In the interest of your safety and to en-
sure the correct use, before installing
and first using the appliance, read this
user manual carefully, including its hints
and warnings. To avoid unnecessary
mistakes and accidents, it is important
to ensure that all people using the ap-
pliance are thoroughly familiar with its
operation and safety features. Save
these instructions and make sure that
they remain with the appliance if it is
moved or sold, so that everyone using
it through its life will be properly in-
formed on appliance use and safety.
For the safety of life and property keep
the precautions of these user's instruc-
tions as the manufacturer is not re-
sponsible for damages caused by
omission.

1.1 

Children and vulnerable

people safety

• This appliance is not intended for use

by persons (including children) with
reduced physical, sensory or mental
capabilities, or lack of experience and
knowledge, unless they have been
given supervision or instruction con-
cerning use of the appliance by a
person responsible for their safety.
Children should be supervised to en-
sure that they do not play with the
appliance.

• Keep all packaging well away from

children. There is risk of suffocation.

• If you are discarding the appliance

pull the plug out of the socket, cut
the connection cable (as close to the
appliance as you can) and remove
the door to prevent playing children
to suffer electric shock or to close
themselves into it.

• If this appliance featuring magnetic

door seals is to replace an older ap-
pliance having a spring lock (latch) on
the door or lid, be sure to make that
spring lock unusable before you dis-
card the old appliance. This will pre-

vent it from becoming a death trap
for a child.

1.2 

General safety

WARNING!

Keep ventilation openings, in the appli-
ance enclosure or in the built-in struc-
ture, clear of obstruction.
• The appliance is intended for keeping

foodstuff and/or beverages in a nor-
mal household as explained in this in-
struction booklet.

• Do not use a mechanical device or

any artificial means to speed up the
thawing process.

• Do not use other electrical appliances

(such as ice cream makers) inside of
refrigerating appliances, unless they
are approved for this purpose by the
manufacturer.

• Do not damage the refrigerant circuit.
• The refrigerant isobutane (R600a) is

contained within the refrigerant circuit
of the appliance, a natural gas with a
high level of environmental compati-
bility, which is nevertheless flamma-
ble.
During transportation and installation
of the appliance, be certain that none
of the components of the refrigerant
circuit become damaged.
If the refrigerant circuit should be-
come damaged:
– avoid open flames and sources of

ignition

– thoroughly ventilate the room in

which the appliance is situated

• It is dangerous to alter the specifica-

tions or modify this product in any
way. Any damage to the cord may
cause a short-circuit, fire and/or elec-
tric shock.

ENGLISH

25

Содержание EN3601AOW

Страница 1: ...EN3601AOX EN3601AOW NL KOEL VRIESCOMBINATIE GEBRUIKSAANWIJZING 2 EN FRIDGE FREEZER USER MANUAL 24 FR RÉFRIGÉRATEUR CONGÉLATEUR NOTICE D UTILISATION 45 DE KÜHL GEFRIERSCHRANK BENUTZERINFORMATION 69 ...

Страница 2: ...esultaten zult krijgen Welkom bij Electrolux Ga naar onze website voor Advies over gebruik brochures het oplossen van problemen en onderhoudsinformatie www electrolux com Registreer uw product voor een betere service www electrolux com productregistration Koop accessoires verbruiksartikelen en originele reserveonderdelen voor uw apparaat www electrolux com shop KLANTENSERVICE Wij raden altijd het ...

Страница 3: ...pelen Houd alle verpakkingsmateriaal bui ten het bereik van kinderen Gevaar voor verstikking Als u het apparaat afdankt trek dan de stekker uit het stopcontact snij de voedingskabel door zo dicht mo gelijk bij het apparaat en verwijder de deur om te voorkomen dat kinderen een elektrische schok krijgen of zich zelf in het apparaat opsluiten Als dit apparaat dat voorzien is van een magnetische deurs...

Страница 4: ...geselecteerd en uitsluitend bedoeld voor gebruik in huishoudelijke apparaten De lampjes zijn niet geschikt voor de verlichting van ruimtes 1 3 Dagelijks gebruik Zet geen hete potten op de kunststof onderdelen in het apparaat Bewaar geen brandbare gassen of vloeistoffen in het apparaat deze kunnen ontploffen Zet geen levensmiddelen direct tegen de luchtopening in de achterwand Als het apparaat rijp...

Страница 5: ...en Verzeker u ervan dat de stekker be reikbaar is nadat het apparaat geïn stalleerd is Aansluiten op de drinkwatervoorzie ning indien voorzien van een water aansluiting 1 6 Onderhoud Alle elektrotechnische werkzaamhe den die noodzakelijk zijn voor het uit voeren van onderhoud aan het appa raat dienen uitgevoerd te worden door een gekwalificeerd elektricien of competent persoon Dit product mag alle...

Страница 6: ...3 1 Inschakelen Steek de stekker in het stopcontact Draai de thermostaatknop op een ge middelde stand 3 2 Uitschakelen Draai de thermostaatknop op de stand O om het apparaat uit te schakelen 3 3 Temperatuurregeling De temperatuur wordt automatisch ge regeld Ga als volgt te werk om het apparaat in werking te stellen draai de thermostaatknop op een la gere stand om de minimale koude te verkrijgen 6 ...

Страница 7: ... het invriezen sneller te laten verlo pen moet u de thermostaatknop echter op een hogere stand instellen om de maximale koude te kunnen verkrijgen In deze omstandigheden kan de temperatuur in de koelkast tot onder de 0 C dalen Als dat ge beurt de thermostaatknop op een warmere stand instellen Zet het verse voedsel dat u in wilt vrie zen op het bovenste vak 4 2 Het bewaren van ingevroren voedsel Al...

Страница 8: ... wordt weergegeven stel dan de temperatuur in op een lage re temperatuur en wacht 12 uur alvo rens de temperatuur nogmaals te con troleren Het is normaal dat het bericht OK ver dwijnt nadat u voedsel in het apparaat geplaatst hebt of na herhaaldelijk ope nen van de deur 4 5 Het plaatsen van de deurplateaus 1 2 Om het bewaren van voedselpakketten van verschillende afmetingen mogelijk te maken kunne...

Страница 9: ...flessen met de openingen naar voren gericht in het voorgeplaat ste schap Als het schap horizontaal ge plaatst is mogen alleen afgeslo ten flessen worden neergezet Dit schap voor een flessenhouder kan worden gekanteld om vooraf geopende flessen te bewaren Trek hiervoor de houder omhoog zodat deze omhoog draait en op het niveau erboven kan worden geplaatst 4 8 Freshzone lade De FreshZone lade is ges...

Страница 10: ...ordt zult u een zacht klikje van de thermostaat horen Dat is nor maal 5 2 Tips voor energiebesparing De deur niet vaker openen of open laten staan dan strikt noodzakelijk Als de omgevingstemperatuur hoog is de thermostaatknop op een lage temperatuur staat en het apparaat volledig gevuld is kan de compres sor continu aan staan waardoor er ijs op de verdamper ontstaat Als dit ge beurt zet u de therm...

Страница 11: ...edsel om te voorkomen dat dit laatste warm wordt smalle pakjes zijn makkelijker op te bergen dan dikke zout maakt voed sel minder lang houdbaar water bevriest als dit rechtstreeks uit het vriesvak geconsumeerd wordt kan het aan de huid vastvriezen het is aan te bevelen de invriesdatum op elk pakje te vermelden dan kunt u zien hoe lang het al bewaard is 5 6 Tips voor het bewaren van ingevroren voed...

Страница 12: ...sverbruik besparen Zorg ervoor dat u het koelsys teem niet beschadigt Veel normaal verkrijgbare keukenreini gers bevatten chemicaliën die de kunst stoffen die in dit apparaat gebruikt zijn kunnen aantasten beschadigen Daar om wordt het aanbevolen de buitenkant van dit apparaat alleen schoon te ma ken met warm water met een beetje af wasmiddel Steek na het schoonmaken van het apparaat de stekker we...

Страница 13: ...Zet ongeveer 12 uur voordat u gaat ontdooien de tempera tuur regelaar op een hogere stand om voldoende koudere serve op te bouwen voor de on derbreking tijdens de werking NEDERLANDS 13 ...

Страница 14: ...n bak warm water in het vriesvak zetten Ver wijder bovendien stukken ijs die afbreken voordat het ontdooien voltooid is 4 Na afloop van het ontdooien de binnenkant grondig droog maken en de schraper bewaren voor toe komstig gebruik 5 Schakel het apparaat in 6 Zet het eerder verwijderde voedsel na twee tot drie uur terug in het vriesvak Gebruik nooit scherpe metalen hulp middelen om de rijp van de ...

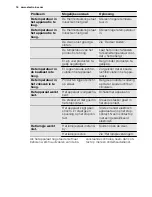
Страница 15: ...ur niet langer open staan dan noodzake lijk De temperatuur van het product is te hoog Laat het product afkoelen tot kamertemperatuur voor dat u het opbergt De kamertemperatuur is te hoog Verlaag de kamertempera tuur Er loopt water over de achterkant van de koelkast Tijdens het automatische ontdooiproces ontdooit de rijp tegen de achterwand Dit is normaal Er loopt water in de koelkast De waterafvoe...

Страница 16: ...dat er koude luchtcirculatie in het appa raat is De temperatuur in het vriesvak is te hoog Producten liggen te dicht op elkaar Berg de producten zodanig op dat er koude lucht kan circuleren Het apparaat werkt niet Het apparaat is uitgescha keld Schakel het apparaat in De stekker zit niet goed in het stopcontact Steek de stekker goed in het stopcontact Het apparaat krijgt geen stroom Er staat geen ...

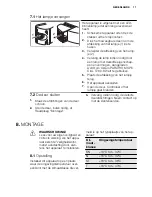
Страница 17: ...en 7 Open de deur Controleer of het lampje gaat branden 7 2 De deur sluiten 1 Maak de afdichtingen van de deur schoon 2 Stel de deur indien nodig af Raadpleeg Montage 3 Vervang indien nodig de defecte deurafdichtingen Neem contact op met de klantenservice 8 MONTAGE WAARSCHUWING Lees voor uw eigen veiligheid en correcte werking van het appa raat eerst de veiligheidsinfor matie aandachtig door alvo ...

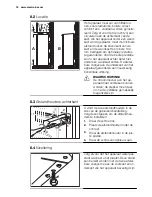
Страница 18: ... apparaat garanderen een nauwkeurig horizontale uitlijning WAARSCHUWING De stroomtoevoer aan het ap paraat moet verbroken kunnen worden de stekker moet daar om na de installatie gemakkelijk toegankelijk zijn 8 3 Afstandhouders achterkant 2 4 3 1 U vindt de twee afstandhouders in de zak van de gebruikershandleiding Volg deze stappen om de afstandhou ders te installeren 1 Draai de schroef los 2 Plaa...

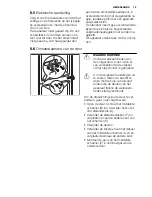
Страница 19: ...erbaarheid van de deur E F A B D C WAARSCHUWING Voordat werkzaamheden wor den uitgevoerd moet u zich er van verzekeren dat de stekker uit het stopcontact is getrokken Om de volgende handelingen uit te voeren raden we aan dit te doen met de hulp van iemand anders die de deuren van het apparaat tijdens de werkzaam heden stevig vasthoudt Om de draairichting van de deur te ver anderen gaat u als volgt...

Страница 20: ... pennen A terug aan de ande re zijde Voer een eindcontrole uit en verzeker u ervan dat Alle schroeven zijn aangedraaid De magnetische afdichtstrip vast zit aan de kast De deur goed open en dicht gaat Als de omgevingstemperatuur laag is bijv in de winter kan het zijn dat het deurrubber niet precies op de kast past Wacht in dat geval tot de deur rubber zich op een natuurlijke wijze zet Als u bovenst...

Страница 21: ...9 GELUIDEN Tijdens normaal gebruik hoort u gelui den compressor koelmiddelcirculatie BRRR HISSS CLICK BLUBB CRACK SSSRRR OK CLICK CLICK BRRR BRRR BLUBB BLUBB NEDERLANDS 21 ...

Страница 22: ...HISSS HISSS SSSRRR SSSRRR CRACK CRACK 22 www electrolux com ...

Страница 23: ...t energiela bel 11 MILIEUBESCHERMING Recycle de materialen met het symbool Gooi de verpakking in een geschikte verzamelcontainer om het te recyclen Help om het milieu en de volksgezondheid te beschermen en recycle het afval van elektrische en elektronische apparaten Gooi apparaten gemarkeerd met het symbool niet weg met het huishoudelijk afval Breng het product naar het milieustation bij u in de b...

Страница 24: ...owledge that you ll get great results every time Welcome to Electrolux Visit our website for Get usage advice brochures trouble shooter service information www electrolux com Register your product for better service www electrolux com productregistration Buy Accessories Consumables and Original spare parts for your appliance www electrolux com shop CUSTOMER CARE AND SERVICE We recommend the use of...

Страница 25: ... to prevent playing children to suffer electric shock or to close themselves into it If this appliance featuring magnetic door seals is to replace an older ap pliance having a spring lock latch on the door or lid be sure to make that spring lock unusable before you dis card the old appliance This will pre vent it from becoming a death trap for a child 1 2 General safety WARNING Keep ventilation op...

Страница 26: ...t not be re frozen once it has been thawed out Store pre packed frozen food in ac cordance with the frozen food manu facturer s instructions Appliance s manufacturers storage recommendations should be strictly adhered to Refer to relevant instruc tions Do not place carbonated or fizzy drinks in the freezer compartment as it creates pressure on the container which may cause it to explode re sulting...

Страница 27: ...trician or competent person This product must be serviced by an authorized Service Centre and only genuine spare parts must be used 1 7 Environment Protection This appliance does not contain gasses which could damage the ozone layer in either its refriger ant circuit or insulation materi als The appliance shall not be discarded together with the ur ban refuse and rubbish The in sulation foam conta...

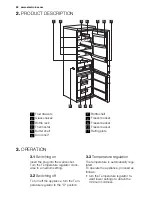
Страница 28: ... 1 Switching on Insert the plug into the wall socket Turn the Temperature regulator clock wise to a medium setting 3 2 Switching off To turn off the appliance turn the Tem perature regulator to the O position 3 3 Temperature regulation The temperature is automatically regu lated To operate the appliance proceed as follows turn the Temperature regulator to ward lower settings to obtain the minimum ...

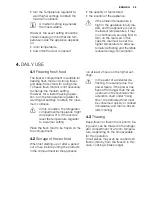
Страница 29: ... a faster freezing opera tion turn the temperature regulator to ward higher settings to obtain the maxi mum coldness In this condition the refrigerator compartment temperature might drop below 0 C If this occurs reset the temperature regulator to a warmer setting Place the fresh food to be frozen on the top compartment 4 2 Storage of frozen food When first starting up or after a period out of use ...

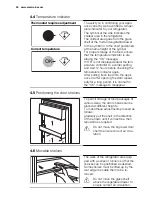
Страница 30: ...dicator again After putting fresh food into the appli ance or after opening the door repeat edly for a long period it is normal for the OK message to disappear 4 5 Positioning the door shelves 1 2 To permit storage of food packages of various sizes the door shelves can be placed at different heights To make these adjustments proceed as follows gradually pull the shelf in the direction of the arrow...

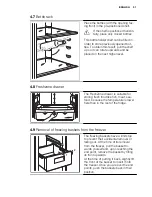
Страница 31: ...le for storing fresh food like fish meat sea food because the temperature is lower here than in the rest of the fridge 4 9 Removal of freezing baskets from the freezer 2 1 The freezing baskets have a limit stop to prevent their accidental removal or falling out At the time of its removal from the freezer pull the basket to wards yourself and upon reaching the end point remove the basket by tilting...

Страница 32: ...late freely around it 5 4 Hints for refrigeration Useful hints Meat all types wrap in polythene bags and place on the glass shelf above the vegetable drawer For safety store in this way only one or two days at the most Cooked foods cold dishes etc these should be covered and may be placed on any shelf Fruit and vegetables these should be thoroughly cleaned and placed in the special drawer s provid...

Страница 33: ... Do not use detergents or abra sive powders as these will damage the finish CAUTION Unplug the appliance before carrying out any maintenance operation This appliance contains hydro carbons in its cooling unit main tenance and recharging must therefore only be carried out by authorized technicians 6 2 Periodic cleaning The equipment has to be cleaned regu larly clean the inside and accessories with...

Страница 34: ...s It is important to periodically clean the defrost water drain hole in the middle of the refrigerator compartment channel to prevent the water overflowing and drip ping onto the food inside 6 4 Defrosting the freezer A certain amount of frost will always form on the freezer shelves and around the top compartment Defrost the freezer when the frost layer reaches a thickness of about 3 5 mm About 12...

Страница 35: ...t of warm water in the freezer com partment In addition remove pieces of ice that break away before defrosting is complete 4 When defrosting is completed dry the interior thoroughly and keep the scraper for future use 5 Switch on the appliance 6 After two or three hours reload the previously removed food into the compartment Never use sharp metal tools to scrape off frost from the evaporator as yo...

Страница 36: ... room tem perature before storage The room temperature is too high Decrease the room temper ature Water flows on the rear plate of the re frigerator During the automatic de frosting process frost de frosts on the rear plate This is correct Water flows into the refrigerator The water outlet is clog ged Clean the water outlet Products prevent that wa ter flows into the water collector Make sure that...

Страница 37: ...he appli ance The temperature in the freezer is too high Products are too near to each other Store products so that there is cold air circulation The appliance does not operate The appliance is switched off Switch on the appliance The mains plug is not con nected to the mains sock et correctly Connect the mains plug to the mains socket correctly The appliance has no power There is no voltage in th...

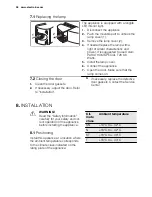
Страница 38: ...mp comes on 7 2 Closing the door 1 Clean the door gaskets 2 If necessary adjust the door Refer to Installation 3 If necessary replace the defective door gaskets Contact the Service Center 8 INSTALLATION WARNING Read the Safety Information carefully for your safety and cor rect operation of the appliance before installing the appliance 8 1 Positioning Install this appliance at a location where the ...

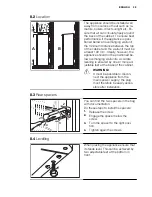
Страница 39: ...low overhanging wall units Accurate levelling is ensured by one or more ad justable feet at the base of the cabinet WARNING It must be possible to discon nect the appliance from the mains power supply the plug must therefore be easily acces sible after installation 8 3 Rear spacers 2 4 3 1 You can find the two spacers in the bag with documentation Do these steps to install the spacers 1 Release th...

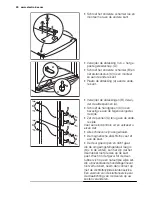
Страница 40: ...C Directives 8 6 Door reversibility E F A B D C WARNING Before carrying out any opera tions remove the plug from the power socket To carry out the following opera tions we suggest that this be made with another person that will keep a firm hold on the doors of the appliance during the operations To change the opening direction of the door do these steps Open the doors Unscrew the middle hinge B Re...

Страница 41: ...that All screws are tightened The magnetic seal adheres to the cabinet The door opens and closes correctly If the ambient temperature is cold i e in Winter the gasket may not fit per fectly to the cabinet In that case wait for the natural fitting of the gasket In case you do not want to carry out the above mentioned operations con tact the nearest After Sales Service Force The After Sales Service ...

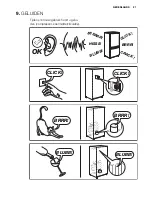
Страница 42: ...BRRR HISSS CLICK BLUBB CRACK SSSRRR OK CLICK CLICK BRRR BRRR BLUBB BLUBB 42 www electrolux com ...

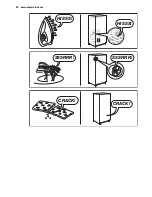
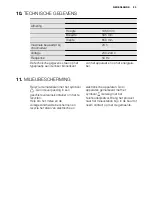
Страница 43: ...HISSS HISSS SSSRRR SSSRRR CRACK CRACK 10 TECHNICAL DATA Dimension Height 1850 mm Width 595 mm Depth 658 mm Rising Time 20 h Voltage 230 240 V Frequency 50 Hz ENGLISH 43 ...

Страница 44: ...erials with the symbol Put the packaging in applicable containers to recycle it Help protect the environment and human health and to recycle waste of electrical and electronic appliances Do not dispose appliances marked with the symbol with the household waste Return the product to your local recycling facility or contact your municipal office 44 www electrolux com ...

Страница 45: ...lisation vous apportera satisfaction Bienvenue chez Electrolux Visitez notre site Internet pour Obtenir des conseils d utilisation des brochures de l aide des informations www electrolux com Enregistrer votre produit pour obtenir un meilleur service www electrolux com productregistration Acheter des accessoires consommables et pièces de rechange d origine pour votre appareil www electrolux com sho...

Страница 46: ...é rioration de l appareil transpor tez le dans sa position d utilisa tion muni de ses cales de trans port selon le modèle Au débal lage de celui ci et pour empê cher des risques d asphyxie et corporel tenez les matériaux d emballage hors de portée des enfants ATTENTION Pour éviter tout risque mobilier immobilier corporel l instal lation les raccordements eau gaz électricité évacuation selon modèle...

Страница 47: ... muni de fermetures magnétiques S il remplace un appa reil équipé d une fermeture à ressort nous vous conseillons de rendre celle ci inutilisable avant de vous en débarrasser Ceci afin d éviter aux enfants de s enfermer dans l appareil et de mettre ainsi leur vie en danger 1 2 Consignes générales de sécurité AVERTISSEMENT Veillez à ce que les orifices de ventila tion situés dans l enceinte de l ap...

Страница 48: ...es dans l appareil risque d explosion Ne placez pas d aliments directe ment contre la sortie d air sur la paroi arrière de l appareil Si l appareil est sans givre Un produit décongelé ne doit jamais être recongelé Conservez les aliments emballés conformément aux instructions de leur fabricant Respectez scrupuleusement les con seils de conservation donnés par le fabricant de l appareil Consultez le...

Страница 49: ...onvient de vérifier régulièrement que la température notamment celle de la zone la plus froide est correcte et le cas échéant d ajuster le dispositif de réglage de température en conséquen ce comme indiqué page Utilisation Mesure de la températureLa mesure de la température dans une zone sur une clayette par exemple peut se faire au moyen d un thermomètre placé dès le départ dans un récipient remp...

Страница 50: ...stallation de l appareil Branchez à l alimentation en eau po table uniquement Si un branche ment sur le réseau d eau est prévu 1 7 Maintenance Les branchements électriques néces saires à l entretien de l appareil doi vent être réalisés par un électricien ou par une personne qualifiée Cet appareil ne doit être entretenu et réparé que par votre service après vente exclusivement avec des piè ces d or...

Страница 51: ...congélation 10 Panier de congélation 11 Plaque signalétique 3 FONCTIONNEMENT 3 1 Mise en fonctionnement Branchez l appareil sur une prise mura le Tournez le bouton du thermostat dans le sens des aiguilles d une montre sur une position moyenne 3 2 Mise à l arrêt Pour mettre à l arrêt l appareil tournez le bouton du thermostat sur la position O 3 3 Réglage de la température La température est réglée...

Страница 52: ...u con gelés pendant longtemps Pour congeler les denrées fraîches il n est pas nécessaire de modifier le ré glage moyen Toutefois pour une congélation plus ra pide tournez le bouton du thermostat vers le haut pour obtenir un réglage de froid maximum Dans ce cas la température du compartiment réfrigérateur peut chuter au dessous de 0 C Si cela se produit repositionnez le bouton du thermostat sur un ...

Страница 53: ...as affiché réglez le thermostat sur une position afin d obte nir plus de froid et attentez 12 heures avant de vérifier à nouveau Après chargement de denrées fraîches dans l appareil ou après des ouvertures répétées ou une ouverture prolongée de la porte il est normal que l inscrip tion OK disparaisse 4 5 Mise en place des balconnets de la porte 1 2 En fonction de la taille des emballages des alime...

Страница 54: ...z les bouteilles ouverture vers l avant sur la clayette prévue à cet ef fet Si la clayette est en position ho rizontale placez uniquement des bouteilles non entamées Cette clayette peut être inclinée afin de pouvoir y placer des bouteilles déjà ou vertes Pour cela soulevez la clayette afin qu elle puisse glisser vers le haut et être placée sur le niveau supérieur 4 8 Bac Freshzone Le bac FreshZone...

Страница 55: ...phénomène est normal 5 2 Conseils pour l économie d énergie N ouvrez pas la porte trop souvent ou plus longtemps que nécessaire Si la température ambiante est éle vée le dispositif de réglage de tem pérature est sur la position de froid maximum et l appareil est plein il est possible que le compresseur fonc tionne en régime continu d où un ris que de formation excessive de givre sur l évaporateur ...

Страница 56: ...ents frais non congelés toucher des aliments déjà congelés pour éviter une remontée en température de ces derniers les aliments maigres se conservent mieux et plus longtemps que les ali ments gras le sel réduit la durée de conservation des aliments la température très basse à laquelle se trouvent les bâtonnets glacés s ils sont consommés dès leur sortie du compartiment congélateur peut pro voquer ...

Страница 57: ...câ bles qui se trouvent à l intérieur de l appareil Ne JAMAIS utiliser de produits abrasifs ou caustiques ni d éponges avec grattoir pour nettoyer l intérieur de façon à ne pas l abîmer et laisser de fortes odeurs Nettoyer le condenseur grille noire et le compresseur situés à l arrière de l appareil avec une brosse ou un aspi rateur Cette opération améliore les per formances de l appareil et perme...

Страница 58: ...nt de la gou lotte d évacuation de l eau de dégivrage située au milieu du compartiment réfri gérateur pour empêcher l eau de dé border et de couler à l intérieur de l ap pareil 6 4 Dégivrage du congélateur Une certaine quantité de givre se forme toujours sur les clayettes du congéla teur et autour du compartiment supéri eur Dégivrez le congélateur lorsque l épais seur de la couche de givre est d e...

Страница 59: ...t congélateur Retirez également les morceaux de glace au fur et à mesure qu ils se détachent avant que le processus de dégi vrage ne soit terminé 4 Une fois le dégivrage terminé sé chez soigneusement l intérieur et conservez la spatule pour une utili sation ultérieure 5 Mettez l appareil en marche 6 Attendez deux à trois heures avant de replacer les denrées surgelées ou congelées dans le comparti ...

Страница 60: ...e trop souvent Ne laissez pas la porte ou verte plus longtemps que nécessaire La température du produit est trop élevée Laissez la température du produit rejoindre la tempé rature ambiante avant de le stocker La température ambiante est trop élevée Abaissez la température de la pièce De l eau coule sur la plaque arrière du ré frigérateur Pendant le dégivrage au tomatique le givre fond sur la plaqu...

Страница 61: ...gérateur est trop élevée Il n y a aucune circulation d air froid dans l appareil Assurez vous qu il y ait une circulation d air froid dans l appareil La température du congélateur est trop élevée Les produits sont trop près les uns des autres Stockez les produits de fa çon à permettre la circula tion de l air froid L appareil ne fonc tionne pas L appareil est à l arrêt Mettez l appareil en mar che...

Страница 62: ... am poule s allume 7 2 Fermeture de la porte 1 Nettoyez les joints de la porte 2 Si nécessaire ajustez la porte Re portez vous au chapitre Installa tion 3 Si nécessaire remplacez les joints de porte défectueux Contactez vo tre service après vente 8 INSTALLATION AVERTISSEMENT Pour votre sécurité et le bon fonctionnement de l appareil veuillez lire attentivement les Consignes de sécurité avant d ins...

Страница 63: ... mise de niveau se fait à l aide d un ou de plusieurs pieds réglables à la base de l appareil AVERTISSEMENT L appareil doit pouvoir être dé branché à tout moment il est donc nécessaire que la prise reste accessible après l installa tion 8 3 Entretoises arrière 2 4 3 1 Vous trouverez deux entretoises dans le même sachet que la notice d utilisation Pour installer les entretoises procédez comme suit ...

Страница 64: ...e fabricant L appareil ne doit pas être raccordée à l aide d un prolongateur d une prise multiple ou d un raccordement multiple risque d incendie Vérifiez que la prise de terre est conforme aux règlements en vi gueur Notre responsabilité ne saurait être en gagée en cas d accidents ou d inci dents provoqués par une mise à la terre inexistante ou défectueuse 8 6 Réversibilité de la porte E F A B D C...

Страница 65: ...les du cache A sur le côté opposé Faites une dernière vérification pour vous assurer que Toutes les vis sont bien serrées Le joint magnétique adhère bien à l appareil La porte s ouvre et se ferme correc tement Si la température ambiante est basse par exemple en hiver il se peut que le joint n adhère pas parfaitement Dans ce cas attendez que le joint reprenne sa taille naturelle Si vous ne souhaite...

Страница 66: ...9 BRUITS L appareil émet certains bruits pendant son fonctionnement compresseur cir cuit frigorifique BRRR HISSS CLICK BLUBB CRACK SSSRRR OK CLICK CLICK BRRR BRRR BLUBB BLUBB 66 www electrolux com ...

Страница 67: ...HISSS HISSS SSSRRR SSSRRR CRACK CRACK FRANÇAIS 67 ...

Страница 68: ...ur l étiquette énergétique 11 EN MATIÈRE DE PROTECTION DE L ENVIRONNEMENT Recyclez les matériaux portant le symbole Déposez les emballages dans les conteneurs prévus à cet effet Contribuez à la protection de l environnement et à votre sécurité recyclez vos produits électriques et électroniques Ne jetez pas les appareils portant le symbole avec les ordures ménagères Emmenez un tel produit dans votr...

Страница 69: ...sse erzielen werden Willkommen bei Electrolux Besuchen Sie uns auf unserer Website um Anwendungshinweise Prospekte Fehlerbehebungs und Service Informationen zu erhalten www electrolux com Ihr erworbenes Produkt zu registrieren um den besten Service dafür zu gewährleisten www electrolux com productregistration Zubehör Verbrauchsmaterial und Original Ersatzteile für Ihr Gerät zu erwerben www electro...

Страница 70: ...von Kindern fern Ersti ckungsgefahr Ziehen Sie vor der Entsorgung des Gerätes den Netzstecker schneiden Sie das Netzkabel so nah wie mög lich am Gerät ab und entfernen Sie die Tür so dass spielende Kinder vor elektrischem Schlag geschützt sind und sich nicht in dem Gerät ein schließen können Wenn dieses Gerät mit magnetischer Türdichtung ein älteres Modell mit Schnappverschluss Türlasche an der Tü...

Страница 71: ...en die nur für Haushaltsgeräte geeignet sind Sie eignen sich nicht zur Raum beleuchtung 1 3 Täglicher Gebrauch Stellen Sie keine heißen Töpfe auf die Kunststoffteile des Gerätes Lagern Sie keine feuergefährlichen Gase oder Flüssigkeiten in dem Ge rät Explosionsgefahr Legen Sie Lebensmittel nicht direkt vor den Luftauslass in der Rück wand Wenn es ein No Frost Gerät ist Ein aufgetautes Produkt darf...

Страница 72: ...der Kochern installiert werden Vergewissern Sie sich dass der Netzstecker des Gerätes nach der In stallation frei zugänglich ist Wenn ein Wasseranschluss vorgese hen ist verbinden Sie das Gerät nur mit dem Trinkwasseranschluss 1 6 Kundendienst Sollte die Wartung des Gerätes elekt rische Arbeiten verlangen so dürfen diese nur von einem qualifizierten Elektriker oder einem Elektro Fach mann durchgef...

Страница 73: ...rierkorb 11 Typenschild 3 BETRIEB 3 1 Einschalten des Geräts Stecken Sie den Stecker in die Wands teckdose Drehen Sie den Temperaturregler im Uhrzeigersinn auf eine mittlere Einstel lung 3 2 Ausschalten des Geräts Drehen Sie den Temperaturregler zum Ausschalten des Geräts in die Position O 3 3 Temperaturregelung Die Temperatur wird automatisch gere gelt Bedienen Sie das Gerät wie folgt DEUTSCH 73 ...

Страница 74: ...lung nicht erforderlich Möchten Sie den Gefriervorgang be schleunigen drehen Sie bitte den Tem peraturregler auf eine höhere Einstel lung um die maximal mögliche Kühlung zu erreichen In diesem Fall kann die Tempe ratur im Kühlschrank unter 0 C fallen Ist dies der Fall drehen Sie den Temperaturregler auf ei ne wärmere Einstellung Legen Sie die einzufrierenden frischen Lebensmittel in das obere Fach...

Страница 75: ...ige OK anzeigt Wird OK nicht angezeigt stellen Sie eine niedrigere Temperatur ein und warten Sie 12 Stunden bevor Sie die Temperaturanzeige erneut prüfen Nach dem Einlegen von frischen Le bensmitteln oder nach häufigem Öffnen der Tür über einen längeren Zeitraum ist es normal dass die Anzeige OK erlischt 4 5 Positionieren der Türablagen 1 2 Die Türablagen können in unterschiedli cher Höhe position...

Страница 76: ... Flaschenhalter kön nen Flaschen mit der Öffnung nach vorn gelagert werden Legen Sie nur verschlossene Flaschen in den Flaschenhalter wenn er sich in horizontaler Stel lung befindet Sie können den Flaschenhalter nach oben kippen damit dort auch bereits geöffnete Flaschen gelagert werden können Ziehen Sie dazu den Flaschen halter nach oben und lassen Sie ihn in die nächsthöhere Stellung einrasten 4...

Страница 77: ...ehnung kann ein plötzliches Krachen verursachen Das ist eine natürliche und nicht gefährli che physikalische Erscheinung Das ist normal Beim Ein oder Ausschalten des Kompressors ist ein leises Klicken des Temperaturreglers zu hören Das ist normal 5 2 Energiespartipps Öffnen Sie die Tür nicht zu häufig und lassen Sie diese nicht länger of fen als unbedingt notwendig Wenn die Umgebungstemperatur hoc...

Страница 78: ... sehr guter Qualität ein teilen Sie die Lebensmittel in kleinere Portionen ein damit diese schnell und vollständig gefrieren und Sie später nur die Menge auftauen müs sen die Sie gerade benötigen die einzufrierenden Lebensmittelporti onen sollten stets luftdicht in Alumini umfolie oder in lebensmittelechte Ge frierbeutel verpackt werden um so wenig Luft wie möglich in der Verpa ckung zu haben acht...

Страница 79: ...kontrollieren Sie dass diese sau ber und frei von Verunreinigungen sind Spülen und trocknen Sie diese sorg fältig ab Ziehen Sie nicht an Leitungen und oder Kabeln im Innern des Kühlschranks und achten Sie darauf diese nicht zu verschie ben oder zu beschädigen Benutzen Sie zur Reinigung des Innenraums keinesfalls Putzmit tel Scheuerpulver stark parfü mierte Reinigungsmittel oder Wachspolituren da d...

Страница 80: ...er Auffang rinne an der Kühlraumrückwand damit das Tauwasser nicht überfließt und auf die gelagerten Lebensmittel tropft 6 4 Abtauen des Gefrierschranks Auf den Ablagen des Gefrierschranks und im Innern des oberen Fachs wird sich stets etwas Reif bilden Tauen Sie den Gefrierschrank ab wenn die Reifschicht eine Stärke von etwa 3 bis 5 mm erreicht hat Stellen Sie den Temperaturreg ler bitte 12 Stund...

Страница 81: ...Entfernen Sie be reits während des Abtauprozes ses vorsichtig Eisstücke die sich lösen lassen 4 Ist das Geräteinnere vollständig ab getaut trocken Sie die nassen Oberflächen gründlich ab und be wahren Sie den Kunststoffschaber für eine spätere Verwendung auf 5 Schalten Sie das Gerät ein 6 Nachdem das Gerät zwei bis drei Stunden in Betrieb ist können Sie die ausgelagerten Lebensmittel wieder in den...

Страница 82: ...häufig geöffnet Lassen Sie die Tür nicht länger als unbedingt erfor derlich offen Die Produkttemperatur ist zu hoch Lassen Sie die Produkttem peratur auf Raumtempera tur abkühlen bevor Sie die Produkte einlagern Die Raumtemperatur ist zu hoch Senken Sie die Raumtem peratur Wasser fließt auf die hintere Platte des Kühlschranks Beim automatischen Ab tauen schmilzt der Frost auf der hinteren Platte D...

Страница 83: ...h Es zirkuliert keine Kaltluft im Innern des Gerätes Stellen Sie sicher dass die Kaltluft im Gerät zirkuliert Die Temperatur im Gefrierschrank ist zu hoch Die einzufrierenden Pack ungen liegen zu dicht anei nander Stellen Sie sicher dass die Kaltluft im Gerät zirkuliert und die Produkte dies nicht verhindern Das Gerät funktio niert nicht Das Gerät ist abgeschal tet Schalten Sie das Gerät ein Der N...

Страница 84: ...tet wird 7 2 Schließen der Tür 1 Reinigen Sie die Türdichtungen 2 Stellen Sie die Tür nach Bedarf ein Siehe hierzu Montage 3 Ersetzen Sie die defekten Türdich tungen falls erforderlich Wenden Sie sich hierzu an den Kunden dienst 8 MONTAGE WARNUNG Lesen Sie bitte die Sicherheits hinweise sorgfältig vor der Auf stellung des Geräts durch um Gefahren für Sie selbst zu ver meiden und einen korrekten Be...

Страница 85: ...räts unter einem Hängeschrank nach Möglichkeit vermieden werden Die ordnungsgemä ße waagrechte Ausrichtung des Gerä tes kann mit Hilfe eines oder mehrerer verstellbarer Füße am Sockel des Geh äuses erfolgen WARNUNG Es muss möglich sein das Ge rät von der Hauptstromversor gung zu trennen daher sollte der Stecker nach der Installation leicht zugänglich sein 8 3 Hintere Distanzstücke 2 4 3 1 Die beid...

Страница 86: ...n Anschlusswerten über einstimmen Das Gerät muss geerdet sein Zu die sem Zweck ist die Netzkabelsteckdose mit einem Schutzkontakt ausgestattet Falls die Steckdose Ihres Hausan schlusses nicht geerdet sein sollte las sen Sie das Gerät bitte gemäß den gel tenden Vorschriften erden und fragen Sie dafür einen qualifizierten Elektriker Der Hersteller übernimmt keinerlei Haf tung für Schäden oder Verlet...

Страница 87: ...gegangen werden Öffnen Sie die Türen Lösen Sie das mittlere Scharnier B Entfernen Sie das Kunststoff Distanzstück A Entfernen Sie das Distanzstück F und befestigen Sie es an der anderen Seite des Scharnierhaltestifts E Entfernen Sie die Türen Entfernen Sie den linken Stift des mittleren Scharniers C D und befes tigen Sie ihn an der anderen Seite Setzen Sie den Stift des mittleren Scharniers E in d...

Страница 88: ...ite wieder an Führen Sie eine Endkontrolle durch um sicherzustellen dass Alle Schrauben fest angezogen sind Der magnetische Dichtungsstreifen am Gerät anliegt Die Tür ordnungsgemäß öffnet und schließt Bei niedrigen Umgebungstemperaturen z B im Winter kann es vorkommen dass die Türdichtung nicht richtig am Gerät anliegt Warten Sie in diesem Fall ab bis sich die Dichtung allmählich an passt Wenden S...

Страница 89: ...BRRR HISSS CLICK BLUBB CRACK SSSRRR OK CLICK CLICK BRRR BRRR BLUBB BLUBB DEUTSCH 89 ...

Страница 90: ...HISSS HISSS SSSRRR SSSRRR CRACK CRACK 10 TECHNISCHE DATEN Abmessungen Höhe 1850 mm Breite 595 mm Tiefe 658 mm Lagerzeit bei Störung 20 Std Spannung 230 240 V Frequenz 50 Hz 90 www electrolux com ...

Страница 91: ...ln Sie Materialien mit dem Symbol Entsorgen Sie die Verpackung in den entsprechenden Recyclingbehältern Recyceln Sie zum Umwelt und Gesundheitsschutz elektrische und elektronische Geräte Entsorgen Sie Geräte mit diesem Symbol nicht mit dem Hausmüll Bringen Sie das Gerät zu Ihrer örtlichen Sammelstelle oder wenden Sie sich an Ihr Gemeindeamt DEUTSCH 91 ...

Страница 92: ...www electrolux com shop 280150306 A 112012 ...

Отзывы: