background image

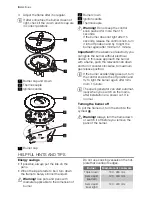
Burner

Diameters of cookware

Semi-rapid

(front right)

120 - 220 mm

Auxiliary

80 - 180 mm

Warning!

 Pots must not enter the

control zone.

Warning!

 Make sure pot handles do

not protrude over the front edge of the
cooktop and that pots are centrally
positioned on the rings in order to
achieve maximum stability and to
obtain lower gas consumption.

Do not place unstable or deformed pots on
the rings to prevent from spill and injury.

Warning!

 Flame diffuser are not

recommended.

Do not simmer for a long time with cast
iron pans and potstones.

Warning!

 Do not put the aluminium foil

on the hob top to keep the surface
clean during the cooking

Warning!

 Use cast iron pots and pans

only on the Triple Crown and rear
burners.

CARE AND CLEANING

Warning!

 Switch the appliance off and

let it cool down before you clean it.
Disconnect the appliance from the
electrical supply, before carrying out
any cleaning or maintenance work.

Warning!

 For safety reasons, do not

clean the appliance with steam
cleaners or high-pressure cleaners.

Warning!

 Do not use abrasive

cleaners, steel wool pads or acids, they
can cause damage to the appliance.

Scratches or dark stains on the glass
have no effect on how the appliance
operates.

• You can remove the pan supports to

easily clean the hob.

• To clean the enamelled parts, cap and

crown, wash it with warm soapy water
and dry it carefully before you put them
back.

• Stainless steel parts wash with water,

and then dry with a soft cloth.

• The pan supports 

are not

 dishwasher

proof; they must be washed 

by hand

.

• When you wash the pan supports by

hand, take care when you dry them as
the enamelling process occasionally
leaves rough edges. If necessary, remove
stubborn stains using a paste cleaner.

• Make sure you position the pan supports

correctly after cleaning.

• To make burners work correctly, make

sure that the arms of the pan supports
are in the centre of the burner.

Be very careful when you replace the
pan supports to prevent the hob top
from damage.

After cleaning, dry the appliance with a soft
cloth.

Removing the dirt:
1. –

Remove immediately:

 melting plas-

tic, plastic foil, and food containing
sugar.

Stop the appliance and let it cool
down

 before you clean: limescale

rings, water rings, fat stains, shiny
metallic discolorations. Use a special
cleaner applicable for surface of hob.

2. Clean the appliance with a damp cloth

and some detergent.

3. At the end 

rub the appliance dry

with a clean cloth.

Cleaning of the spark plug

This feature is obtained through a ceramic
ignition candle with a metal electrode. Keep
these components well clean to prevent dif-
ficult lighting and check that the burner
crown holes are not obstructed.

Periodic maintenance

Periodically speak your local Service Force
Centre to check the conditions of the gas
supply pipe and the pressure adjuster, if fit-
ted.

electrolux 

9

Содержание EHT70830X

Страница 1: ...user manual notice d utilisation Gas hob Table de cuisson gaz EHT70830X FR ...

Страница 2: ...ing stickers and the protective layer of the stainless steel hob panel if present from the appliance be fore first use Do not remove the rating plate It can invalidate the guarantee Set the cooking zones to the off posi tion after each use Burners and accessible part become hot during and after use Do not put cutlery or saucepan lids on the cooking surface Cookware and its contents can tip over Th...

Страница 3: ...l directly below the appliance Prevent damage of the cut surfaces of the worktop against moisture with a cor rect sealant Seal the appliance to the worktop with no space left with a correct sealant Prevent damage to the bottom of the ap pliance from steam and moisture e g from a dishwasher or oven Do not install the appliance adjacent to doors and below windows Hot cook ware can be hit off the hob...

Страница 4: ...ON Warning The following instructions about installation connection and maintenance must be carried out by qualified personnel in compliance with standards and local regulations in force Gas Connection Choose fixed connections or use a flexible pipe in stainless steel in compliance with the regulation in force If you use flexible metallic pipes be careful they do not come in touch with mobile part...

Страница 5: ...correct Use a soapy solution not a flame Injectors replacement 1 Remove the pan supports 2 Remove the caps and crowns of the burner 3 With a socket spanner 7 remove the in jectors and replace them with the ones which are necessary for the type of gas you use see table in Technical Data section 4 Assemble the parts follow the same procedure backwards 5 Replace the rating plate it is near the gas su...

Страница 6: ...ets to disconnect the appli ance from the mains at all poles with a contact opening width of minimum 3 mm eg automatic line protecting cut out earth leakage trips or fuse None of a parts of the connection cable can not get a temperature 90 C The blue neutral cable must be connected to the terminal block label with N The brown or black phase cable fitted in the terminal block contact marked with L ...

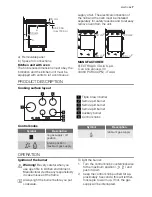
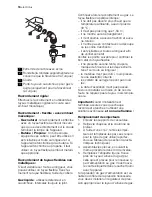
Страница 7: ... 3 4 5 6 1 Triple Crown burner 2 Semi rapid burner 3 Semi rapid burner 4 Semi rapid burner 5 Auxiliary burner 6 Control knobs Control knobs Symbol Description no gas supply off position ignition position maximum gas supply Symbol Description minimum gas supply OPERATION Ignition of the burner Warning Be very careful when you use open fire in kitchen environment Manufacturer decline any responsibil...

Страница 8: ... to maximum gas release position If the burner accidentally goes out turn the control knob to the off position and try to light the burner again after mini mum 1 minute The spark generator can start automat ically when you switch on the mains after installation or a power cut It is normal Turning the burner off To put the flame out turn the knob to the symbol Warning Always turn the flame down or ...

Страница 9: ...h it with warm soapy water and dry it carefully before you put them back Stainless steel parts wash with water and then dry with a soft cloth The pan supports are not dishwasher proof they must be washed by hand When you wash the pan supports by hand take care when you dry them as the enamelling process occasionally leaves rough edges If necessary remove stubborn stains using a paste cleaner Make ...

Страница 10: ... a fault first try to find a solution to the problem yourself If you cannot find a solution to the problem yourself speak your dealer or the local Service Force Centre If you operated the appliance incorrect ly or the installation was not carried out by a registered engineer the visit from the customer service technician or dealer may not take place free of charge even during the warranty peri od ...

Страница 11: ...TURAL GAS G20 G25 2E 20 25 mbar LPG Butane Propane 3 28 30 37 mbar TOWN GAS G130 1c 8 mbar kW kW inj 1 100 mm G20 20 mbar G25 25 mbar inj 1 100 mm G30 28 30 mbar G31 37 mbar inj 1 100 mm m h m h m h g h g h Auxili ary 1 0 0 33 70 0 095 0 111 50 73 71 127 0 140 Semi rapid 1 9 0 45 96 0 181 0 210 71 138 136 195 0 266 Triple Crown 3 8 1 4 146 0 362 0 421 98 276 271 348 0 517 ENVIRONMENT CONCERNS The ...

Страница 12: ...e shop where you purchased the product Packaging material The packaging materials are friendly to the environment and can be recycled The plastic components are identified by marking PE PS etc Discard the packaging materials as household waste at the waste disposal facilities in your municipality 12 electrolux ...

Страница 13: ...un emballage à la portée des enfants Ils risquent en effet de s étouffer ou de se blesser Ne laissez pas les enfants s approcher de l appareil pendant ou après son utili sation et cela jusqu à ce qu il soit froid Application Retirez tous les emballages les étiquet tes et le film protecteur du panneau de la table de cuisson en acier inoxydable le cas échéant avant de l utiliser pour la première foi...

Страница 14: ...bles qu après les avoir installés dans des meubles d encastrement appropriés et qui répondent aux normes en vigueur N installez pas la table de cuisson au dessus d un appareil électroménager si celui ci ne l a pas formellement prévu Installez l appareil uniquement sur un plan de travail dont la surface est plane Ne modifiez pas ou n essayez pas de modifier les caractéristiques de cet appa reil Vou...

Страница 15: ... d un interrupteur à coupure omnipolaire ayant une distance d ouverture des contacts d au moins 3 mm Si la patte de scellement se trouve à proximité du répartiteur vérifiez toujours que le câble d alimentation n entre pas en contact avec le bord de la patte Les dispositifs d isolement comprennent des disjoncteurs des fusibles les fusibles à visser doivent être retirés du support des disjoncteurs d...

Страница 16: ... soumis à aucune traction et aucu ne torsion il n entre pas en contact avec la découpe ou les coins tranchants il est visitable sur toute sa longueur afin de vérifier son état Vérifiez les points suivants pour contrôler le bon état du tuyau flexible il ne présente aucune fente coupure marque de brûlure sur les deux extrémi tés et sur toute sa longueur le matériau n est pas durci mais présen te une...

Страница 17: ...tre magasin vendeur Utilisez toujours une prise antichoc cor rectement installée Assurez vous que la prise principale est accessible après installation Ne tirez jamais sur le câble d alimentation électrique pour débrancher l appareil Ti rez toujours sur la prise de courant L appareil ne doit pas être raccordé à l aide d un prolongateur d un raccorde ment multiple ou d une prise multiple ris que d ...

Страница 18: ... b a a Panneau amovible b Espace pour les branchements Au dessus d un four Les dimensions de la niche d encastrement doivent être conformes aux indications et l élément de cuisine doit être équipé d aéra tions pour assurer un apport d air continu Les raccordements électriques de la table de cuisson et du four doivent être installés séparément pour des raisons de sécurité et pour permettre un retra...

Страница 19: ... fabricant décline toute responsabilité en cas de mauvais usage de la flamme Allumez toujours le brûleur avant de poser les plats Pour allumer le brûleur 1 Tournez le sélecteur dans le sens inver se des aiguilles d une montre jusqu à sa position maximale puis ap puyer dessus pour l enfoncer 2 Maintenez la commande appuyée pen dant environ 5 secondes cela permet au thermocouple de se réchauffer Si ...

Страница 20: ...indre les brûleurs Tournez la manette jusqu au symbole Avertissement Baissez ou éteignez toujours la flamme d un brûleur avant de retirer un récipient CONSEILS UTILES Économies d énergie Si possible couvrez les casseroles Lorsque le liquide commence à bouillir baissez le feu pour laisser légèrement fré mir le liquide Avertissement Utilisez des casseroles et poêles dont le fond correspond à la dime...

Страница 21: ...selle mais doi vent être lavés à la main Lorsque vous lavez les supports de cas seroles à la main faites attention au mo ment de les sécher car l émaillage produit parfois des aspérités sur les bords Si né cessaire enlevez les taches rebelles à l aide d une crème détergente Après avoir lavé les supports de cassero les veillez à les remettre en place correc tement Pour que les brûleurs fonctionnent...

Страница 22: ...anomalies de fonctionnement peuvent dépendre d opérations d entretien non correctes ou d oubli et peuvent être ré solues à l aide des indications fournies dans le tableau sans faire appel à un service après vente Si l anomalie persiste contac tez votre magasin vendeur ou votre service après vente Si un problème résulte d une mauvaise utilisation ou si l installation de l appareil n a pas été réali...

Страница 23: ... 28 30 mbar 763 g h G31 3 37 mbar 750 g h G130 1c 8 mbar 10 4 kW Alimentation électri que 230 V 50 Hz Catégorie III1c2E 3 Raccordement au gaz G 1 2 Alimentation en gaz G20 G25 2E 20 25 mbar Classe de l appareil 3 Diamètres de by pass Brûleur Ø by pass en 1 100 mm Auxiliaire 28 Semi rapide 32 Triple couronne 56 Brûleurs à gaz BRÛ LEUR PUIS SANCE NOR MALE PUIS SAN CE RÉ DUI TE PUISSANCE NORMALE GAZ ...

Страница 24: ... l environnement et notre sécurité s assurant ainsi que les déchets seront traités dans des conditions optimum Pour obtenir plus de détails sur le recyclage de ce produit veuillez prendre contact avec les services de votre commune ou le magasin où vous avez effectué l achat Emballage Tous les matériaux d emballage sont écologiques et recyclables Les com posants en plastique sont identifiables grâc...

Страница 25: ...electrolux 25 ...

Страница 26: ...26 electrolux ...

Страница 27: ...electrolux 27 ...

Страница 28: ...397201301 B 082011 www electrolux com shop ...

Отзывы: