background image

electrolux


11

Periodic maintenance

Periodically ask your local Service Centre to check the conditions of the gas supply pipe

and the pressure adjuster, if fitted.

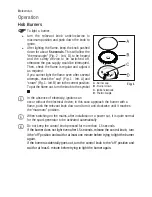
Ignition electrode

The electric ignition is obtained through a ceramic "electrode" and a metal electrode

(Fig. 1 - letter C). Keep these components well clean, to avoid difficult lighting, and check

that the burner crown holes are not obstructed.

Do not apply any cleaning agents to hot cooking zones. Ensure any residues are wiped off before the
cooking zones are used again.

If scratches or cracks are noticed, disconnect the appliance from the

electrical supply to avoid the risk of electric shock and call your nearest

Service Force Centre.

Keep all objects and materials which can melt away from the cooking surface, e.g. plastics,
aluminium foil.
Care should be taken when preparing food or drinks containing sugar. If anything of this nature
accidentally comes into contact with the ceramic surface it must be scraped off immediately  while
stlll hot and wiped away to avoid damage to the surface.

The burners

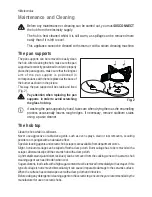
The burner caps and crowns can be removed for cleaning.

Wash the burners taps and crowns using hot soapy water, and remove marks with a mild

paste cleaner. A well moistened soap impregnated steel wool pad can be used with

caution, if the marks are particularly difficult to remove.

After cleaning, be sure to wipe dry with a soft cloth.

Содержание EHT6432

Страница 1: ...AUS ERFAHRUNG GUT Gas hob EHT6432 user manual GB ...

Страница 2: ...2 electrolux ...

Страница 3: ...future The Electrolux ambition is to offer a wide variety of quality products that make your life more comfortable You find some examples on the cover in this manual Please take a few minutes to study this manual so that you can take advantage of the benefits of your new machine We promise that it will provide a superior User Experience delivering Ease of Mind Good luck ...

Страница 4: ...nmental Information U Contents Instructions for the User Important Safety Information 5 Description of the Hob 7 Operation 8 Maintenance and Cleaning 10 Something Not Working 12 Service and original spare parts 29 Standard Guarantee Conditions 30 European Guarantee 32 Instructions for the Installer Engineers Technical Data 13 Gas Connection 17 Conversion from Natural Gas to LPG 19 Electrical Conne...

Страница 5: ...hfromtheheatedpartsofthisappliance Iftheapplianceisoutoforder disconnectitfromtheelectricsupply Child Safety Thisapplianceisnotintendedforusebychildrenorotherpersonswhosephysical sensoryormental capabilities or lack of experience and knowledge prevents them from using the appliance safely withoutsupervisionorinstructionbyaresponsiblepersontoensurethattheycanusetheappliance safely Thisappliancehasb...

Страница 6: ...bleisinperfectconditions Otherwise contactyourdealerbeforeproceedingwiththeinstallation Disconnecttheappliancefromtheelectricalsupply beforecarryingoutanycleaningormanteinance work Thisappliancecannotbecleanedwith steamorwithasteamcleaningmachine The residual heat indicator comes on when the cooking zone is switched on Children should be keptawayuntilitswitchesoff The manufacturer disclaims any re...

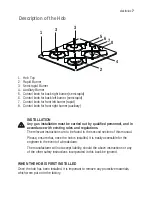
Страница 7: ... accept liability should the above instructions or any of the other safety instructions incorporated in this book be ignored WHEN THE HOB IS FIRST INSTALLED Once the hob has been installed it is important to remove any protective materials which were put on in the factory 1 Hob Top 2 Rapid Burner 3 Semi rapid Burner 4 Auxiliary Burner 5 Control knob for back right burner semi rapid 6 Control knob ...

Страница 8: ...sence of electricity ignition can occur without the electrical device in this case approach the burner with a flame push the relevant knob down and turn it anti clockwise until it reaches the maximum position When switching on the mains after installation or a power cut it is quite normal for the spark generator to be activated automatically Fig 1 A Burner cap B Burner crown C Ignitionelectrode D ...

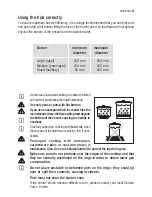
Страница 9: ...re pans or cast iron plates is inadvisable Also do not use aluminium foil to protect the top during use Make sure pots do not protrude over the edges of the cooktop and that they are centrally positioned on the rings in order to obtain lower gas consumption Do not place unstable or deformed pots on the rings they could tip over or spill their contents causing accidents Pots must not enter the cont...

Страница 10: ...ing process occasionally leaves rough edges If necessary remove stubborn stains using a paste cleaner The hob top Clean the hob while it is still warm Never use aggressive or abrasive agents such as oven sprays stain or rust removers scouring powders or sponges with an abrasive effect Special cleaning agents and ceramic hob scrapers are available from department stores Slight non burnt soilage can...

Страница 11: ...liance from the electrical supply to avoid the risk of electric shock and call your nearest Service Force Centre Keep all objects and materials which can melt away from the cooking surface e g plastics aluminiumfoil Careshouldbetakenwhenpreparingfoodordrinkscontainingsugar Ifanythingofthisnature accidentallycomesintocontactwiththeceramicsurfaceitmustbescrapedoffimmediately while stlll hot and wipe...

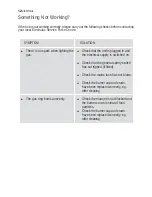
Страница 12: ...urns unevenly SOLUTION Check that the unit is plugged in and the electrical supply is switched on Check that the general safety switch has not tripped if fitted Check the mains fuse has not blown Check the burner cap and crown have been replaced correctly e g after cleaning Check the main jet is not blocked and the burner crown is clear of food particles Check the burner cap and crown have been re...

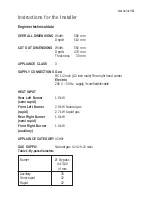
Страница 13: ...LASS 3 SUPPLY CONNECTIONS Gas RC 1 2 inch 1 2 inch male Rear right hand corner Electric 230 V 50 Hz supply 3 core flexible cable HEAT INPUT Rear Left Burner 1 9 kW semi rapid Front Left Burner 2 9 kW Natural gas rapid 2 7 kW Liquid gas Rear Right Burner 1 9 kW semi rapid Front Right Burner 1 0 kW auxiliary APPLIANCE CATEGORY II2H3 GAS SUPPLY Natural gas G20 2H 20 mbar Instructions for the Installe...

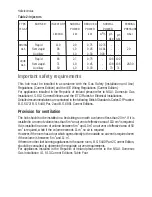
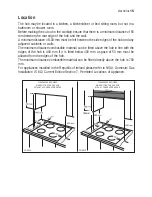
Страница 14: ...ained in the following British Standards Codes Of Practice B S 6172 B S 5440 Par 2 and B S 6891 Current Editions Provision for ventilation The hob should not be installed in a bed sitting room with a volume of less than 20 m3 If it is installed in a room of volume less than 5 m3 an air vent of effective area of 110 cm2 is required If it is installed in a room of volume between 5 m3 and 10 m3 an ai...

Страница 15: ... combustible material can be fitted above the hob in line with the edges of the hob is 400 mm If it is fitted below 400 mm a space of 50 mm must be allowed from the edges of the hob The minimum distance combustible material can be fitted directly above the hob is 700 mm For appliances installed in the Republic of Ireland please refer to NSAI Domestic Gas Installation I S 813 Current Edition Sectio...

Страница 16: ...nce is required to carry out the work ensure all the necessaryprecautionsarefollowed z Thesidewallsoftheunitinwhichthehobisgoingtobeinstalled mustnotexceed the height of the working top z Avoidinstallingtheapplianceintheproximityofinflammablematerials e g curtains teatowelsetc THE MANUFACTURER WILL NOT ACCEPT LIABILITY SHOULDANY OF THE OTHER SAFETY INSTRUCTIONS INCORPORATED IN THIS BOOKLET OR THE ...

Страница 17: ...he diagram Screw the parts together without using excessive force A End of shaft with nut B Washer C Elbow FO 0264 It is important to install the elbow correctly with the shoulder on the end of the thread fitted to the hob connecting pipe Failure to ensure the correct assembly will cause leakage of gas Gas Connection Connection to the gas supply should be with either rigid or semi rigid pipe i e s...

Страница 18: ...nob 3 To adjust use a thin bladed screwdriverandturntheadjustment screw it can be located down the centreofthegastapshaftoronthe tap body according to the different models see Fig 3 until the flame is steady and does not extinguish when the knob is turned from MIN to MAX Repeat this procedure for allburners Pressure Testing 1 Removelefthandpansupportandfrontleftburnercapandcrown 2 Fitmanometertube...

Страница 19: ...andthegasrate isadjustedtosuit Method 1 Ensurethatthegastapsareinthe OFF position 2 Isolatethehobfromtheelectricitysupply 3 Remove all pan supports burner caps rings crowns and control knobs 4 With the aid of a 7mm box spanner the burner injectors can then be unscrewed and replacedbytheappropriateLPGinjectors To adjust the gas rate With the aid of a thin bladed screwdriver completely tighten down ...

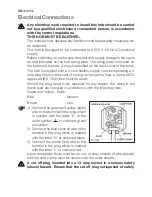
Страница 20: ...e event of having to change the fuse a 3 amp ASTA approved BS 1362 fuse must be used Should the plug need to be replaced for any reason the wires in the mains lead are coloured in accordance with the following code Green and Yellow Earth Blue Neutral Brown Live 1 Connect the green and yellow earth wire to the terminal in the plug which is marked with the letter E or the earth symbol or coloured gr...

Страница 21: ... a type suitable for the required load in compliance with the current electric regulations The switch must not break the yellow and green earth cable at any point Ensure that the hob supply cord does not come into contact with surfaces with temperatures higher than 50 deg C The replacement of electric cable must be carried out exclusivelybytheserviceforcecentreorbypersonnelwith similarcompetencies...

Страница 22: ...22 electrolux Wiring diagram 1 TAPS IGNITOR SWITCHES 2 IGNITOR UNIT ...

Страница 23: ...tricity supply should now be satisfactory Carry out D Resistance to Earth check Inlet wiring faulty Rectify any fault Isolate appliance and carry out B Insulation check Rectify any fault includingreplacing fuses as necessary NO YES SOCKET face view PLUG with cover removed Earth Wire Green Yellow Neutral Wire Blue FUSE E N L Brown Blue Green Yellow Green Yellow Brown Blue NO YES ...

Страница 24: ...ter set on Ω Ohms x 1 scale TestleadsfromLtoNinapplianceterminalblock Ifmeterreads 0 thenthereisashort circuit b meter set on Ω Ohm x 100 scale RepeattestwithleadsfromLtoE Ifmeterreadslessthan infinity thereisafault NOTE Shoulditbefoundthatthefusehasfailedbutnofaultisindicated adetailedcontinuitycheck i e bydisconnectingandcheckingeachcomponent isrequiredtotracethefaultycomponent Itispossiblethata...

Страница 25: ...trode Check by pass simmer adjusted Light burner manually Check continuity from N on the mains connector block and O on theignitorunit Check continuity from L on the mains connector block and the taps ignition switches Check continuity from ignition switches connector to ignitor unit Check continuity from the tip of each electrode to the terminals 1 to 4 on the ignitor unit Check for breaks in the...

Страница 26: ...b seepingintothecabinetbelow 1 Removethepansupports theburnerscaps and crowns and turn the hob upside down taking care the ignition candles are not damagedinthisoperation 2 Placetherelevantsealingallaroundtheglass topedge takingcarethatthesealingsmeet withoutoverlapping Fig 6 3 Placethehobinthecutout takingcareofits centring 4 Fixthehobwiththerelevantscrewssupplied withtheinjectorskit Fig 7 A Seal...

Страница 27: ...movable to allow an easy access if a technical assistance intervention is needed Kitchen unit with oven ThehobrecessdimensionsmustcomplytheindicationgiveninFigs 5 andmustbeprovidedwith bracketstoallowacontinuoussupplyofair Toavoidoverhating thebuildinginshouldbecarriedout as shown in Figs 9 and 10 The hob s electric connection and the oven s one must be carried out separately both for safety reaso...

Страница 28: ...28 electrolux Fig 9 Fig 10 FO 0938 FO 0939 Cut Out Size The dimensions of the cut out are given in the diagram 550 4 7 0 30 ...

Страница 29: ...son we recommend that for any problem you contact the dealer who sold it to you or our nearest authorized Service Centre specifying the nature of the problem the appliance model Mod the product number Prod No and the serial number Ser No marked on the identification plate Original spareparts certified by the product manufacturer and carrying this symbol are only available at our Service Centre and...

Страница 30: ...cturer s instructions The appliance has not been serviced maintained repaired taken apart or tampered with by any person not authorised by us Electrolux Service Force Centre must undertake all service work under this guarantee Any appliance or defective part replaced shall become the Company s property This guarantee is in addition to your statutory and other legal rights Exclusions Damage or call...

Страница 31: ... appliance requiring service or if you wish to purchase spare parts please contact your local Service Force Centre by telephoning 0870 5 929 929 Your telephone call will be automatically routed to the Service Force Centre co vering your postcode area For the address of your local Service Force Centre and further information about Service Force please visit the website at www serviceforce co uk Bef...

Страница 32: ...uarantee is for the same period and to the same extent for labour and parts as exists in your new country of residence for this particular model or range of appliances The appliance guarantee is personal to the original purchaser of the appliance and cannot be transferred to another user The appliance is installed and used in accordance with instructions issued by Electrolux and is only used withi...

Страница 33: ...electrolux 33 ...

Страница 34: ......

Страница 35: ......

Страница 36: ...35694 9401 04 07 R 0 www electrolux co uk ...

Отзывы: