background image

Installation

•  An authorised person must install this appliance and 

MUST provide a certificate of compliance. 

This 

certificate should be retained along with purchase 
information.

•  Before using the appliance, ensure that all packing 

materials are removed from the appliance. 

•  In order to avoid any potential hazard, the installation 

instructions in this booklet, and any labels on the 
appliance must be followed.

•  Ensure that all specified vents, openings and air spaces 

are not blocked.

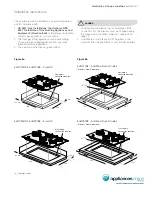
•  Where the appliance is built into a benchtop, the 

benchtop material must be capable of withstanding 85°C.

•  Ensure that the duplicate rating label (in the instruction 

pack) is attached to a readily accessible adjacent surface, 
so that the cooktop can be easily identified in the case of  
a service call.

Servicing

•  Servicing MUST only be carried out by authorised 

personnel.

•  To maintain safe operation, it is recommended that the 

product be inspected every five years by an authorised 
service person.

•  If the supply cord is damaged, it must be replaced by an 

authorised service person in order to avoid a hazard.

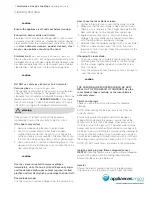
Cleaning

•  Always ensure the appliance is turned off 


before cleaning.

•  This appliance contains aluminium fittings. 


Do not use caustic based cleaners.

•  Do not use steam cleaners as this may cause moisture 

build up on electrical components.

•  Always clean the appliance immediately after 


any food spillage.

•  Do not place bodies and caps in a dishwasher.

•  Do not place burners in a dishwasher.

Controls 

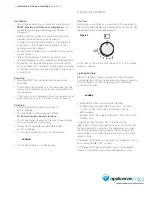
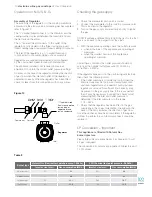
Each burner is controlled by a control knob. The markings on 

the control panel indicate which burner the knob controls, and 
the setting for that burner (see Figure 4).

NOTE! Gas controls turn anticlockwise from ‘OFF’ and have 
limited movement.

Lighting burners

Electronic ignition: These cooktops are fitted with mains 

powered ignition. When the appliance has been connected 
and the power is on, depressing any knob will release 
sparks to all burners.

•  Keep hands clear of burners when lighting.
•  If burner does not light within 5 seconds, turn knob 


to ‘OFF’ position, allow gas to disperse, then try  
lighting again.

•  Burners MUST be operated between ‘HIGH’ and ‘LOW’ 

settings only.

To light a burner, the knob must be turned to the  
 

‘HIGH’ position, then pushed down as far as possible 

for approximately 5 seconds. If the flame goes out when 
the knob is released simply depress the knob again, this 
time holding it down with slightly more force for the same 
length of time. 
The height of the flame can be varied by turning the control 

knob toward the    ‘LOW’ position.

In the absence of electrical power, carry out the ignition 
directly to the burner with a hand held ignition source.

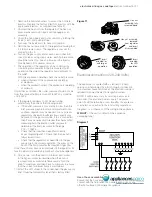
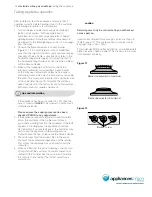
Figure 4

electrolux e:line gas cooktops 

installation

Using your cooktop


    caution


    caution

Содержание EHGC77BS

Страница 1: ...user manual gas cooktops EHGC77BS EHGC97BS EHGF77BX EHGF97BX ...

Страница 2: ...suse and hazards For future reference please store this booklet in a safe place Contents General warnings 1 Using your cooktop 2 Burners 3 Cleaning and care 4 Troubleshooting 5 Technical data 6 Installation instructions 7 Installation procedure 8 Gas connection 9 LP conversion 10 Electrical connection 11 Testing appliance operation 12 Warranty 13 Information on disposal for users Most of the packa...

Страница 3: ...heat cold and rapid temperature changes but is vulnerable to impact A pepper mill falling on the hob could crack it Never stand or put heavy loads on the hob or use as a storage space 8 enamelled burner skirts 1 removable cast iron trivet side 2 removable cast iron trivet top 3 removable wok trivet 4 burners each unit has a small medium large and wok burner 5 control knob 6 stainless steel hob 7 s...

Страница 4: ... hob is resistant to heat cold and rapid temperature changes but is vulnerable to impact A pepper mill falling on the hob could crack it Never stand or put heavy loads on the hob or use as a storage space 8 enamelled burner skirts 1 removable cast iron trivet side 2 removable cast iron trivet top 3 removable wok trivet 4 burners each unit has a small medium 2 per large and wok burner 5 control kno...

Страница 5: ...idents Do not modify this appliance Description of the burner General Warnings electrolux e line gas cooktops safety instructions 1 Please read the user manual carefully and store in a handy place for later reference Pass the user manual on to possible new owners of the cooktop The symbols you will see in this booklet have these meanings warning This symbol indicates information concerning your pe...

Страница 6: ...this may cause moisture build up on electrical components Always clean the appliance immediately after any food spillage Do not place bodies and caps in a dishwasher Do not place burners in a dishwasher Controls Each burner is controlled by a control knob The markings on the control panel indicate which burner the knob controls and the setting for that burner see Figure 4 NOTE Gas controls turn an...

Страница 7: ...ans All common pots and pans aluminium stainless steel cast iron ceramic etc may be used on your new gas cooktop Ensure that the pots or pans are steady and have flat bases to avoid dangerous spill over of hot liquids and wasted energy Never use asbestos mats wire mats or grids aluminium foil as it can lead to overheating cracked enamel or broken glass The warranty will be void if these items are ...

Страница 8: ...tion How to use the razor blade scraper 1 Pull back the protective cover until the blade is visible 2 Make sure that the razor blade is clean and not worn There is a risk otherwise that it might damage the hob New razor blades can be bought from pharmacies 3 Angle scraper at approx 45 and scrape away the spillage The razor blade can be pressed down hard onto the hob without causing any damage 4 Ca...

Страница 9: ...ontrol knob is activated Electricity supply is disconnected or switched off Switch on electricity or check fuses Ignition spark plugs wet or dirty Dry or clean ignition spark plugs Flames uneven or tending to lift Flame ports blocked or wet Clean or dry flame ports Burner cap incorrectly fitted Ensure this component is fitted correctly Flames not staying on when knob is released Knob not held down...

Страница 10: ...on through knobs Ignition through knob Flame safeguard Yes Yes Yes Yes Colours Black Stainless steel Black Stainless steel Gas types NG LP conversion kit supplied NG LP conversion kit supplied NG LP conversion kit supplied NG LP conversion kit supplied Cooktop dimensions mm Width 746 744 896 894 Depth 531 530 531 530 Height 55 55 55 55 Cut out dimensions mm Width 680 680 860 860 Depth 490 490 490 ...

Страница 11: ...7BS EHGF77BX Proud Fit EHGC97BS EHGF97BX Proud Fit to combustible surface 860 Gas supply connection location 148 min 490 132 min EHGF97BX Additional Flush Fit detail Stainless Steel model only Gas supply connection location 148 min 490 125 min 680 Gas supply connection location EHGF77BX Additional Flush Fit detail Stainless Steel model only 33 34 Gas supply connection location caution Cooktops are...

Страница 12: ...clamps and screws are supplied with 5 burner models Fit the clamps as shown in Figure 8 The clamp location points are shown in Figure 9 For flush fit installation or when benchtops are less than 33mm in thickness it will be necessary to fit a spacer between the benchtop and each clamp to ensure clamps can be tightened sufficiently Installation procedure 8 electrolux e line gas cooktops installatio...

Страница 13: ...ith appliance installed Elbow positioning It is possible to reposition the elbow if required by loosening the locking nut and elbow by using two spanners Re tighten the entire assembly after the elbow has been repositioned When fitting elbow to appliance ensure that the sealing washer is fitted Regulator An appliance regulator is provided The regulator must be positioned so that the pressure test ...

Страница 14: ...tant This appliance is fitted with Natural Gas burner injectors Please follow the procedure below if a conversion to suit LP gas is required The conversion kit contains appropriate LPG injectors and 1 LPG sticker Table 3 Burner type Natural Gas Nominal test point pressure 1 00kPa LPG Nominal test point pressure 2 60kPa Injector size mm Gas consumption MJ h Injector size mm Gas consumption MJ h Sma...

Страница 15: ...late valve should be turned on one at a time and the injector hole blanked off for several seconds 7 The operation of the regulator can be confirmed by connecting a manometer to the pressure test point located on the side of the regulator body adjacent to the outlet With the appliance operating check the outlet pressure when all burners of the appliance are operating at maximum when the smallest b...

Страница 16: ... the appliance has been converted to LPG then the bypass screw will HAVE to be screwed in until a small stable flame results Please ensure the supply pressure has been checked PRIOR to any adjustment 4 If the appliance cannot be adjusted to perform safely inform the customer of the problem and affix an appropriate warning notice to the appliance If the fault appears to be dangerous the appliance s...

Страница 17: ... Electrolux and travelling costs for representatives of the Authorised Service Centre to and from your home or business If you are outside an Electrolux service area you will bear these costs For information about whether you are within an Electrolux service area please phone 13 13 49 in Australia or 0800 10 66 10 in New Zealand 7 Proof of purchase is required before you can make a claim under thi...

Страница 18: ...ns innovating with insight Not design for design s sake but design for the user s sake For us thoughtful design means making appliances easier to use and tasks more enjoyable to perform freeing our customers to experience the ultimate 21st century luxury ease of mind Our aim is to make this ease of mind more available to more people in more parts of their everyday lives all over the world The Thin...

Отзывы: