background image

 electrolux 

29

Guarantee/Customer Service

Warranty


FOR SALES IN AUSTRALIA AND NEW ZEALAND 
APPLIANCE: ELECTROLUX

This document sets out the terms and conditions of product warranties for Electrolux branded appliances. It 
is an important document. 
Please keep it with your proof of purchase documents in a safe place for future reference should you require 
service for your Electrolux appliance.


General Terms and Conditions


1.

In this warranty


(a)


'Electrolux' means Electrolux Home Products Pty Ltd ABN 51004 762 341 in respect of Appliances pur-

chased in Australia and Electrolux (NZ) Limited in respect of Appliances purchased in New Zealand;


(b)


'Appliance' means any Electrolux product purchased by you accompanied by this document;


(c)


'Warranty Period' means


i)


where you use the Appliance for personal, domestic or household purposes in Australia the period 

of 24 months and in New Zealand the period of 24 months;


ii)


where you use the Appliance for commercial purposes, in Australia the period of 3 months and in 

New Zealand the period of 3 months, (if the period stated is 0 months you are not covered by this 
product warranty) following the date of original purchase of the Appliance;


(d)


'you' means the purchaser of the Appliance not having purchased the appliance for re-sale, and 'your' 

has a corresponding meaning.


2.

This warranty only applies to Appliances purchased and used in Australia or New Zealand and is in addition 
to (and does not exclude, restrict, or modify in any way) any non-excludable statutory warranties in Aus-
tralia or New Zealand.


3.

Electrolux warrants that, when dispatched from an Electrolux warehouse, the Appliance is free from de-
fects in materials and workmanship for the Warranty Period.


4.

During the Warranty Period Electrolux or its Authorised Service Centre will, at no extra charge if your ap-
pliance is readily accessible without special equipment, and subject to these terms and conditions, repair 
or replace any parts which it considers to be defective. You agree that any replaced Appliances or parts be-
come the property of Electrolux. This warranty does not apply to light globes, batteries, filters or similar 
perishable parts.


5.

Parts and Appliances not supplied by Electrolux are not covered by this warranty.


6.

Where you are within an Electrolux service area, this warranty covers the cost of transport of the Appli-
ance to and from Authorised Service Centres of Electrolux and travelling costs for representatives of the 
Authorised Service Centre to and from your home or business. If you are outside an Electrolux service area, 
you will bear these costs. For information about whether you are within an Electrolux service area, please 
phone 13 13 49 in Australia, 
or 0800 10 66 10 in New Zealand.


7.

Proof of purchase is required before you can make a claim under this warranty.


8.

You may not make a claim under this warranty unless the defect claimed is due to faulty or defective parts 
or workmanship. Electrolux is not liable in the following situations (which are not exhaustive):


(a)


The Appliance is damaged by


i)


accident


ii)


misuse or abuse, including failure to properly maintain or service


iii)


normal wear and tear


iv)


power surges, electrical storm damage or incorrect power supply


v)


incomplete or improper installation


vi)


incorrect, improper or inappropriate operation


vii)


insect or vermin infestation.


Содержание EHD80170P

Страница 1: ...user manual Induction hob EHD 80170 P AU ...

Страница 2: ... Guarantee Customer Service 29 Service 31 Electrolux Thinking of you Share more of our thinking at www electrolux com 5 Subject to change without notice The following symbols are used in this user information 1Warning This must be read Important advice for the safety of persons and information on avoiding damage to the appliance 3General information and advice 2Information on environmental protect...

Страница 3: ...ilt in units and work surfaces that meet standards This appliance is not intended to be op erated by means of an external timer or separate remote control system In the event of faults with the appliance or damage to the glass ceramic cracks scratches or splits the appliance must be switched off and disconnected from the electrical supply to prevent the pos sibility of an electric shock Repairs to...

Страница 4: ... not allow saucepans or frying pans to boil dry The ventilation gap of 5mm between the worktop and front of the unit underneath it must not be covered Description of the Appliance Cooking surface layout Induction cooking zone 1800 W with power function 2500 W Induction cooking zone 2400 W with power function 3700 W Induction cooking zone 1800 W with power function 2500 W Control panel Induction co...

Страница 5: ...hild lock with display Timer STOP GO with indicator Heat setting selection Power function Heat setting indicator Residual heat indicator Pan recognition and automatic switch off indicator Sensor field Function On Off To switch the appliance on and off Lock Locking unlocking the control panel Stop Go To switch the Keep Warm setting on off Cooking zone Off To switch off the cooking zone 1 9 Heat set...

Страница 6: ...e induction cooking zones create the heat required for cooking directly in the base of the cookware The glass ceramic is merely heated by the residual heat of the cookware The cooling fan switches itself on and off depending upon the temperature of the elec tronics Display Description Residual heat Cooking zone is still hot number Fault Malfunction has occurred Pan detection Cookware is unsuitable...

Страница 7: ...ting The control bar is touched where the desired heat setting is positioned The heat setting is shown in the display Correct to the left or the right if necessary Do not release before the desired heat set ting is reached Control panel Display To switch on Touch for 1 second lights up The opera tional readiness indica tors of the individual cooking zones also light up To switch off Touch for 1 se...

Страница 8: ...ff Turning the STOP GO function on and off The STOP GO function simultaneously tog gles all active cooking zones to keep warm mode then back to the heat setting they were at before 3 STOP GO does not stop timer func tions 3 STOP GO controls the entire control panel apart from the sensor field Control panel Display To switch on Touch lights up To switch off Touch goes out Control panel Display To s...

Страница 9: ...ing set The length of time that the automatic warm up function operates depends on the heat setting selected Step Control panel Display 1 Select warm up setting display flashes 2 Select the desired heat setting between 1 and 8 The desired heat setting is dis played display lights up As long as the display is lit the appliance is working at full power After the automatic warm up is completed the di...

Страница 10: ...onds otherwise the appliance automatically switches it self off Step Control panel Pilot light 1 Switch on appliance Do not set a heat setting lights up The operational readi ness indicators of the individual cooking zones light up 2 Touch for 4 seconds over lights up The child safety device is switched on Step Control panel Pilot light 1 Switch on appliance Do not set a heat setting above lights ...

Страница 11: ...es the additional power for this cooking zone available by reducing the power of the corresponding other cooking zone Example the heat setting 9 is selected on one cooking zone The power function is switched on for the corresponding cooking zone The power function is carried out but the heat setting 9 of one of the cooking zones and the power function for the other cooking zone of the pair exceed ...

Страница 12: ...after a few seconds the shortest remaining time of all the timer functions is dis played and the corresponding pilot light flashes Function Condition Outcome after the time has elapsed Automatic cut out a heat setting is set acoustic signal 00 flashes Cooking zone switches off Countdown timer cooking zones not in use acoustic signal 00 flashes Step Control panel Display 1 Touch once Pilot light of...

Страница 13: ...s displayed 2 Touch The time remaining counts backwards to 00 The pilot light goes out The Timer function for the selected cooking zone is switched off Step Control panel Indicator 1 Select cooking zone Pilot light of the selected cooking zone flashes faster Time remaining is displayed 2 Touch or 01 to 99 minutes After a few seconds the pilot light flashes more slowly The time is set The time coun...

Страница 14: ...r more that 10 seconds an acoustic signal sounds The acoustic signal switches itself off automatically when the sensor fields are no longer covered Induction cooking zones In the case of overheating e g when a saucepan boils dry the cooking zone automatically switches itself off is displayed Before being used again the cooking zone must be set to 0 and cooled down If cookware that is not suitable ...

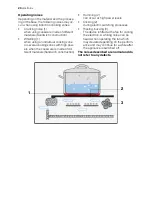
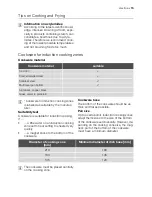
Страница 15: ...water on an induction cooking zone set to heat setting 9 is heated very quickly a magnet sticks to the bottom of the cookware Cookware base The bottom of the cookware should be as thick and flat as possible Pan size Up to a certain limit induction cooking zones adapt themselves to the size of the bottom of the cookware automatically However de pending on the cooking zone size the mag netic part of...

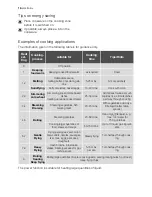
Страница 16: ... dishes Heating up ready cooked meals 25 50 mins Add at least twice as much liquid as rice stir milk dishes part way through cooking 3 4 Steaming Braising Steaming vegetables fish braising meat 20 45 mins With vegetables add only a little liquid a few table spoons 4 5 Boiling Steaming potatoes 20 60 mins Use only a little liquid e g max l water for 750 g potatoes Cooking larger quantities of food ...

Страница 17: ...ceramic surface at an angle 2 Remove residues by sliding the blade over the surface 3 Wipe the appliance with a damp cloth and a little washing up liquid 4 Rub the appliance dry using a clean cloth Scrapers and cleaners for glass ceramic and stain less steel can be purchased in specialized shops 3 Remove stubborn residues with a clean er for glass ceramic or stainless steel 3 Scratches or dark sta...

Страница 18: ...tic signal 6x ap pliance switches off One or more sensor fields have been covered for longer than 10 seconds Uncover sensor field Acoustic signal sounds when ap pliance is switched off The control panel is wholly or part ly covered by objects Remove objects Acoustic signal sounds and appli ance switches itself on and then off again after 5 seconds another acoustic signal sounds The On Off sensor f...

Страница 19: ...nger to the user may result from improper re pairs 3 If the appliance has been operated in correctly the engineer s visit will be chargeable even during the warranty period and number are displayed Electronics fault Disconnect the appliance from the electrical supply for a few minutes Take the fuse out of the house s wiring system If after switching on again is displayed again call the customer se...

Страница 20: ...l cooking zones with high pow ers when the cookware is made of dif ferent materials Sandwich construction Humming 2 can occur at high power levels Clicking 2 during electric switching processes Hissing buzzing 3 The device is fitted with a fan for cooling the electrics A whiring noise can be heard when operating the fan which may deviate depending on the perform ance and may continue for a while a...

Страница 21: ...s product may not be treated as household waste Instead it shall be handed over to the applicable collection point for the recy cling of electrical and electronic equip ment By ensuring this product is disposed of correctly you will help pre vent potential negative consequences for the environment and human health which could otherwise be caused by in appropriate waste handling of this prod uct Fo...

Страница 22: ... e g from a dishwasher or oven Avoid installing the appliance next to doors and under windows Otherwise hot cook ware may be knocked off the rings when doors and windows are opened z Risk of injury from electrical cur rent The electrical mains terminal is live Make electrical mains terminal free of voltage Follow connection schematic Observe electrical safety rules Ensure anti shock protection by ...

Страница 23: ...inks should be fitted according to the appropriate connection di agram Note for single phase connection the link or bridge will need to be fitted be tween terminals 1 2 refer to the connec tion sticker on back of the unit The earth lead is connected to terminal E The earth lead must be longer than leads carrying elec tric current The cable connections must be made in accordance with regulations an...

Страница 24: ...24 electrolux Assembly ...

Страница 25: ...electrolux 25 ...

Страница 26: ...26 electrolux ...

Страница 27: ...electrolux 27 1 WARNING Surface temperature of base exceed 95 C under bench access must be restricted by use of non combustible barrier on installation ...

Страница 28: ...28 electrolux Rating Plate Induktion 7 4 kW 55GBDC2AU EHD80170P 7 4 kW 949 593 115 230 V 50 Hz ELECTROLUX ...

Страница 29: ...hat when dispatched from an Electrolux warehouse the Appliance is free from de fects in materials and workmanship for the Warranty Period 4 During the Warranty Period Electrolux or its Authorised Service Centre will at no extra charge if your ap pliance is readily accessible without special equipment and subject to these terms and conditions repair or replace any parts which it considers to be def...

Страница 30: ...es or condi tions or impose obligations upon Electrolux which cannot be excluded restricted or modified To the ex tent permitted by law the liability of Electrolux if any arising out of or in relation to the Appliance or any services supplied by Electrolux shall be limited where it is fair and reasonable to do so a in the case of Appliances at its option to the replacement or repair of the Applian...

Страница 31: ...re Department or one of our service partners In order to be able to assist you quickly we require the following information three digit letter number combination for glass ceramic Model description Product number PNC Serial number S No for numbers see rating plate Type of fault Any error messages displayed by the appliance So that you have the necessary reference numbers from your appliance at han...

Страница 32: ...www electrolux com www electrolux com au www electrolux co nz 867 202 652 D 060309 04 ...

Отзывы: