background image

they do not come in touch with mobile

parts or they are not squeezed. Also be

careful when the hob is put together with

an oven.

Make sure that the gas

supply pressure of the

appliance obeys the

recommended values.

If the supplied pressure has not the

specified value, it is necessary to

assemble a proper pressure regulator in

compliance with the standard UNI EN 88.

For Liquid Gas (LPG) the use of pressure

regulator is allowed only if they are in

compliance with UNI EN 12864. The

adjustable connection is fixed to the

comprehensive ramp by means of a

threaded nut G 1/2". Screw the parts

without force, adjust the connection in

the necessary direction and tighten

everything.

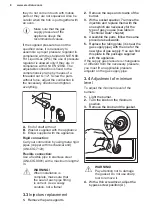
A

B

C

A. End of shaft with nut

B. Washer supplied with the appliance

C. Elbow supplied with the appliance
Rigid connection:

Carry out connection by using metal rigid

pipes (copper with mechanical end)

(UNI-CIG 7129).
Flexible connection:

Use a flexible pipe in stainless steel

(UNI-CIG 9891) with a maximum length 2

m.

WARNING!

When installation is

complete, make sure that

the seal of each pipe fitting

is correct. Use a soapy

solution, not a flame!

3.3 Injectors replacement

1. Remove the pan supports.

2. Remove the caps and crowns of the

burner.

3. With a socket spanner 7 remove the

injectors and replace them with the

ones which are necessary for the

type of gas you use (see table in

"Technical Data" chapter).

4. Assemble the parts, follow the same

procedure backwards.

5. Replace the rating plate (it is near the

gas supply pipe) with the one for the

new type of gas supply. You can find

this plate in the package supplied

with the appliance.

If the supply gas pressure is changeable

or different from the necessary pressure,

you must fit an applicable pressure

adjuster on the gas supply pipe.

3.4 Adjustment of minimum

level

To adjust the minimum level of the

burners:

1. Light the burner.

2. Turn the knob on the minimum

position.

3. Remove the knob and the gasket.

WARNING!

Pay attention not to damage

the gasket. Do not use sharp

tool to remove it.

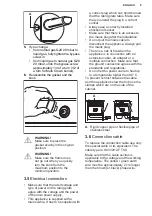
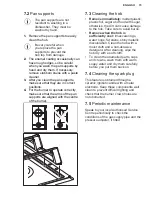
4. With a thin screwdriver, adjust the

bypass screw position (A).

www.electrolux.com

8

Содержание EGS6434X

Страница 1: ...EGS6434X EGS6436X EN Hob User Manual 2 IT Piano cottura Istruzioni per l uso 20 ...

Страница 2: ...ice and repair information www electrolux com support Register your product for better service www registerelectrolux com Buy Accessories Consumables and Original spare parts for your appliance www electrolux com shop CUSTOMER CARE AND SERVICE Always use original spare parts When contacting our Authorised Service Centre ensure that you have the following data available Model PNC Serial Number The ...

Страница 3: ... the appliance Keep all packaging away from children and dispose of it appropriately WARNING Keep children and pets away from the appliance when it operates or when it cools down Accessible parts become hot during use If the appliance has a child safety device it should be activated Children shall not carry out cleaning and user maintenance of the appliance without supervision 1 2 General Safety W...

Страница 4: ...opening Let the hob surface cool down before closing the lid If the supply cord is damaged it must be replaced by the manufacturer an authorized Service or similarly qualified persons in order to avoid a hazard Where the appliance is directly connected to the power supply an all pole isolating switch with a contact gap is required Complete disconnection in compliance with the conditions specified ...

Страница 5: ...ctrical connections should be made by a qualified electrician The appliance must be earthed Before carrying out any operation make sure that the appliance is disconnected from the power supply Make sure that the parameters on the rating plate are compatible with the electrical ratings of the mains power supply Make sure the appliance is installed correctly Loose and incorrect electricity mains cab...

Страница 6: ...me hot Do not operate the appliance with wet hands or when it has contact with water Do not use the appliance as a work surface or as a storage surface When you place food into hot oil it may splash WARNING Risk of fire and explosion Fats and oil when heated can release flammable vapours Keep flames or heated objects away from fats and oils when you cook with them The vapours that very hot oil rel...

Страница 7: ...oducts abrasive cleaning pads solvents or metal objects Do not clean the burners in the dishwasher 2 6 Service To repair the appliance contact the Authorised Service Centre Use original spare parts only 2 7 Disposal WARNING Risk of injury or suffocation Contact your municipal authority for information on how to dispose of the appliance Disconnect the appliance from the mains supply Cut off the mai...

Страница 8: ...eel UNI CIG 9891 with a maximum length 2 m WARNING When installation is complete make sure that the seal of each pipe fitting is correct Use a soapy solution not a flame 3 3 Injectors replacement 1 Remove the pan supports 2 Remove the caps and crowns of the burner 3 With a socket spanner 7 remove the injectors and replace them with the ones which are necessary for the type of gas you use see table...

Страница 9: ...correct socket Always use a correctly installed shockproof socket Make sure that there is an access to the mains plug after the installation Do not pull the mains cable to disconnect the appliance Always pull the mains plug There is a risk of fire when the appliance is in connection with an extension cable an adapter or a multiple connection Make sure that the ground connection agrees with the sta...

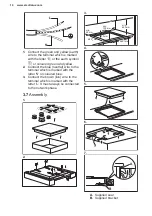
Страница 10: ...blue neutral wire to the terminal which is marked with the letter N or coloured blue 3 Connect the brown live wire to the terminal which is marked with the letter L It must always be connected to the network phase 3 7 Assembly 1 2 3 min 55 mm min 650 mm 560 mm 2 0 480 mm 2 0 min 100 mm 30 mm 4 5 6 7 A B A Supplied seal B Supplied bracket www electrolux com 10 ...

Страница 11: ...ibilities for insertion The panel installed below the hob must be easy to remove and let an easy access in case a technical assistance intervention is necessary Kitchen unit with door min 6 mm min 30 mm 60 mm min 5 mm max 150 mm A B A Removable panel B Space for connections Kitchen unit with oven The electrical connection of the hob and the oven must be installed separately for safety reasons and ...

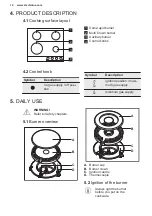
Страница 12: ...escription no gas supply off posi tion Symbol Description ignition position maxi mum gas supply minimum gas supply 5 DAILY USE WARNING Refer to Safety chapters 5 1 Burner overview A B D C C D A B A Burner cap B Burner crown C Ignition candle D Thermocouple 5 2 Ignition of the burner Always light the burner before you put on the cookware www electrolux com 12 ...

Страница 13: ...er minimum 1 minute CAUTION In the absence of electricity you can ignite the burner without electrical device in this case approach the burner with a flame turn the control knob counter clockwise to maximum gas supply position and push it down Keep the control knob pushed for equal or less than 10 seconds to let the thermocouple warm up If the burner accidentally goes out turn the control knob to ...

Страница 14: ... for predisposed hobs The lid protects the hob from dust when closed and collects splashes of grease when opened Do not use it for other functions Keep the lid clean all the time Make sure that the hob is cold before you close the lid Glass lids can shatter when hot 7 CARE AND CLEANING WARNING Refer to Safety chapters 7 1 General information Clean the hob after each use Always use cookware with a ...

Страница 15: ...lastic plastic foil sugar and food with sugar otherwise the dirt can cause damage to the hob Take care to avoid burns Remove when the hob is sufficiently cool limescale rings water rings fat stains shiny metallic discoloration Clean the hob with a moist cloth and a non abrasive detergent After cleaning wipe the hob dry with a soft cloth To clean the enamelled parts caps and crowns wash them with w...

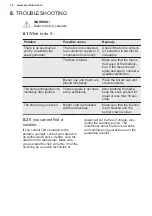
Страница 16: ...guishes im mediately after ignition Thermocouple is not heat ed up sufficiently After lightning the flame keep the knob pushed for equal or less than 10 sec onds The flame ring is uneven Burner crown is blocked with food residues Make sure that the injector is not blocked and the burner crown is clean 8 2 If you cannot find a solution If you cannot find a solution to the problem yourself contact y...

Страница 17: ...03 IT MADE IN ITALY TYPE IP20 0049 A B C A Stick it on Guarantee Card and send this part if applicable B Stick it on Guarantee Card and keep this part if applicable C Stick it on instruction booklet 9 TECHNICAL DATA 9 1 Hob dimensions Width 595 mm Depth 510 mm 9 2 Bypass diameters BURNER Ø BYPASS 1 100 mm Multi Crown 57 Semi rapid 32 Auxiliary 28 ENGLISH 17 ...

Страница 18: ...IMUM POWER kW INJECTOR MARK Multi Crown 4 0 1 4 146 Semi rapid 2 0 0 45 96 Auxiliary 1 0 0 33 70 9 5 Gas burners for LPG G30 G31 28 30 37 mbar BURNER NORMAL POWER kW MINIMUM POWER kW INJECTOR MARK NOMINAL GAS FLOW g h G30 28 30 mbar G31 37 mbar Multi Crown 3 55 1 4 095 258 254 Semi rapid 2 0 0 45 71 145 143 Auxiliary 1 0 0 33 50 73 71 10 ENERGY EFFICIENCY 10 1 Product information according to EU 6...

Страница 19: ...d pan supports are assembled correctly Use cookware with diameters applicable to the size of burners Center the pot on the burner When you heat up water use only the amount you need If it is possible always put the lids on the cookware When the liquid starts to boil turn down the flame to barely simmer the liquid If it is possible use a pressure cooker Refer to its user manual 11 ENVIRONMENTAL CON...

Страница 20: ...i sull assistenza e la riparazione www electrolux com support Per registrare il vostro prodotto e ricevere un servizio migliore www registerelectrolux com Acquistare accessori materiali di consumo e ricambi originali per la vostra apparecchiatura www electrolux com shop ASSISTENZA CLIENTI E ASSISTENZA TECNICA Consigliamo sempre l impiego di ricambi originali Quando si contatta il nostro Centro di ...

Страница 21: ...ne continua I bambini devono essere sorvegliati per assicurarsi che non giochino con l apparecchiatura Tenere gli imballaggi lontano dai bambini e smaltirli in modo adeguato AVVERTENZA Tenere i bambini e gli animali domestici lontani dall elettrodomestico durante il funzionamento o il raffreddamento Le parti accessibili si riscaldano molto durante l uso Se l elettrodomestico ha un dispositivo di s...

Страница 22: ...recchiatura prima di installarla nella struttura a incasso Non usare una pulitrice a vapore per pulire l apparecchiatura Non utilizzare detergenti abrasivi o raschietti di metallo per pulire il vetro della porta dei coperchi con cerniera per non rigare la superficie e causare la rottura del vetro Rimuovere qualsiasi residuo dal coperchio prima di aprirlo Lasciar raffreddare la superficie del piano...

Страница 23: ...amento dell apparecchiatura dato che è pesante Usare sempre i guanti di sicurezza e le calzature adeguate Proteggere le superfici di taglio con un materiale di tenuta per evitare che l umidità causi dei rigonfiamenti Proteggere la base dell apparecchiatura da vapore e umidità Non installare l apparecchiatura accanto ad una porta o sotto una finestra per evitare che pentole calde cadano dall appare...

Страница 24: ...to che consenta di scollegare l apparecchiatura dalla presa di corrente a tutti i poli Il dispositivo di isolamento deve avere una larghezza dell apertura di contatto non inferiore ai 3 mm 2 3 Collegamento gas Tutti i collegamenti del gas devono essere eseguiti da una persona qualificata Prima di procedere con l installazione verificare che le condizioni di distribuzione locale pressione e tipo di...

Страница 25: ...amente la manopola dalla posizione massima a quella minima Usare esclusivamente gli accessori in dotazione con l apparecchiatura Non utilizzare un diffusore di fiamma sul bruciatore Un apparecchiatura per cottura a gas produce calore e umidità Provvedere ad un adeguata ventilazione nell ambiente in cui si trova l apparecchiatura Se si prevede un impiego prolungato e intenso dell apparecchiatura pu...

Страница 26: ...entilazione naturali almeno 100 cm o installare una cappa meccanica Scegliere dei collegamenti fissi o usare un tubo flessibile in acciaio inossidabile conforme alle disposizioni vigenti Se si utilizzano tubi in metallo flessibili fare attenzione che non entrino in contatto con parti mobili o non siano schiacciati Ulteriore attenzione è richiesta qualora al piano di cottura fosse abbinato il forno...

Страница 27: ...ondente al nuovo tipo di gas Questa targhetta è presente nell imballo fornito con l apparecchiatura Se la pressione del gas di alimentazione è variabile o differente da quella prevista montare un adattatore di pressione adeguato nel tubo di alimentazione del gas 3 4 Regolazione del livello minimo Per regolare il livello minimo dei bruciatori 1 Accendere il bruciatore 2 Ruotare la manopola sulla po...

Страница 28: ...siste il rischio di incendio Accertarsi che il collegamento di messa a terra sia in linea con le disposizioni e le norme in vigore Il cavo di alimentazione non deve riscaldarsi ad una temperatura superiore a 90 C Per evitare il contatto tra il cavo e l apparecchiatura al di sotto del piano di cottura utilizzare dei morsetti sul lato dell unità A A Condotto rigido in rame o tubo flessibile in accia...

Страница 29: ...mm min 650 mm 560 mm 2 0 480 mm 2 0 min 100 mm 30 mm 4 5 6 7 A B A Guarnizione in dotazione B Staffa in dotazione 8 ATTENZIONE Installare l apparecchiatura esclusivamente su un piano di lavoro dalla superficie piatta ITALIANO 29 ...

Страница 30: ...ccesso in caso di interventi dell assistenza tecnica Unità da cucina con porta min 6 mm min 30 mm 60 mm min 5 mm max 150 mm A B A Pannello rimovibile B Spazio per gli allacciamenti Mobile da incasso con forno Il collegamento elettrico del piano di cottura e del forno deve essere eseguito separatamente per questioni di sicurezza oltre che per consentire una facile rimozione del forno dall unità 4 D...

Страница 31: ...ma di posizionare una pentola AVVERTENZA Fare attenzione in fase di utilizzo di fiamme libere all interno della cucina Il produttore declina qualsiasi responsabilità in caso di cattivo utilizzo delle fiamme 1 Premere la manopola di regolazione e ruotarla in senso antiorario fino alla posizione massima 2 Tenere premuta la manopola di regolazione per circa 10 secondi Questo consentirà il riscaldamen...

Страница 32: ...ccendere il bruciatore dopo almeno 1 minuto Il generatore di scintille si avvia in modo automatico all accensione delle prese dopo l installazione o dopo un interruzione di corrente Non si tratta di un anomalia di funzionamento Il piano di cottura viene fornito con delle valvole progressive Queste rendono la regolazione della fiamma più precisa 5 3 Spegnimento del bruciatore Per spegnere la fiamma...

Страница 33: ...zioni Tenere sempre pulito il coperchio Accertarsi che il piano di cottura sia freddo prima di chiudere il coperchio I coperchi in vetro possono rompersi quando vengono riscaldati 7 PULIZIA E CURA AVVERTENZA Fare riferimento ai capitoli sulla sicurezza 7 1 Informazioni generali Pulire il piano cottura dopo ogni utilizzo Usare sempre pentole con il fondo pulito Graffi o macchie scure sulla superfic...

Страница 34: ... plastica zucchero e alimenti con zucchero in caso contrario la sporcizia potrebbe causare danni al piano cottura Attenzione a evitare le ustioni Quando il piano di cottura è sufficientemente raffreddato è possibile rimuovere i segni di calcare e d acqua le macchie di grasso e le macchie opalescenti Pulire il piano di cottura con un panno umido e un detergente non abrasivo Al termine della pulizia...

Страница 35: ...one La termocoppia non si è ri scaldata a sufficienza Dopo aver acceso la fiam ma tenere premuta la ma nopola per circa 10 secon di L anello della fiamma non è omogeneo La corona del bruciatore è bloccata da residui di cibo Controllare che l iniettore principale non sia ostruito e che la corona del brucia tore sia pulita 8 2 Se non è possibile trovare una soluzione Qualora non sia possibile trovar...

Страница 36: ...0 0049 A B C A Attaccarla sul Foglietto di garanzia ed inviare questa parte ove prevista B Attaccarla sul Foglietto di garanzia e conservare questa parte ove prevista C Attaccarla sul libretto di istruzioni 9 DATI TECNICI 9 1 Dimensioni del piano di cottura Larghezza 595 mm Profondità 510 mm 9 2 Diametri bypass BRUCIATORE Ø BYPASS 1 100 mm Multi corona 57 Semi rapido 32 Ausiliario 28 www electrolu...

Страница 37: ...IMA kW SEGNO INIETTORE Multi corona 4 0 1 4 146 Semi rapido 2 0 0 45 96 Ausiliario 1 0 0 33 70 9 5 Bruciatori a gas per GPL G30 G31 28 30 37 mbar BRUCIA TORE POTENZA NORMALE kW POTENZA MINIMA kW SEGNO INIETTORE PORTATA NOMINALE GAS g h G30 28 30 mbar G31 37 mbar Multi corona 3 55 1 4 095 258 254 Semi rapido 2 0 0 45 71 145 143 Ausiliario 1 0 0 33 50 73 71 10 EFFICIENZA ENERGETICA 10 1 Informazioni...

Страница 38: ...mpiego razionale dell energia Informazioni generali 10 2 Risparmio energetico Prima dell uso assicurarsi che i bruciatori e i supporti pentole siano assemblati correttamente Usare pentole con diametro adatto alle dimensioni dei bruciatori Centrare la pentola sul bruciatore Quando si riscalda l acqua utilizzare solo la quantità necessaria Se possibile coprire sempre le pentole con il coperchio Quan...

Страница 39: ...rmali rifiuti domestici Portare il prodotto al punto di riciclaggio più vicino o contattare il comune di residenza Electrolux Appliances AB Contact Address Al Powstańców Śląskich 26 30 570 Kraków Poland ITALIANO 39 ...

Страница 40: ...www electrolux com shop 867367368 A 152021 ...

Отзывы: