background image

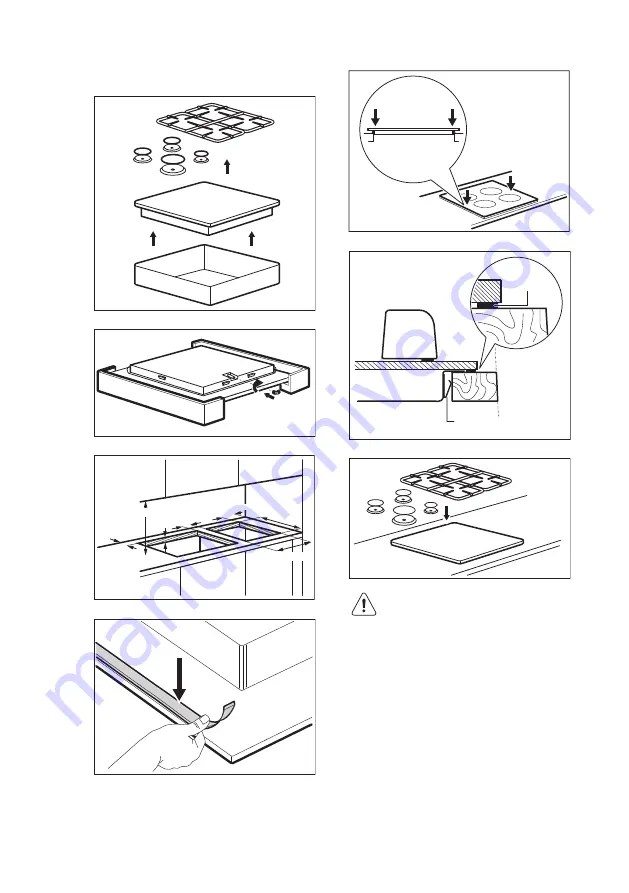
8.7 Assembly

1.

2.

3.

30 mm

55 mm

40-50 mm

min. 650 mm

490 mm

min. 450 mm

270 mm

4.

5.

6.

B

A

7.

CAUTION!

Install the appliance only on

a worktop with flat surface.

8.8 Installation of more than

one hob

If several hobs are to be installed side by

side into the same cut out, an assembly

kit including a support side bracket and

supplementary seals is available at our

Authorised Service Centres. The relevant

installation instructions are supplied

within the kit package.

www.electrolux.com

14

Содержание EGC3313NOK

Страница 1: ...EGC3313NOK EN Hob User Manual ...

Страница 2: ...brochures trouble shooter service information www electrolux com webselfservice Register your product for better service www registerelectrolux com Buy Accessories Consumables and Original spare parts for your appliance www electrolux com shop CUSTOMER CARE AND SERVICE Always use original spare parts When contacting our Authorised Service Centre ensure that you have the following data available Mo...

Страница 3: ...e parts are hot If the appliance has a child safety device this should be activated Children shall not carry out cleaning and user maintenance of the appliance without supervision Children aged 3 years and under must be kept away from this appliance when it is in operation at all times 1 2 General Safety WARNING The appliance and its accessible parts become hot during use Care should be taken to a...

Страница 4: ...e appliance If the supply cord is damaged it must be replaced by the manufacturer an authorized Service or similarly qualified persons in order to avoid a hazard Where the appliance is directly connected to the power supply an all pole isolating switch with a contact gap is required Complete disconnection in compliance with the conditions specified in overvoltage category III must be guaranteed Th...

Страница 5: ...ian The appliance must be earthed Before carrying out any operation make sure that the appliance is disconnected from the power supply Make sure that the electrical information on the rating plate agrees with the power supply If not contact an electrician Make sure the appliance is installed correctly Loose and incorrect electricity mains cable or plug if applicable can make the terminal become to...

Страница 6: ...the appliance with wet hands or when it has contact with water Do not use the appliance as a work surface or as a storage surface When you place food into hot oil it may splash WARNING Risk of fire and explosion Fats and oil when heated can release flammable vapours Keep flames or heated objects away from fats and oils when you cook with them The vapours that very hot oil releases can cause sponta...

Страница 7: ...event the deterioration of the surface material Deactivate the appliance and let it cool down before you clean it Disconnect the appliance from the electrical supply before maintenance Do not use water spray and steam to clean the appliance Clean the appliance with a moist soft cloth Only use neutral detergents Do not use abrasive products abrasive cleaning pads solvents or metal objects Do not cl...

Страница 8: ...le warm up If not the gas supply is interrupted 3 Adjust the flame after it is regular If after some tries the burner does not light check if the crown and its cap are in correct positions WARNING Do not keep the control knob pushed for more than 15 seconds If the burner does not light after 15 seconds release the control knob turn it into off position and try to light the burner again after minim...

Страница 9: ...and above the control knob otherwise the flame heats the control knob up CAUTION Make sure that pot handles are not above the front edge of the cooktop CAUTION Make sure that the pots are placed centrally on the burner in order to get maximum stability and to get lower gas consumption CAUTION Liquids spilt during cooking can cause the glass to break 5 2 Diameters of cookware Use cookware with diam...

Страница 10: ...gar If not the dirt can cause damage to the hob Take care to avoid burns Remove when the hob is sufficiently cool limescale rings water rings fat stains shiny metallic discoloration Clean the hob with a moist cloth and non abrasive detergent After cleaning wipe the hob dry with a soft cloth To clean the enamelled parts cap and crown wash them with warm soapy water and dry them carefully before you...

Страница 11: ...s clean 7 2 If you cannot find a solution If you cannot find a solution to the problem yourself contact your dealer or an Authorised Service Centre Give the data from the rating plate Make sure you operated the hob correctly If not the servicing by a service technician or dealer will not be free of charge also during the warranty period The instructions about the Service Centre and conditions of g...

Страница 12: ...threaded nut G 1 2 Screw the parts and tighten everything with teflon tape if necessary to get the right direction A B C A End of shaft with nut B Washer C Elbow if needed Liquid gas Use the rubber pipe holder for liquid gas Always engage the gasket Then continue with the gas connection The flexible pipe is prepared for apply when it can not get hot more than room temperature higher than 30 C it i...

Страница 13: ... minimum position 8 5 Electrical connection Make sure that the rated voltage and type of power on the rating plate agree with the voltage and the power of the local power supply This appliance is supplied with a mains cable It has to be supplied with a correct plug which can hold the load that the rating plate rates Make sure that you install the plug in a correct socket Always use a correctly ins...

Страница 14: ...h flat surface 8 8 Installation of more than one hob If several hobs are to be installed side by side into the same cut out an assembly kit including a support side bracket and supplementary seals is available at our Authorised Service Centres The relevant installation instructions are supplied within the kit package www electrolux com 14 ...

Страница 15: ...The electrical connection of the hob and the oven must be installed separately for safety reasons and to let easy remove oven from the unit 9 TECHNICAL DATA 9 1 Hob dimensions Width 290 mm Depth 520 mm 9 2 Bypass diameters BURNER Ø BYPASS 1 100 mm Triple Crown 56 9 3 Other technical data TOTAL POWER Gas original G20 2H 20 mbar 3 8 kW Gas replacement G30 G31 3B P 30 30 mbar 276 g h Electric supply ...

Страница 16: ...ergy saving Before use make sure that the burners and pan supports are assembled correctly Use cookware with diameters applicable to the size of burners Center the pot on the burner When you heat up water use only the amount you need If it is possible always put the lids on the cookware When the liquid starts to boil turn down the flame to barely simmer the liquid If it is possible use a pressure ...

Страница 17: ...ENGLISH 17 ...

Страница 18: ...www electrolux com 18 ...

Страница 19: ...ENGLISH 19 ...

Страница 20: ...www electrolux com shop 867329437 A 132016 ...

Отзывы: