5
20Watt - 12 Volts
Maintenance and cleaning
Cleaning the hood
Clean the outside of the hood using a damp cloth and a
mild detergent. Never use corrosive, abrasive or flammable
cleaning products.
Cleaning the grease filters
Clean the filter every month or every other month according
to how much the hood is used. The cleaner the filters, the
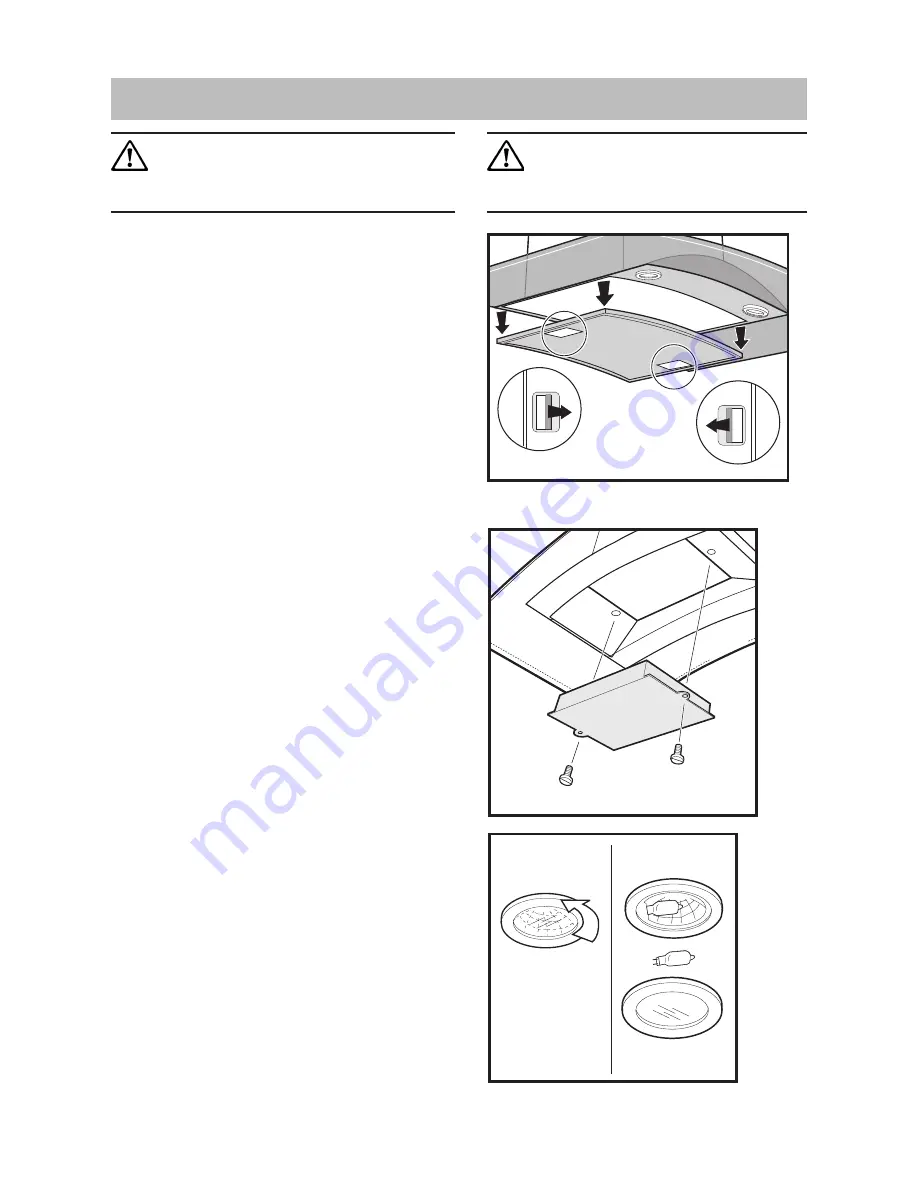
better it collects grease. Remove the filter by (Fig. 3):
•
Push the handles towards the centre of the hood
•
Pull the filter down to remove.
The filter is made of aluminium wires on which the grease
collects. Clean the filter in hot water using a detergent, or in
a dishwasher. Let the filter dry before putting it back. Note
that a dishwasher may discolour the filter.
Mounting the carbon filter
Only applicable for recirculation. The carbon filters absorb
smells and odours.
The carbon filter cannot be washed nor regenerated.
The carbon filter should be replaced every 6 months under
normal use.
Ask the technical assistance service or manufacturing
company for a new one.
After approximately three years of use, the KF2000 filter
should be replaced with a new, as the odour reduction capacity
will be reduced.
Mounting the carbon filter (Fig. 2):
•
Unplug the unit or disconnect it from the power supply
•
Remove the metal grease filter. Fig. 3
•
Fit the carbon filter and fix it to the body of the hood
with two supplied screws. Fig. 4.
•
Refit the metal grease filters.
To dismount proceed in reverse order.
Changing the light
Disconnect the cooker hood from the main supply before
changing the light.
•
Unscrew the light shield
•
Replace the damaged lamp with a new lamp of the same
kind and rating. Fig. 5.
•
Screw in place the light shield.
•
If the lighting does not work properly, check that the
bulbs have been mounted properly into place before
contacting your nearest service centre!
Clean the filter regularly. The grease that
collects in the filter and the duct could ignite
if a hot plate is left on (or if overheating
occurs).
Fig. 3
Before doing any maintenance work on the hood,
disconnect it from the main supply by
disconnecting the plug from the wall socket or
unscrewing the fuse.
Fig. 5
Fig. 4
Содержание EFC 929
Страница 1: ...User Manual EFC 929 GB ...
Страница 8: ...LI1RDA Ed 06 01 ...


