background image

4

ELECTRIC COOKTOP INSTALLATION INSTRUCTIONS

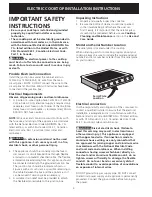
IMPORTANT SAFETY 
INSTRUCTIONS

 Be sure your cooktop is installed and grounded 

properly by a qualified installer or service 
technician.

• 

These cooktops must be electrically grounded in 
accordance with local codes or, in their absence, 
with the National Electrical Code ANSI/NFPA No. 
70—latest edition in the United States, or with 
CSA Standard C22.1, Canadian Electrical Code, 
Part 1, in Canada.

WARNING

The electrical power to the cooktop 

must be shut off while line connections are being 
made. Failure to do so could result in serious injury 
or death.

Provide Electrical Connection

Install the junction box under the cabinet and run 

120/240 or 120/208 Volt, AC wire from the main 
circuit panel.  NOTE: DO NOT connect the wire to the 
circuit panel at this time. Wait until all wires have been 

connected in the junction box.

Electrical Requirements

Observe all governing codes and local ordinances.

1.  A 3-wire or 4-wire single phase 120/240 or 120/208 

Volt, 60 Hz AC only electrical supply is required on a 
separate circuit fused on both sides of the line (time-
delay fuse or circuit breaker is recommended, 40A or 
50A).DO NOT fuse neutral.

NOTE:

 Wire sizes and connections must conform with 

the fuse size and rating of the appliance in accordance 
with the National Electrical Code ANSI/NFPA No. 70–
latest edition, or with CSA standard C22.1, Canadian 
Electrical Code, Part 1, and local local codes and 

ordinances.

WARNING

An extension cord must not be used 

with this appliance. Such use may result in a fire, 
electrical shock, or other personal injury.

2.  The appliance should be connected to the fused 

disconnect (or circuit breaker) box through flexible 
armored or nonmetallic sheathed cable. The flexible 
armored cable extending from this appliance should 

be connected directly to the grounded junction box. 

The junction box should be located as shown in 

Figure 3 with as much slack as possible remaining in 
the cable between the box and the appliance, so it 
can be moved if servicing is ever necessary.

3.  A suitable strain relief must be provided to attach 

the flexible armored cable to the junction box.

Unpacking Instructions

1.  Unpack and visually inspect the cooktop

2.  Be sure the bottle of cleaner conditioner packed 

in the literature bag is left where the user can 

find it easily. It is important that the ceramic-glass 

smoothtop be pretreated before use see 

Cooktop 

Cleaning and Maintenance

 section in the 

Use and 

Care Guide

.

Model and Serial Number Location

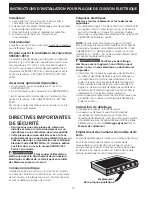
The serial plate is located under the cooktop.

When ordering parts for or making inquires about your 

cooktop, always be sure to include the model and serial 

numbers and a lot number or letter from the serial plate 

on your cooktop.

Electrical connection

It is the responsibility and obligation of the consumer to 
contact a qualified installer to assure that the electrical 
installation is adequate and is in conformance with the 
National Electrical Code ANSI/NFPA No. 70-latest edition, 
or with CSA Standard C22.1, Canadian Electrical Code, 
Part 1, and local codes and ordinances.


Risk of electrical shock  (Failure to 

heed this warning may result in electrocution or 
other serious injury.) This appliance is equipped 
with copper lead wire. If connection is made to 
aluminum house wiring, use only connectors that 
are approved for joining copper and aluminum wire 
in accordance with the National Electrical Code 
and local code and ordinances. When installing 
connectors having screws which bear directly on 
the steel and/or aluminum flexible conduit, do no 
tighten screws sufficiently to damage the flexible 
conduit. Do not over bend or excessively distort 
flexible conduit to avoid separation of convolutions 
en exposure of internal wires.

DO NOT ground to a gas supply pipe. DO NOT connect 
to electrical power supply until appliance is permanently 
grounded. Connect the ground wire before turning on 

the power.

Serial Plate 

Location

Содержание E36EC75HSS - 36" Pro-Style Slide-In Electric Rangetop

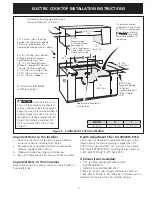
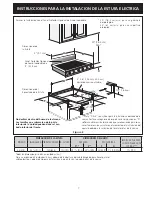
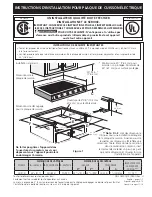
Страница 1: ... 8 10 2 cm x 20 3 cm opening to route armoured cable 7 18 4 cm Note D E are critical to the proper installation of the cooktop Please make sure to respect those dimensions D reflects a finished dimension it is recommended to undercut this dimension and adjust upon installation of the appliance due to the variation in countertop materials Do not slide unit into cabinet cutout Protruding screws on t...

Страница 2: ... those dimensions D reflects a finished dimension it is recommended to undercut this dimension and adjust upon installation of the appliance due to the variation in countertop materials All dimensions are in inches cm Allow 2 5 cm space below the armoured cable opening to clear the electric cable and allow space for installation of the junction box on the wall at the back of the cooktop Do not sli...

Страница 3: ...etween Rear Edge of Cutout and Nearest Combustible Surface Above Countertop 36 91 4 cm Min Important Notes to the Installer 1 Read all instructions contained in these installation instructions before installing the cooktop 2 Remove all packing material before connecting the electrical supply to the cooktop 3 Observe all governing codes and ordinances 4 Be sure to leave these instructions with the ...

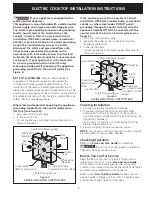
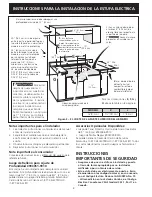
Страница 4: ...be located as shown in Figure 3 with as much slack as possible remaining in the cable between the box and the appliance so it can be moved if servicing is ever necessary 3 A suitable strain relief must be provided to attach the flexible armored cable to the junction box Unpacking Instructions 1 Unpack and visually inspect the cooktop 2 Be sure the bottle of cleaner conditioner packed in the litera...

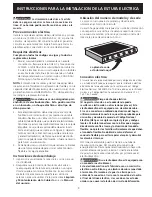
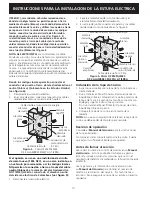
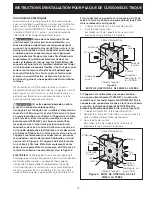
Страница 5: ...codes do not permit grounding through the neutral white wire the appliance frame MUST NOT be connected to the neutral wire of the 4 wire electrical system see figure 5 1 Disconnect the power supply 2 Separate the green or bare copper and white appliance cable wires 3 In the junction box connect appliance and power supply cable wires as shown in Figure 5 Figure 4 3 WIRE GROUNDED JUNCTION BOX Cable ...

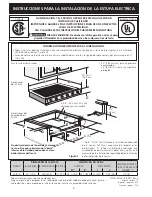
Страница 6: ...la Estufa Dimensiones de la Estufa Para la Instalación Estándar Nota D E son críticos para la instalación adecuada de la cocina Por favor asegúrese de respetar estas dimensiones D refleja una dimensión terminada que se recomienda para socavar esta dimensión y ajustar en el momento de la instalación del aparato debido a la variación de los materiales de la cocina No deslizar dentro del hueco de la ...

Страница 7: ...rminada que se recomienda para soca var esta dimensión y ajustar en el momento de la instalación del aparato debido a la variación de los materiales de la cocina No deslizar dentro del hueco de la alacena Los tornillos que sobresalen de la parte inferior de la unidad pueden dañar el aca bado inferior del frente Todas las dimensiones se dan en pulgadas cm Deje un espacio de 2 pulgadas 5 cm debajo d...

Страница 8: ...dera o metal está rotegida por una placa cortafuego retardante de llama de no menos de 1 8 0 3 cm cubierta con una lámina de acero msg no inferior al No 28 de acero inoxidable de 0 015 0 4 mm aluminio de 0 024 0 6 mm o cobre de 0 020 0 5 mm 30 76 2 cm min de espacio entre la parte superior del fogón y la parte inferior de un armario de madera o metal sin protección Ubicación aproximada de la caja ...

Страница 9: ...cilmente si fuera necesario para hacer una reparación 3 Se debe de usar un conectador que reduzca la tirantez de una forma adecuada para unir el cable blindado flexible a la caja de empalme Instrucciones de desembalaje 1 Inspeccione visualmente la tapa de la cocina para ver si está dañada 2 Asegúrese que la botella de limpiador ubicada en la empaquete de literatura esta situada en un lugar donde p...

Страница 10: ...es Conductor de unión listado UL o CSA Alambre verde o desnudo Alambre desnudo Alambre negros Figura 5 CAJA DE EMPALMES DE 4 ALAMBRES PUESTA A TIERRA Alambre desnudo Cable desde el suministro de energía Alambre verde o desnudo Cable de la estufa Caja de empalmes Conductor de unión listado UL o CSA Alambre blanco Alambre rojos Alambre negros Alambre blanco Instalación de la Tapa de Cocina 1 Inspecc...

Страница 11: ...ppareil dans le comptoir Les vis qui dépassent sous l appareil pourraient endommanger l armoire 35 1 8 89 2 cm 1 2 5 cm 7 18 4 cm Installation standard Note D E sont des dimensions critiques pour une installation adéquate de la plaque de cuisson Assurez vous de respecter ces dimensions D reflète une dimension finale Étant donné la variation dans le matériel du comptoir il est recommandé de tailler...

Страница 12: ...variation dans le matériel du comptoir il est recommandé de tailler un peu plus petit que cette dimension et l ajuster lors de l installation de l appareil 7 18 4 cm Ne faites pas glisser l appareil dans l ouverture du comptoir Les vis qui dépassent sous l appareil pourraient endommager l armoire Toutes les dimensions sont en pouces cm Seulement certains modèles sont disponibles au Canada Laissez ...

Страница 13: ...5 0 4 mm d aluminium de 0 024 0 6 mm ou de cuivre de 0 020 0 5 mm Dégagement minimum de 30 76 2 cm entre le haut de la surface de cuis son et la base de l armoire en bois ou en métal non protégée L armoire supérieure ne doit pas excéder une profondeur maximale de 13 33 cm Emplacement approximatif de la boîte de jonction Minimum de K du rebord de la plaque de cuisson au mur en matériel inflam mable...

Страница 14: ...hez pas encore le câble au panneau de circuits Exigences électriques Observez tous les règlements et les codes locaux applicables 1 Un câble électrique à 4 fils de 120 240 ou 120 208 Volts monophasé 60 Hz CA est requis sur un circuit séparé muni d un fusible sur chaque fil conducteur fusible temporisé ou disjoncteur recommandé 40A ou 50A NE RELIEZ pas de fusible au neutre NOTE Le calibre des fils ...

Страница 15: ... les fils blanc et vert des autres et utilisez le fil de mise à la terre pour mettre à la terre l appareil conformément aux codes locaux branchez le conducteur neutre de manière habituelle au circuit neutre voir la figure 5 Si l appareil doit être branché à un câble à 3 fils aux États Unis seulement où les codes locaux permettent la connexion du fil de mise à la terre du châssis au neutre blanc Vo...

Страница 16: ...nctionnement Référez vous au Manuel d utilisation pour le mode de fonctionnement Ne touchez pas à la vitre de la plaque de cuisson ou aux éléments Ils peuvent être suffisamment chauds pour causer des brûlures Avant d appeler le service d entretien Consultez la liste des vérifications préventives et les instructions d opération dans votre Manuel d utilisation Vous sauverez probablement du temps et ...

Отзывы: