ElectrIQ iQlean-LR02C30 Скачать руководство пользователя страница 9


SETTING UP THE CHARGING BASE / DUST BOX 


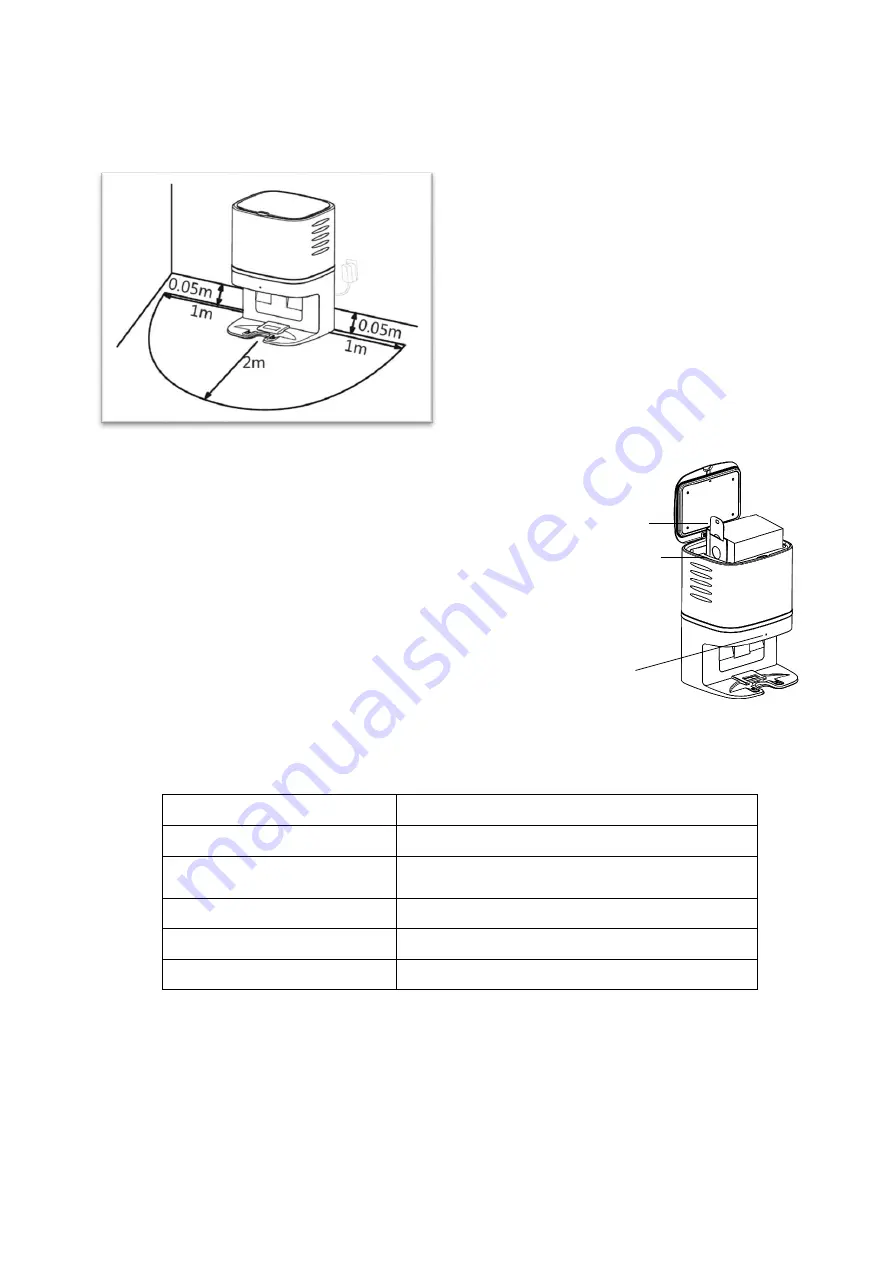
Place the charging base within 5 cm of the 
back wall with no objects 1 m to either side 
and 2 m in front. 
 
Keep away from strongly reflective surfaces 
such as mirrors. 
 
Once the base is positioned, it can be 
plugged in to a suitable socket. 


Fit the dust bag into the charging base, by opening the lid, 
and slide the cardboard handle on the bag into the slot on 
the left-hand side within the dust box. The status indicator 
on the front of the vacuum will go from flashing red, to a 
constant white light to show the bag is inserted properly. 
 
Note: Ensure that the dust bag is connected the correct 
way around with the handle facing up. 


DUST BOX STATUS INDICATOR 
 

LED  

Reason 

Fast Flashing Red


Dust bag not installed properly.


Slow Flashing Red


Suction pipe blocked. Check dust bag is 
inserted correctly and for any blockage.


Constant White


Dust box is operational


Rapid Flash White


Dust collection complete.


Slow Flash White


Charging base available / robot on charge.


Guide plate 

Handle 

Status indicator 

Содержание iQlean-LR02C30

Страница 1: ...for choosing this electriQ robot vacuum cleaner The instruction manual is designed to provide you with all the required instructions related to the use and maintenance of this appliance In order to op...

Страница 2: ......

Страница 3: ...EANING AND REPLACEMENT 16 CLEANING OF SENSORS AND CHARGING CONTACTS 16 DUST BOX AND FILTER CLEANING 17 CLEANING THE WATER TANK 19 REPLACING THE DUST BAG 19 CLEANING THE MAIN BRUSH 20 BATTERY REPLACEME...

Страница 4: ...into the robot while robot is in operation This appliance is not intended for use by persons including children with reduced physical sensory or mental capabilities It is also not intended for use by...

Страница 5: ...ing first time If not using the robot for a long time please fully charge and remove the battery Always use the charging base provided Clean the robot and brushes regularly Empty and vacuum the dust c...

Страница 6: ...to suit your different cleaning needs Great cleaning efficiency and power saving Charging base both recharges the vacuum s battery and unloads the robot s dust into its own dust box for ease of emptyi...

Страница 7: ...ndicator Laser Module MAIN BODY TOP MAIN BODY UNDERSIDE MAIN BODY Front Wheel DC Power Jack Power Switch Dust Box Water Tank Release Button Dust Collection Port Dust Box Suction Port Main Brush Side W...

Страница 8: ...Cleaning Tool Dust Box Contacts Tank Sealing Cap LED Status Indicator Body Dust Bag Lid Mop Water Tank Charging Port Power Cord Dust Bag Guide Plate Dust Bag Handle Dust Box Suction Port Note HEPA and...

Страница 9: ...e within the dust box The status indicator on the front of the vacuum will go from flashing red to a constant white light to show the bag is inserted properly Note Ensure that the dust bag is connecte...

Страница 10: ...e robot for the first time it should be charged for 12 hours With the robot turned on using the switch on the side Place the contacts on the front of the robot onto the contacts on the charging base T...

Страница 11: ...rridors and narrow walkways the robot will avoid those areas Also ensure any objects that are under 2cm tall are removed to prevent the risk of the robot climbing and jamming o Take care to remove sma...

Страница 12: ...s and hold the POWER button for 5 seconds to change the WI FI setup mode See the APP Control section for more details Alternatively much more functionality can be gained by using the supplied remote c...

Страница 13: ...stacles before cleaning the room in an S shaped pattern SPOT CLEANING With the unit in Sleep mode press the SPOT CLEANING button to enter spot cleaning mode The robot will intensively clean a specific...

Страница 14: ...when the planned cleaning is finished or when the battery level is low SUCTION BUTTON VACUUM MODE When the dust box is attached press the suction button to change the suction level between 1 and 2 Th...

Страница 15: ...move the water tank when charging to remove risk of electric shock To fill tank open tank sealing cap and slowly pour in water After replacing the tank sealing cap fix the microfibre mop to the Velcro...

Страница 16: ...over time please replace them Note that the left and right brushes are different and should be changed accordingly CLEANING OF SENSORS AND CHARGING CONTACTS Use the cleaning tool or a soft dry cloth...

Страница 17: ...lease button to remove the dust box Open the dust box cover and empty any contents into a bin Remove the primary filter Open the top filter cover and remove the HEPA filter and sponge filter Remove an...

Страница 18: ...he first 15 30 days The maximum service life of the high efficiency filter is three months Do not expose the filters to direct sunlight Ensure that the pre filter and sponge filter are completely dry...

Страница 19: ...cardboard handle slide the full dust bag up and out of the charging base before placing in a bin Insert a new bag by sliding the cardboard handle down the guide plate until it is in position The stat...

Страница 20: ...rush BATTERY REPLACEMENT REMOVAL Using a small screwdriver Remove the two screws from the battery cover on the underside of the robot Remove the battery cover Take out the battery and disconnect the c...

Страница 21: ...BLE FOR SETUP The robot has AP Access Point to connect to Wi Fi The AP connection uses a direct local WI FI connection between your phone and the robot to upload the network details Please ensure your...

Страница 22: ...email address or phone number and press continue to register A verification code will be sent by the method selected in step 3 Enter the code into the app Type in the password you would like to creat...

Страница 23: ...ct the location of your home See SETTING YOUR LOCATION below New rooms can be added by pressing the ADD ANOTHER ROOM option at the bottom See ADD ANOTHER ROOM below Untick any rooms that are not requi...

Страница 24: ...I FI network We advise turning mobile data off during setup 1 Open app and press to add device or use the add device button 2 Select the category Small Home Appliances then the device Robot Vacuum Wi...

Страница 25: ...d to your Wi Fi 8 This screen confirms your connection to the hot spot Select Confirm hot spot connection next 9 Now the robot is being added to the Wi Fi 10 The device is now added You will now be ta...

Страница 26: ...go through the setup process Environmental information Provides outdoor temperature and humidity based on the location details entered Rooms Use to view the units set up within each room Smart Scene A...

Страница 27: ...is the main control screen for the vacuum cleaner robot providing access to the controls to amend the functions and settings NOTE Due to continuous development of the app the layout and availability...

Страница 28: ...ber of pre set configurations Below is an example of how to set up a scene 1 Press on the Smart Scene tab at the bottom of the Home screen 2 Press on the Plus in the top right corner to add a smart sc...

Страница 29: ...on for specifying a trigger for the scene to start Press the Pen next to Please Enter Scene Name to input the name for your Scene Press the Red Plus next to When any condition is satisfied to add the...

Страница 30: ...n Echo CONNECTION TROUBLESHOOTING 1 Check whether the device is powered on and is in the correct WI FI connection mode if not please refer to the CHANGING BETWEEN CONNECTION MODES section 2 Ensure the...

Страница 31: ...e it for the next cleaning assignment Robot is stuck or entangled in an obstacle Turn off the robot clean the dust box turn over and clean the wheels and side brushes Remote control malfunctions effec...

Страница 32: ...LACEMENT PART iQlean LR02C30 MC Mop Cloth iQlean LR02C30 HPFLT HEPA Filter iQlean LR02C30 HPSPG Sponge Filter iQlean LR02C30 LSB Left Side Brush iQlean LR02C30 RSB Right Side Brush iQlean LR02C30 MB M...

Страница 33: ...llowing internet address https www electriQ co uk content declaration of conformity electriQ UK SUPPORT www electriQ co uk support www electriQ co uk Call 0330 390 3061 Office hours 9AM 5PM Monday to...

Отзывы: