background image


SETTING UP YOUR OVEN


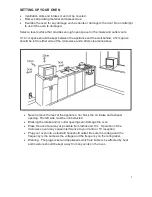
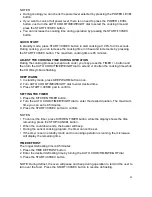
  Ventilation slots and intakes must not be covered. 

  Remove all packing material and accessories.  

  Examine the oven for any damage such as dents or damage to the door. Do not attempt 

to use if the oven is damaged. 
 

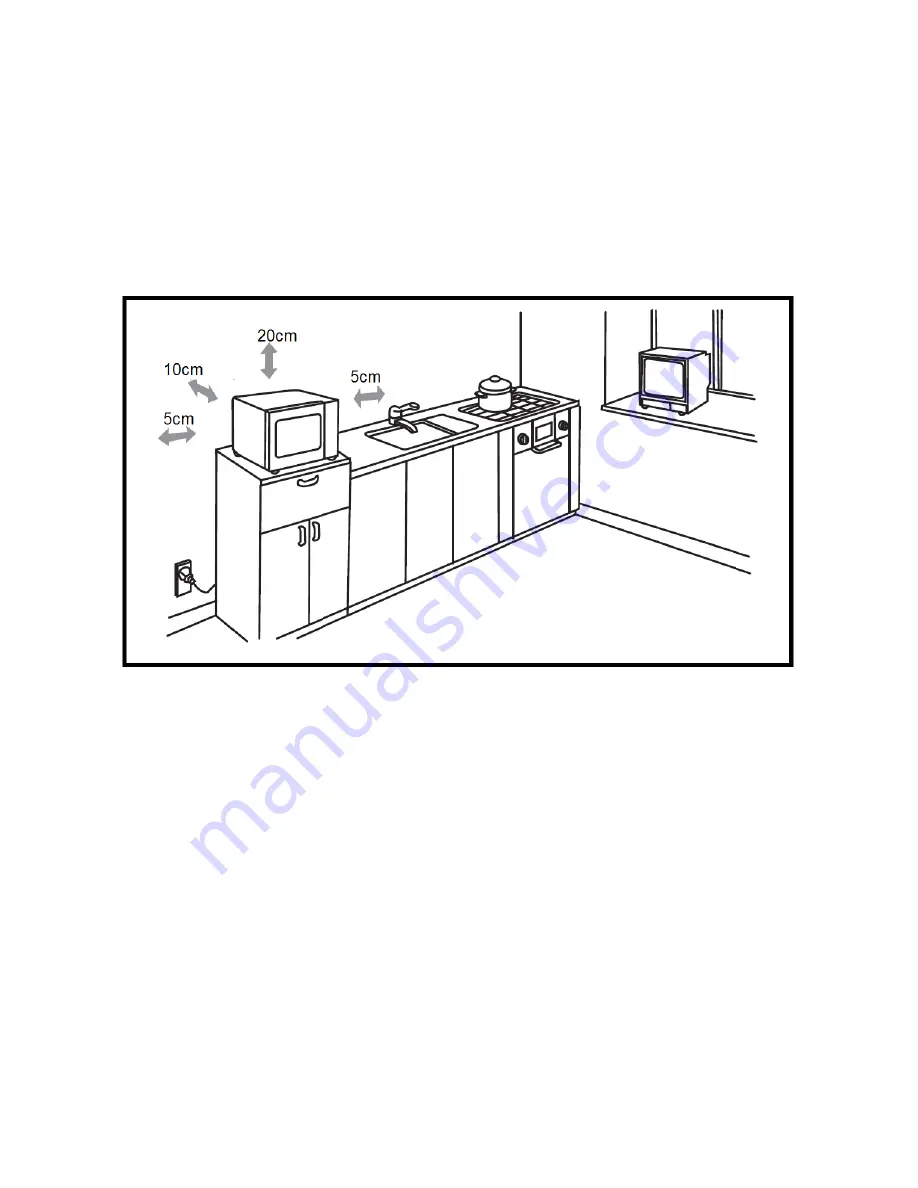
Select a level surface that provides enough open space for the intake and outlet vents.


A 10 cm space should be kept between the appliance and the wall behind, a 5cm space 
should be left to either side of the microwave and a 20cm clearance above. 


  Never remove the feet of the appliance, nor block the air intake and exhaust 

opening. The left side must be unobstructed.  

  Blocking the intake and/or outlet openings can damage the oven. 

  Place the oven far away as possible from radios and TVs.  Operation of the 

microwave oven may cause interference to your radio or TV reception. 

  Plug your oven into a standard household outlet. Be sure the voltage and the 

frequency is the same as the voltage and the frequency on the rating label. 

  Warning:  The plug socket and appliances which are liable to be affected by heat 

and moisture should be kept away from any vents on the oven. 


Содержание eiQCMW60L

Страница 1: ...MICROWAVE OVEN eiQCMW60L Thank you for choosing electriQ Please read this user manual before using this microwave and keep it safe for future reference Visit our page www electriQ co uk for our entire range of electricals ...

Страница 2: ...CLOCK 10 MICROWAVE COOKING 10 QUICK START 11 ADJUSTING THE COOKING TIME DURING OPERATION 11 KEEP WARM MODE 11 KITCHEN TIMER FUNCTION 11 TIME DEFROST 11 WEIGHT DEFROST 12 MULTIPLE STAGE COOKING 12 CHILD LOCK 12 FAILURE WARNINGS 12 SENSOR COOK 13 AUTO COOK 14 CARE AND CLEANING 15 USE OF SUITABLE UTENSILS 16 TROUBLESHOOTING 17 SPECIFICATIONS 17 ELECTRIQ UK SUPPORT 17 ...

Страница 3: ...or instruction concerning use of the appliance in a safe way and understand the hazards involved Children shall not play with the appliance Cleaning and user maintenance shall not be made by children unless they are older than 8 and supervised Children less than 8 years of age shall be kept away unless continuously supervised Keep the appliance and its cord out of reach of children less than 8 yea...

Страница 4: ...contact the retailer or manufacturer for support The cable insulation on electrical appliances may melt when touching hot parts of the appliance Never bring electrical appliance cables into contact with the microwave During use the appliance will become hot Accessories and ovenware may become very hot Always use oven gloves to remove accessories or ovenware from the cooking compartment Alcoholic v...

Страница 5: ...ppliance door will no longer close properly during operation Always keep the seal clean Operating the microwave without food Operating the appliance without food in the cooking compartment may lead to overloading Never switch on the appliance unless there is food in the cooking compartment An exception to this rule is a short crockery test see the section Microwave suitable crockery Using the appl...

Страница 6: ...lectrical outlet that conforms to regulations then one must be installed by a qualified electrician The earthed electrical outlet must be near to the microwave In case of any damage to the supply cable you must call and arrange a certified and qualified electrician to replace the cable for you You may damage the microwave if it is wired incorrectly Any damage due to incorrect wiring will not be co...

Страница 7: ...wave and a 20cm clearance above Never remove the feet of the appliance nor block the air intake and exhaust opening The left side must be unobstructed Blocking the intake and or outlet openings can damage the oven Place the oven far away as possible from radios and TVs Operation of the microwave oven may cause interference to your radio or TV reception Plug your oven into a standard household outl...

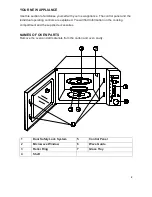
Страница 8: ...ividual operating controls are explained You will find information on the cooking compartment and the supplied accessories NAMES OF OVEN PARTS Remove the oven and all materials from the carton and oven cavity 1 Door Safety Lock System 5 Control Panel 2 Microwave Window 6 Wave Guide 3 Roller Ring 7 Glass Tray 4 Shaft ...

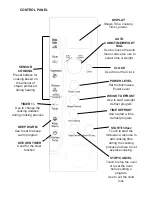
Страница 9: ...Microwave Power Level CLOCK Used to set the Clock KITCHEN TIMER Used for the timer function KEEP WARM Use to set the keep warm program STOP CANCEL Touch to stop the oven or reset the oven before setting a program Use to set the child lock WEIGHT DEFROST Use to start a weight defrost program TIME DEFROST Use to start a time defrost program TIMER Use to change the cooking duration during cooking pro...

Страница 10: ...CHANGING TIME FORMAT The clock can display in 12 or 24 hour formats In standby mode press the clock button to toggle between the time formats Hr12 indicates a 12 hour clock and Hr24 indicates 24 hours SETTING THE CLOCK 1 In standby mode press the CLOCK button which will display the time format currently set 2 Turn the AUTO COOK TIME WEIGHT dial to adjust the hour value 3 Press CLOCK button 4 Turn ...

Страница 11: ...EEP WARM 1 In standby mode press KEEP WARM button once 2 Turn AUTO COOK TIME WEIGHT dial to enter desired time 3 Press START 30SEC pad to confirm SETTING THE TIMER 1 Press the KITCHEN TIMER button 2 Turn the AUTO COOK TIME WEIGHT dial to enter the desired duration The maximum time you can set is 95 minutes 3 Press the START 30SEC button to confirm NOTES To cancel the timer press KITCHEN TIMER butt...

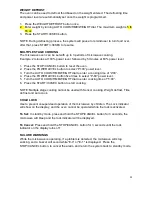
Страница 12: ...time of 2 00 4 Press the POWER LEVEL button five times to select P 60 power level 5 Turn the AUTO COOK TIME WEIGHT dial to enter cooking time of 5 00 6 Press the START 30SEC button to start cooking NOTE Multiple stage cooking cannot be used with Sensor cooking Weight defrost Time defrost and Auto cook CHILD LOCK Use to prevent unsupervised operation of the microwave by children The Lock indicator ...

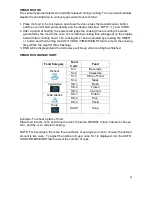
Страница 13: ...utton and then turning the AUTO COOK TIME WEIGHT dial to amend the cooking time While the sign COOK is flashing 3 END will be displayed and the microwave will bleep when cooking has finished SENSOR COOKING CHART Food Category Food Code Food Reheat Sr 1 Beverage Sr 2 Casserole Sr 3 Plate of Food Sr 4 Steak Vegetables SE 1 Fresh SE 2 Frozen SE 3 Canned Side Dishes SS 1 Potato SS 2 Rice SS 3 Pasta So...

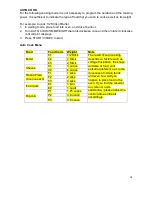
Страница 14: ...Press START 30SEC to start Auto Cook Menu Food Food Code Weight Note Butter b1 1 2 Stick The result of auto cooking depends on factors such as voltage fluctuation the shape and size of food your personal preference as to the doneness of certain foods and even how well you happen to place food in the oven If you find the result at any rate not quite satisfactory please adjust the cooking time a lit...

Страница 15: ...ed by using the wrong cleaning agent observe the information in the table Do not use Sharp or abrasive cleaning agents Metal or glass scrapers to clean the glass in the appliance door Metal or glass scrapers to clean the door seal Hard scouring pads and sponges Cleaning agents with high concentrations of alcohol Wash new sponge cloths thoroughly before use Allow all surfaces to dry thoroughly befo...

Страница 16: ...l tie Make slits to allow steam to escape Paper plates and cups Use for short term cooking warming only Do not leave oven unattended while cooking Paper towels Use to cover food for reheating and absorbing fat Use with supervision for a short term cooking only Parchment paper Use as a cover to prevent splattering or a wrap for steaming Plastic Microwave safe only Follow the manufacturer s instruct...

Страница 17: ...t double the cooking time The food was colder than usual Stir or turn the food during cooking SPECIFICATIONS Power Consumption 230 240V 50Hz 1500W Output 1200W Operation Frequency 2450MHz Outside Dimensions 359mm H 628mm W 491mm D Oven Cavity Dimensions 294mm H 468mm W 474mm D Oven Capacity 60Litres Cooking Uniformity Turntable System Net Weight Approx 16 8 kg According to Waste of Electrical and ...

Отзывы: