background image


INSTALLATION 


1. 

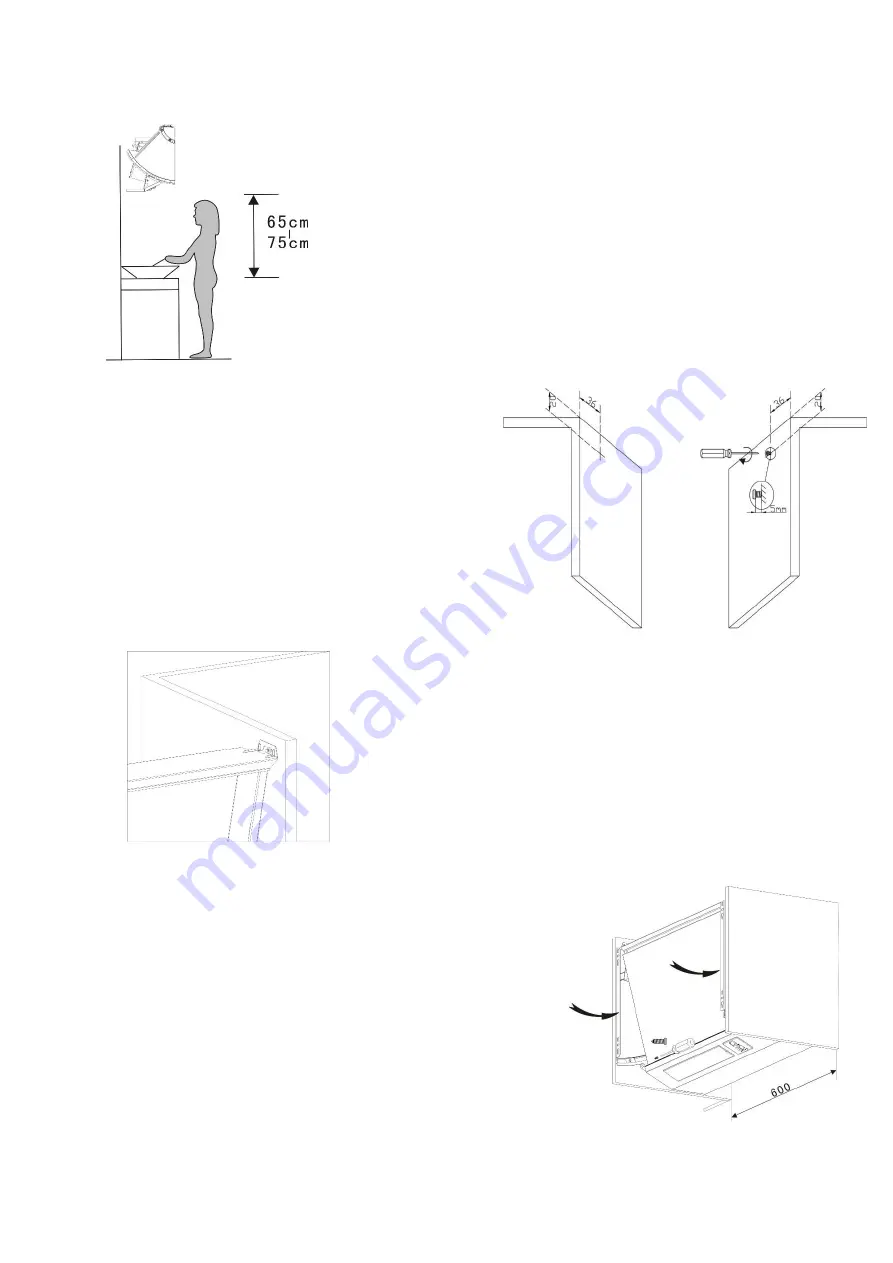
The  cooker  hood  should  be  placed  at  a  height  of  65-

75cm above the cooking surface for best efficiency. 


2.    To  install  the  cooker hood  between  two 

cupboards. Drill a pilot hole (≤ 2mm) and 

insert  a  screw  on  the  side  of  each 

cupboard  following  the  measurements  in 

the diagram.    The screw should protrude 

by  5mm,  and  the  distance  between  the 

screw and the cooking surface should be


no less than 1040mm 


3.    Hang the cooker hood on the screws between the two 

cupboards.   


4.  Push the fan-shaped frames to the end, in order 

to  make  the  outer  edges  of  the  frames  at  the 

same  vertical  level  as  the  outer  edge  of  the 

cupboards.   

5.  Mark the positions for the lower screws. Drill the 

upper  hole  and  fix  the  screws.  Make  sure  all 

four screws are well fixed.   

Содержание eiQCHINTGY60

Страница 1: ...lectriQ cooker hood This instruction manual is designed to provide you with all required instructions related to the installation use and maintenance of the appliance In order to operate the unit corr...

Страница 2: ...NTS SAFETY 3 PRODUCT OVERVIEW 5 VENTILATION OPTIONS 6 INSTALLATION 7 OPERATION 10 CLEANING AND MAINTENANCE 11 FILTER INFORMATION 12 LIGHT REPLACEMENT 12 TECHNICAL INFORMATION 13 TROUBLESHOOTING 14 SUP...

Страница 3: ...lection at one end as this could cause a potential fire risk Do not leave frying pans unattended during use because overheated fat or oils might catch fire If the cooker hood is damaged do not attempt...

Страница 4: ...oubt professional advice should be sought Regulations concerning the discharge of air have to be fulfilled There is a potential fire risk if cleaning is not carried out in accordance with the instruct...

Страница 5: ...S SUPPLIED Description Illustration Qty Cooker hood 1 Left fan shaped frame 1 Right fan shaped frame 1 Adjusting plate 1 Outlet 1 Air Flaps 120MM 1 pair Flat self tapping screw ST4 14mm 16 Flat self t...

Страница 6: ...elled through the vent holes in the side of the chimney When setting the unit up in this configuration carbon filters should also be used to remove odours from the air Details of sourcing and fitting...

Страница 7: ...the diagram The screw should protrude by 5mm and the distance between the screw and the cooking surface should be no less than 1040mm 3 Hang the cooker hood on the screws between the two cupboards 4...

Страница 8: ...vent hose and route it appropriately Rigid kits if preferred can be obtained from either the retailer who supplied the hood DIY Stores or Builders Merchants DIY Stores or Builders Merchants DOOR INSTA...

Страница 9: ...e sure the position is as accurate as possible 4 5 Fix the fan shaped door frames on the door with screws Make sure the frames are symmetrical Install the door into the cooker hood the two sides of th...

Страница 10: ...Push down the front panel with the fan still switched on This will turn the hood off and when the cooker hood is next opened the fan speed will be the same as the last time it was operated The light i...

Страница 11: ...the filter directly affects the efficiency of the cooker hood If it s not cleaned the grease residue potentially flammable will saturate on the filter Remove the filter as shown in the diagrams below...

Страница 12: ...oal filter cannot be washed or recycled It should be changed at three or six months according to the amount of use the hood receives LIGHT FITTING REPLACEMENT Important The light fitting must be repla...

Страница 13: ...power of the lighting system WL 2 0 W Average illumination of the lighting system on the cooking surface Emiddle 60 lux Lighting efficiency LEhood 30 Lux W Lighting efficiency class Class A Grease Fi...

Страница 14: ...and 75cm INFORMATION FOR DISMANTLING Do not dismantle the appliance in a way which is not shown in the user manual The appliance could not be dismantled by user At the end of life the appliance should...

Отзывы: