


English
- 7 -
Remote Control
2.
9
9
3
3
/$1*
68%7
(3*
7;7
4
0(18
0(18
%$&.
(;,7
#
$%&
'()
*+,
-./
012
3456
789
:;<=
79
1. Standby:
Switches On / Off the TV
2.
1HWÀL[
/DXQFKHVWKH1HWÀL[DSSOLFDWLRQ
3. Numeric
buttons:
Switches the channel, enters a
number or a letter in the text box on the screen.
4. TV:
Switches to TV Source
5. Back/Return:
Returns to previous screen, opens index
page (in TXT mode)
6. Internet:
Opens the portal page, where you can reach
many web based applications
7. Volume
+/-
8. Directional
buttons:
Helps navigate menus, content
etc. and displays the subpages in TXT mode when
pressed Right or Left
9. Mute:
Completely turns off the volume of the TV
10. Info:
Displays information about on-screen content,
shows hidden information (reveal - in TXT mode)
11. EPG (Electronic programme guide):
Displays the
electronic programme guide
12. Freeview Play:
Connects to the Freeview Play platform
where you can access available catch-up TV services
13. Coloured Buttons:
Follow the on-screen instructions
for coloured button functions
14. Language:
Switches among sound modes (analogue
TV), displays and changes audio/subtitle language
(digital TV, where available)
15. Subtitles:
Turns subtitles on and off (where available)
16. Rapid reverse:
Moves frames backwards in media
such as movies
17. No Function
18. Play:
Starts to play selected media
19. Stop:
Stops the media being played
20. Pause:
Pauses the media being played
21. Rapid advance:
Moves frames forward in media such
as movies
22. Screen:
Changes the aspect ratio of the screen
23. My button 1 (*)
24. Media browser:
Opens the media browsing screen
25. Quick Menu:
Displays a list of menus for quick access
26. Text:
Displays teletext (where available), press again
to superimpose the teletext over a normal broadcast
picture (mix)
27. Source:
Shows all available broadcast and content
sources
28. Exit:
Closes and exits from displayed menus or returns
to previous screen
29. Pro/-
30. OK:
&RQ¿UPVXVHUVHOHFWLRQVKROGVWKHSDJHLQ7;7
mode), views channel list (DTV mode)
31. Menu:
Displays TV menu
32. Swap:
Quickly cycles between previous and current
channels or sources
(*) MY BUTTON:
This button may have a default function depending on the
model. However you can set a special function to this button
E\SUHVVLQJRQLWIRU¿YHVHFRQGVZKHQRQDGHVLUHGVRXUFH
RU FKDQQHO$ FRQ¿UPDWLRQ PHVVDJH ZLOO EH GLVSOD\HG RQ
the screen. Now the MY BUTTON is associated with the
selected function.
Note that if you perform
First Time Installation
, MY BUTTON
will return to its default function.
English
- 8 -
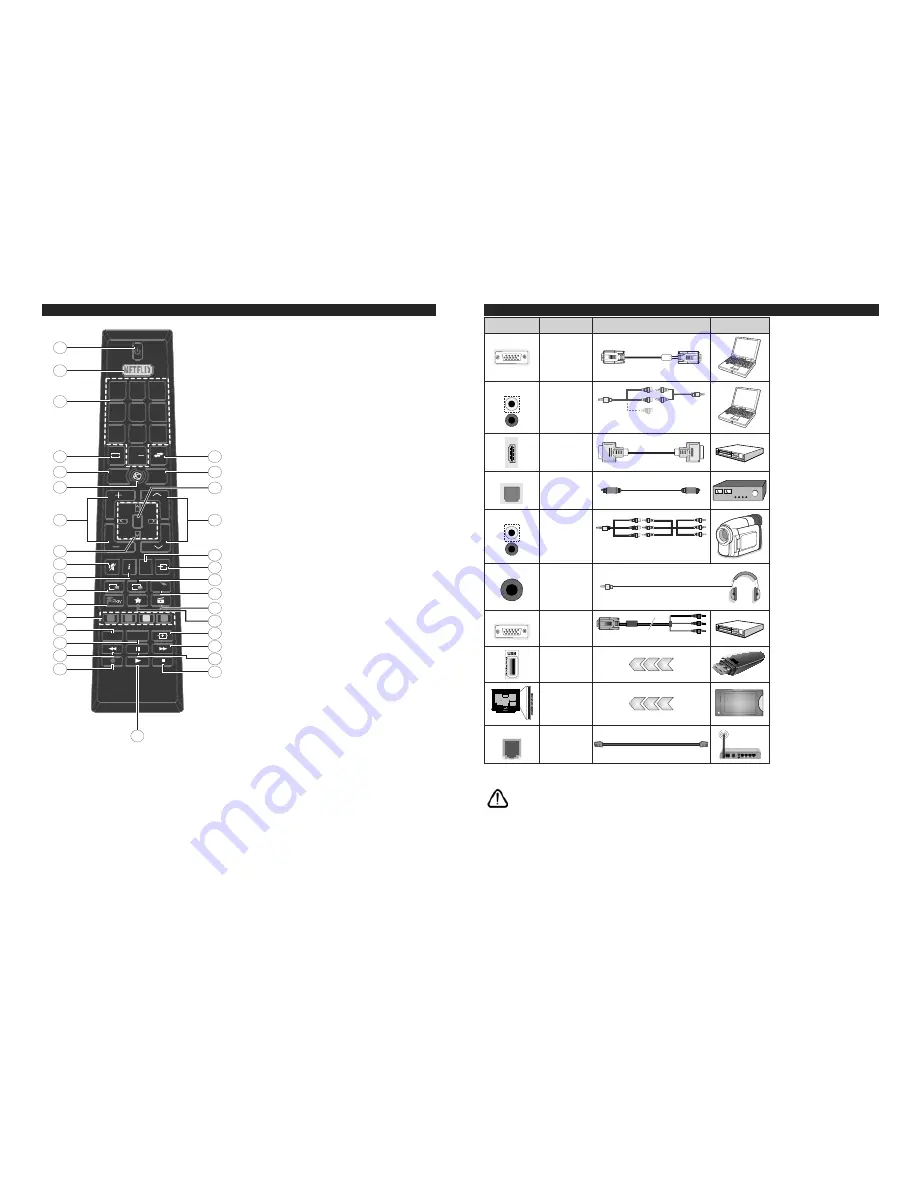
Connections
Connector
Type
Cables
Device
VGA
Connection
(back)
AUDIO IN
PC/YPbPr
Audio
Connection
(side)
YPbPr/PC Audio
Cable
Side Audio/Video
Connection Cable
HDMI
Connection
(back)
SPDIF
SPDIF
(Optical Out)
Connection
(back)
SIDE AV
Side AV
(Audio/Video)
Connection
(side)
Audio/Video
Cable
Side Audio/Video
Connection Cable
HEADPHONE
Headphone
Connection
(side)
YPBPR
YPbPr Video
Connection
(back)
PC to YPbPr Connection Cable
USB
Connection
(side)
CI
Connection
(side)
CAM
module
LAN
Ethernet
Connection
(back)
LAN / Ethernet Cable
NOTE: When connecting a
device via the YPbPr or Side
AV input, you must use the
connection cables to enable
connection.
See the illustrations
on the left side. | You can use
YPbPr to VGA cable to enable
YPbPr signal via VGA input.
|
You cannot use VGA and YPbPr
at the same time. | To enable
PC/YPbPr audio, you will need
to use the side audio inputs
with a YPbPr/PC audio cable
for audio connection. | If an
external device is connected via
the SCART socket, the TV will
automatically switch to AV mode.|
When receiving DTV channels
(Mpeg4 H.264) or while in Media
Browser mode, output will not be
available via the scart socket. |
When using the wall mounting
kit (available from third party
in the market, if not supplied),
we recommend that you plug all
your cables into the back of the
TV before mounting on the wall.
| Insert or remove the CI module
only when the TV is SWITCHED
OFF. You should refer to the
module instruction manual for
details of the settings. | The/Each
USB input of your TV supports
devices up to 500mA. Connecting
devices that have current value
above 500mA may damage your
TV. | By connecting an HDMI cable
to your TV, you have to use only a
shielded (high grade) HDMI cable
WRJXDUDQWHHDVXI¿FLHQWLPPXQLW\
a g a i n s t p a r a s i t i c f r e q u e n c y
radiation. And make sure to use a
High-Speed HDMI cable that can
WUDQVPLW KLJK GH¿QLWLRQ VLJQDOV
such as 4K contents, for trouble-
free transmission.
If you want to connect a device to the TV, make sure that both the TV and the device are turned off before making
any connection. After the connection is done, you can turn on the units and use them.


